
You’ve found a really snazzy web font and want to integrate it into your website as easily, quickly and free of charge as possible? Or you have reached into your design bag of tricks and created a unique font with which you would like to decorate your website? Then you’ve come to the right place!
In this article, you’ll learn how to quickly & easily add custom fonts to your website.
And here we go 💪
Why should I upload custom fonts?
Online fonts are an important tool in web design to give a website that certain something. In other words: to make it prettier. But a web font can also contribute significantly to the recognition value of the website and also strengthen a positive reputation. Apart from that, the font itself can become a USP (unique selling point) of your website.
However, you should make sure that the web font is easy to read and that you do not use too many different ones on your website. This can have a negative impact on the user experience on your website and consequently increase the bounce rate. It can also slow down loading times in terms of search engine optimisation.
How do I embed a custom font into my website?
Unfortunately, you cannot simply select web fonts in Google Fonts and embed them in your website – that would be too good to be true. This method is now obsolete within the EU as it is not privacy compliant.
Web fonts and data protection
With Google Fonts, a connection would be established with the Google server every time the website is visited – and the Google fonts loaded in connection with this – and visitor data would be transferred to it accordingly.
However, this is highly problematic, especially since Google is a company based in the USA.
Since the end of the data protection agreement between the USA and the EU (Privacy Shield), the transfer of data to the USA is generally not allowed. This is because the USA is considered an unsafe third country with an inadequate level of data protection by the European Court of Justice.
As a rule, you need the opt-in consent of your visitor. The easiest way to obtain this consent is with the help of a cookie banner, such as Real Cookie Banner.
Download web fonts
In order to use online fonts on your website, the first step is to download them. Many online font libraries such as Google Fonts, Adobe Fonts, dafont and Font Squirrel provide numerous free fonts.
However, there is still the joyful issue of licensing rights. This is because some free fonts may not be used for commercial purposes. There are also fonts that may be used free of charge on desktop devices, but are chargeable as web fonts. Therefore, always read the licence conditions of the respective web font!
Converting custom fonts
Before you can integrate a customised or downloaded font into your website, you must convert it into a suitable format. Usually there are ttf, woff and otf files.
One font library that provides a free font generator is Font Squirrel. How exactly to convert a font to Font Squirrel can be found in our article on web fonts.
After you have downloaded the converted file, you can unpack it and your font is web-ready.
Which plugin can I use to upload individual fonts to WordPress?
Since there is now a plugin for almost everything, you will, of course, find one here too. There are several plugins that help you to easily add your created and converted fonts to your WordPress website. We will introduce you to two candidates in the following.
Use Any Font
Use Any Font is a WordPress plugin to upload a custom font quickly and without CSS knowledge. Apart from that, Use Any Font offers you the possibility to use predefined fonts – among others from Google Fonts, which you can store on your own server, according to the plugin manufacturers.
In this way, you avoid data transfer to the Google server or to the USA, which is considered a third country with an inadequate level of data protection.
So how exactly does Use Any Font work?
- Go to your WordPress backend.
- Click on Plugins > Install in the menu bar on the left. Enter “Use Any Font” in the search field.
- Install and activate the plugin afterwards.
- After the installation is complete, the plug-in is displayed in your menu on the left. Click on the menu item “Use Any Font”.
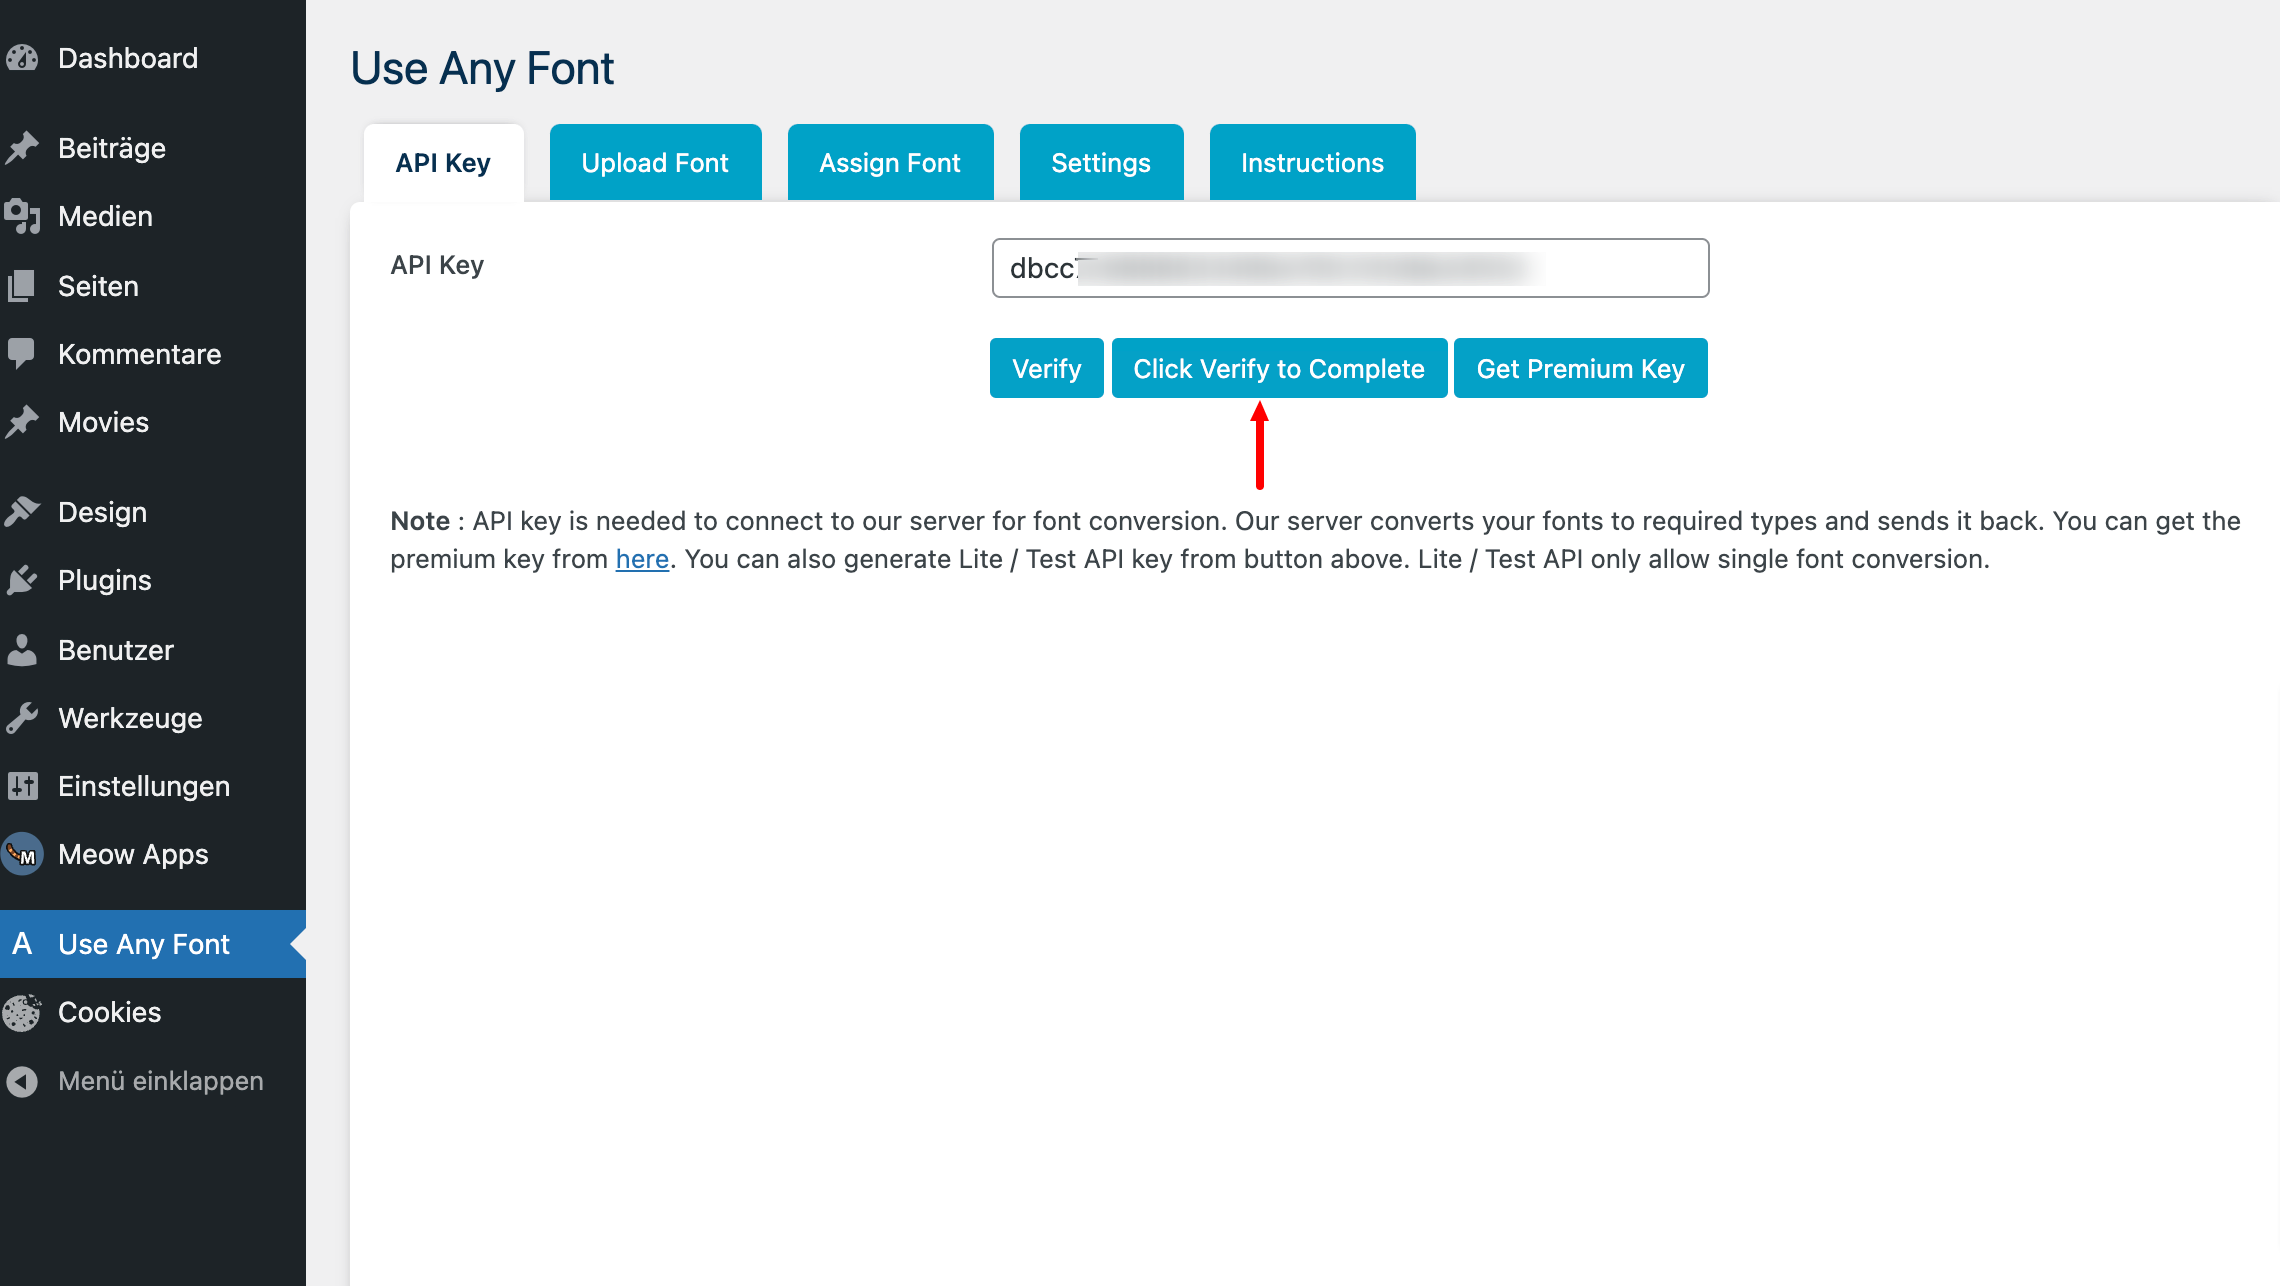
- Now you are in the overview. Here you will be asked to enter an API key to be able to use the plugin. If you have bought it, you have already received your key. If you are using the free version of the font plugin, you can also generate a key (Generate Free Lite/Test API Key). Don’t forget to click on Verify afterwards. The API key is needed to establish a connection with the server of the plug-in provider in order to enable the conversion of fonts.
- To upload a font, click on the Upload Font tab. Here you will see the two buttons Upload Fonts and Add Predefined Fonts.
Upload Fonts
Here you can upload a font that you have previously downloaded from a font library – such as Google Fonts or Font Squirrel. Remember to unzip the downloaded file if it is a ZIP file. The following screenshot shows you what an unzipped Roboto font from Google Fonts looks like.
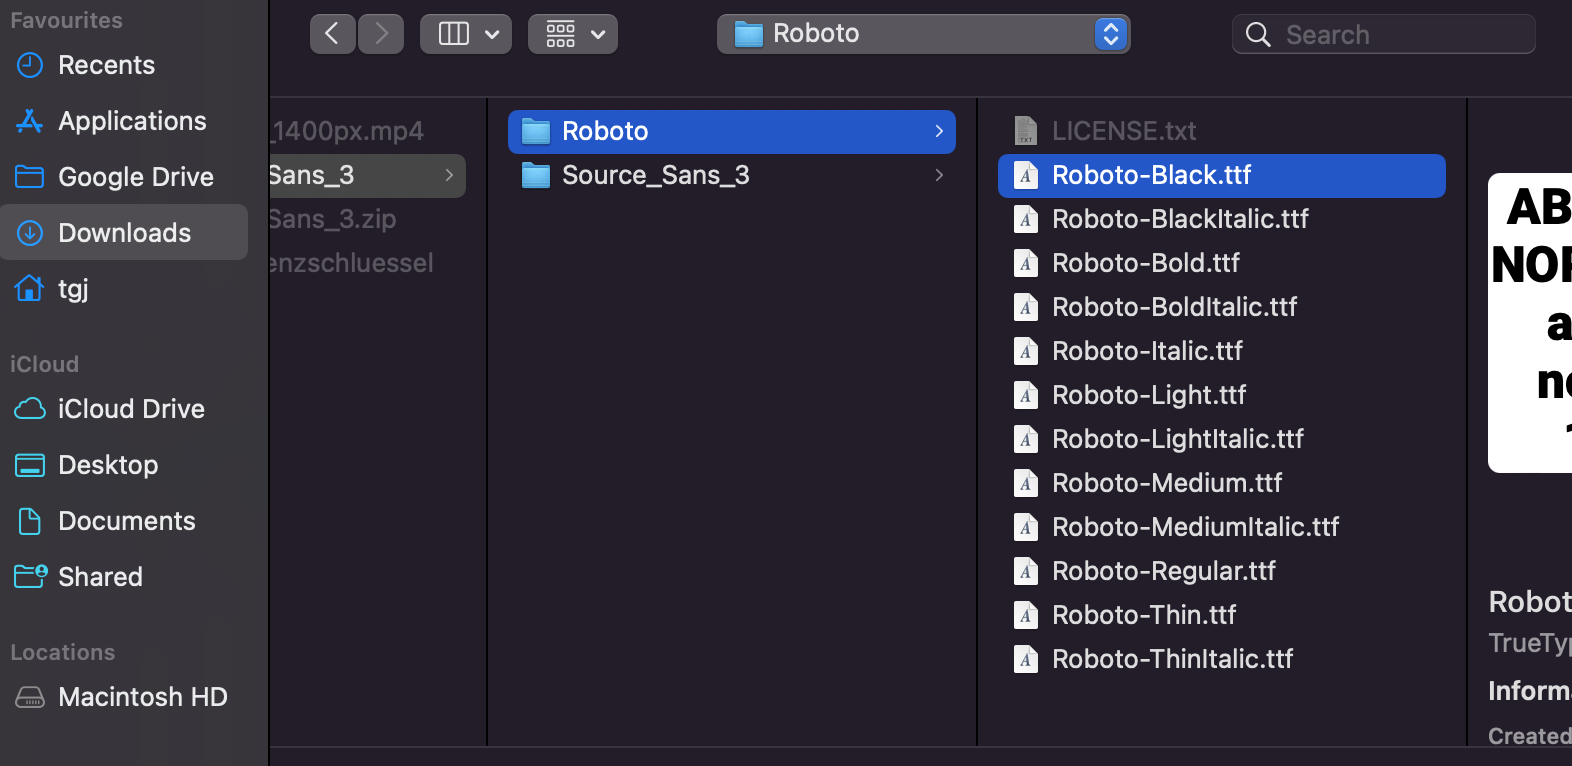
As you can see, different styles of the Roboto font are made available to you. For example, different text widths (400 or regular or normal, 700 or bold or bold, 800 or black or extrs bold, etc.) or font styles (e.g. italics for italic text).
Select a style and upload it.
👉 Important: Only the following formats are allowed: ttf, otf, woff
Under Font Name you can name your font. For the sake of simplicity, we call ours roboto, as it is called on Google Fonts. Important: The “Black” in the file name stands for the font width 800 and does not belong to the name of the font.
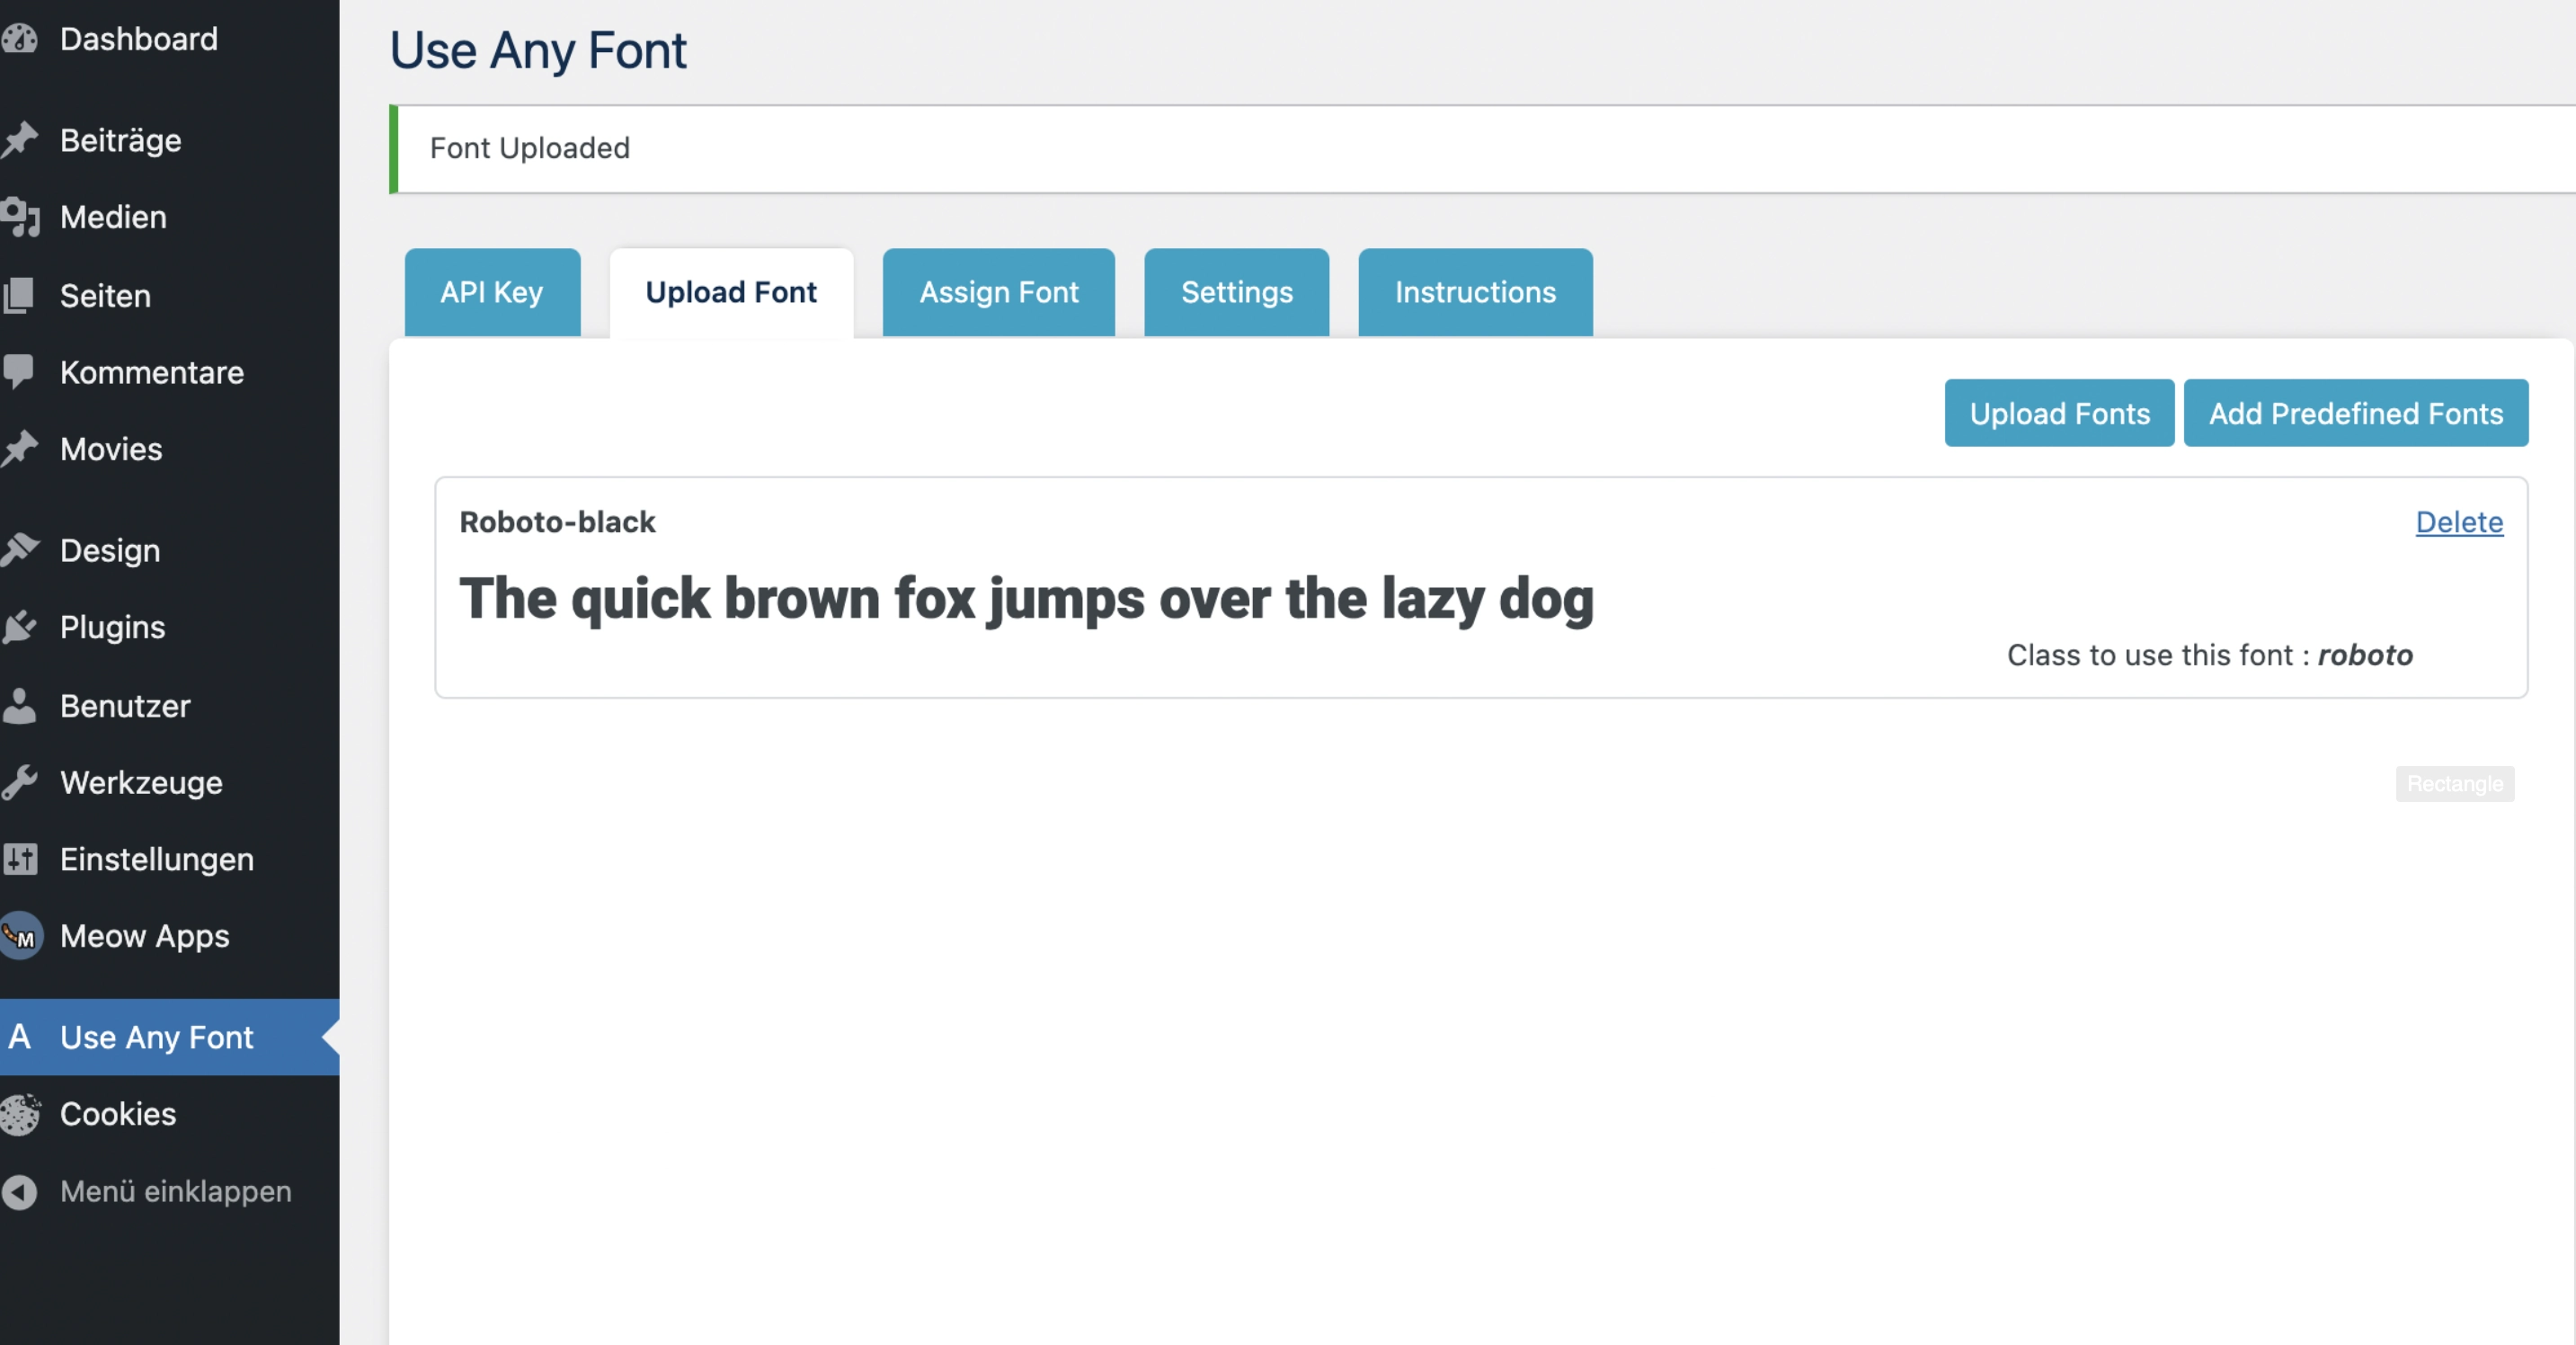
As you can see in the screenshot above, the font has been uploaded successfully. However, it is not yet displayed. We will now show you how exactly to do this:
- Click on the Assign Font tab and then on the Assign Font button of the same name.
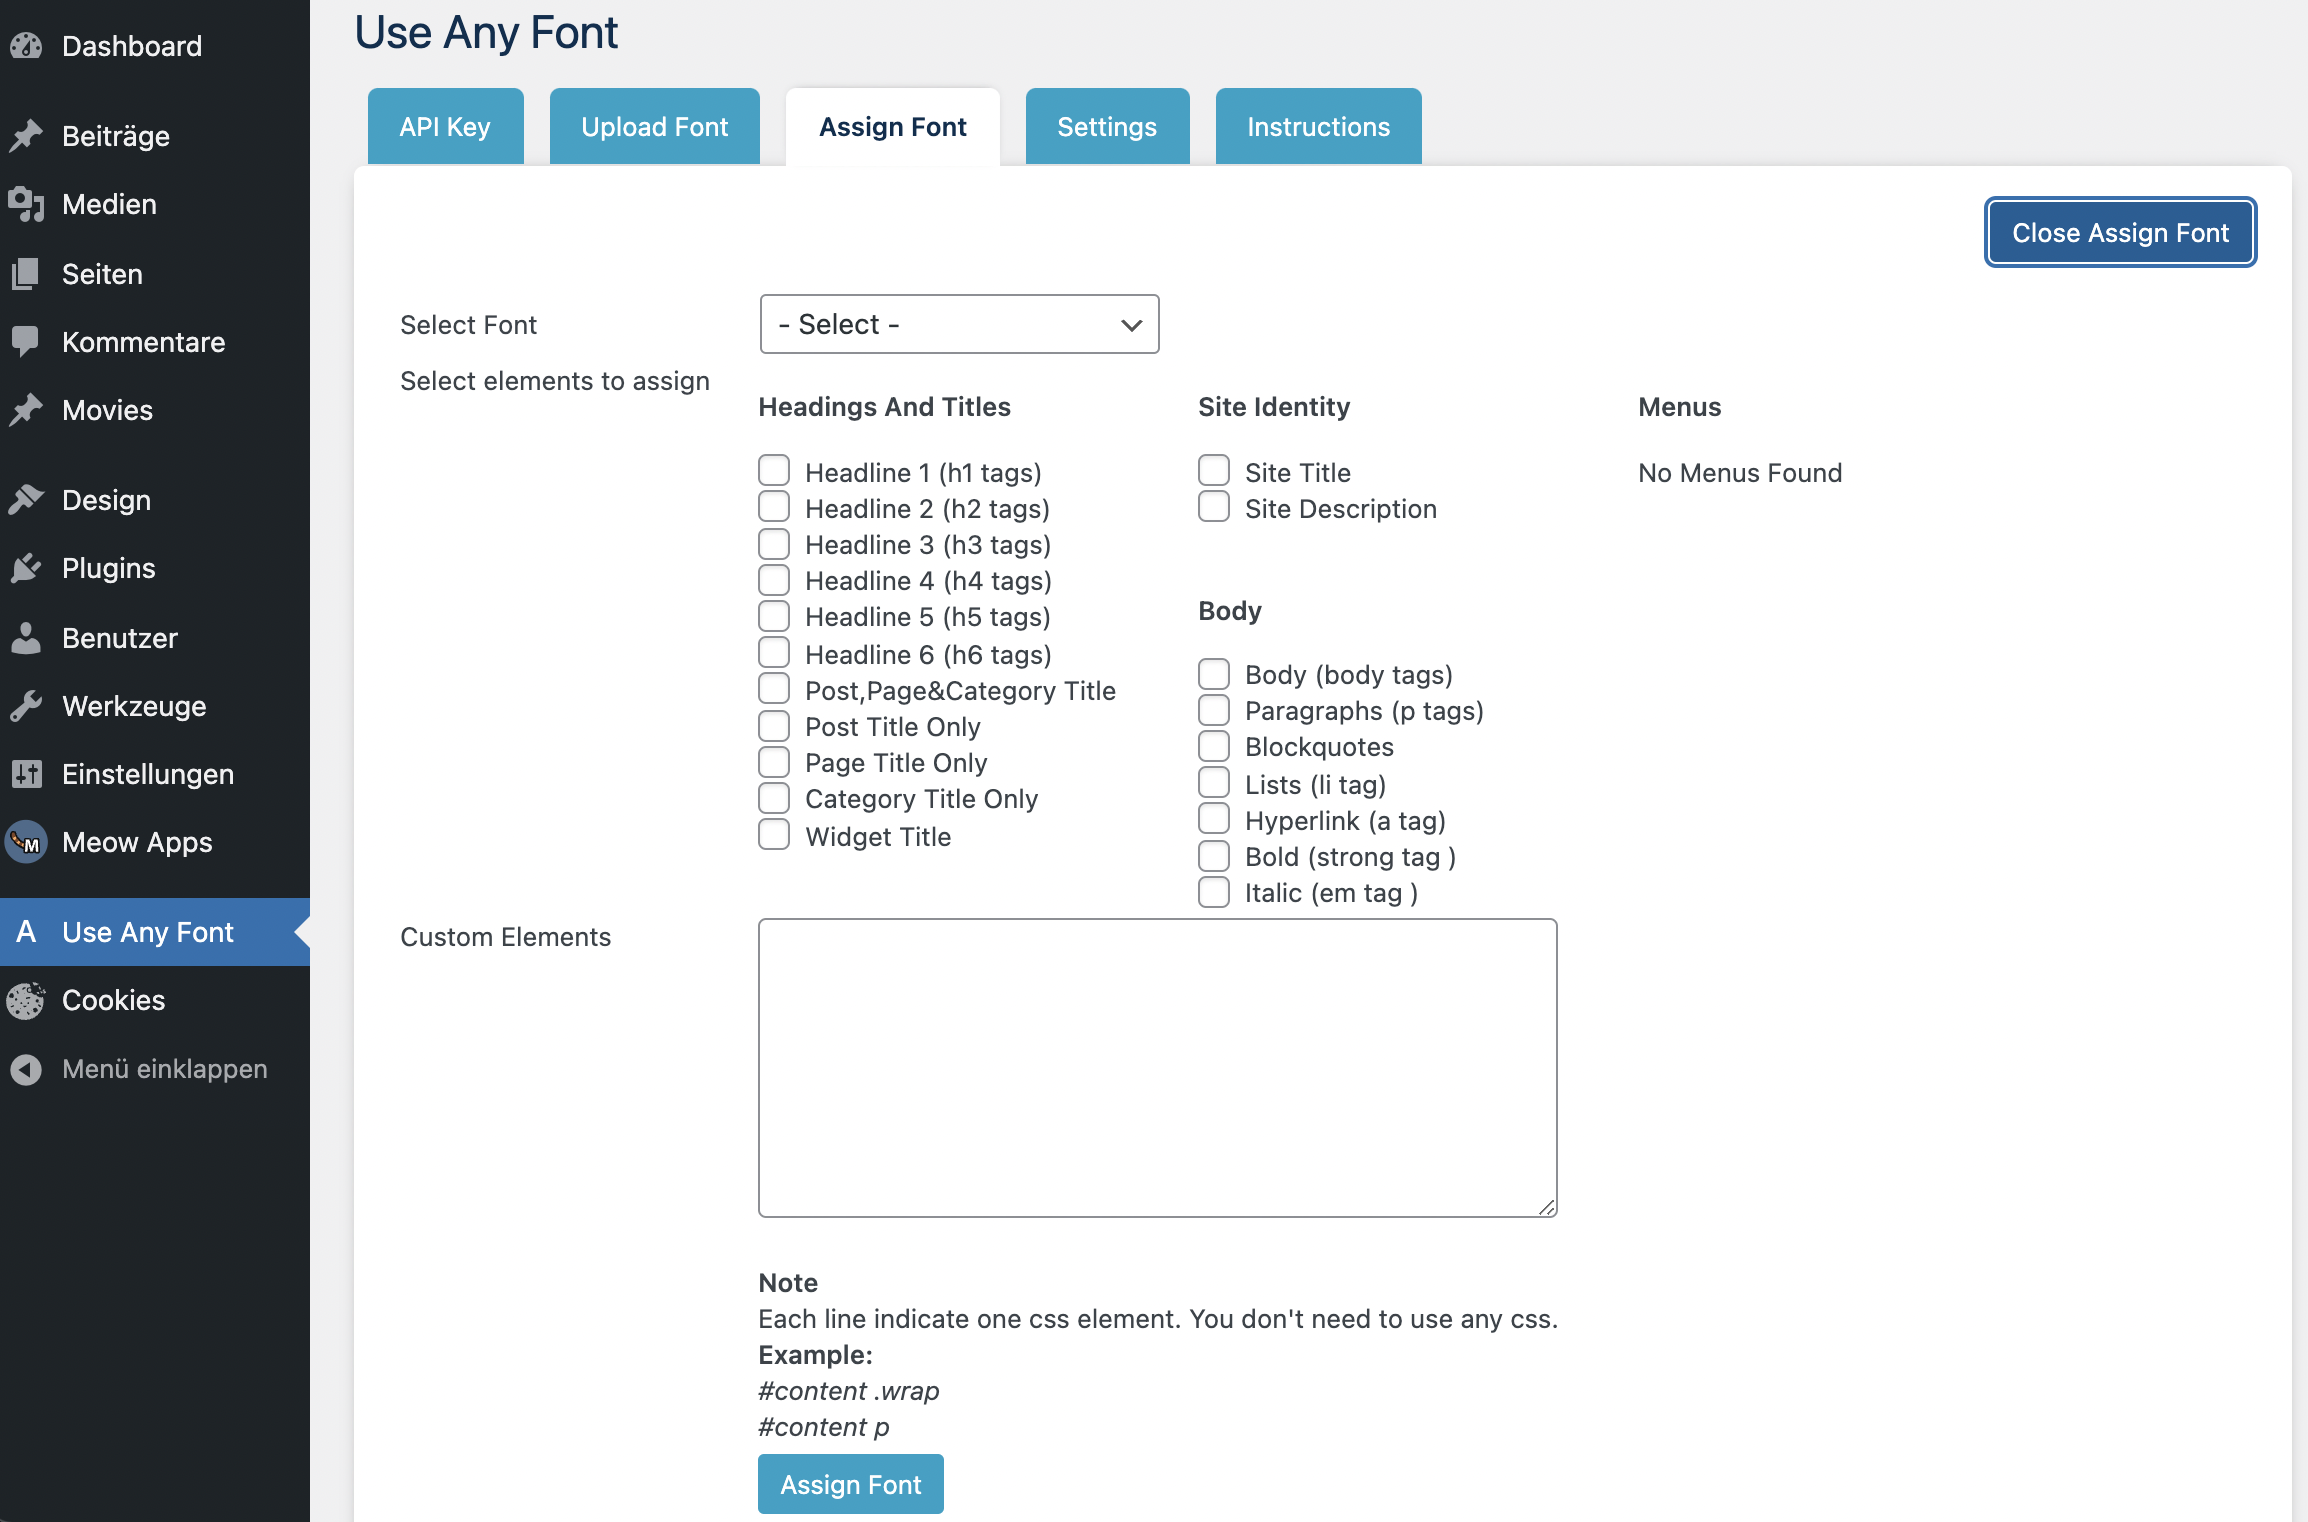
- Select the uploaded font under Select Font. In our case roboto.
- Under Select elements to assign you can now choose where the font should be used. For example, you can use it in a headline. (The smaller the number after the H, the larger the headline.) If necessary, it’s worth just trying things out here 😉 .
- When you have set everything to your satisfaction, click on the Assign Font button at the bottom.
The problem is that you can no longer change the settings you have made. The only thing you can do is delete the font and its settings and create it again.
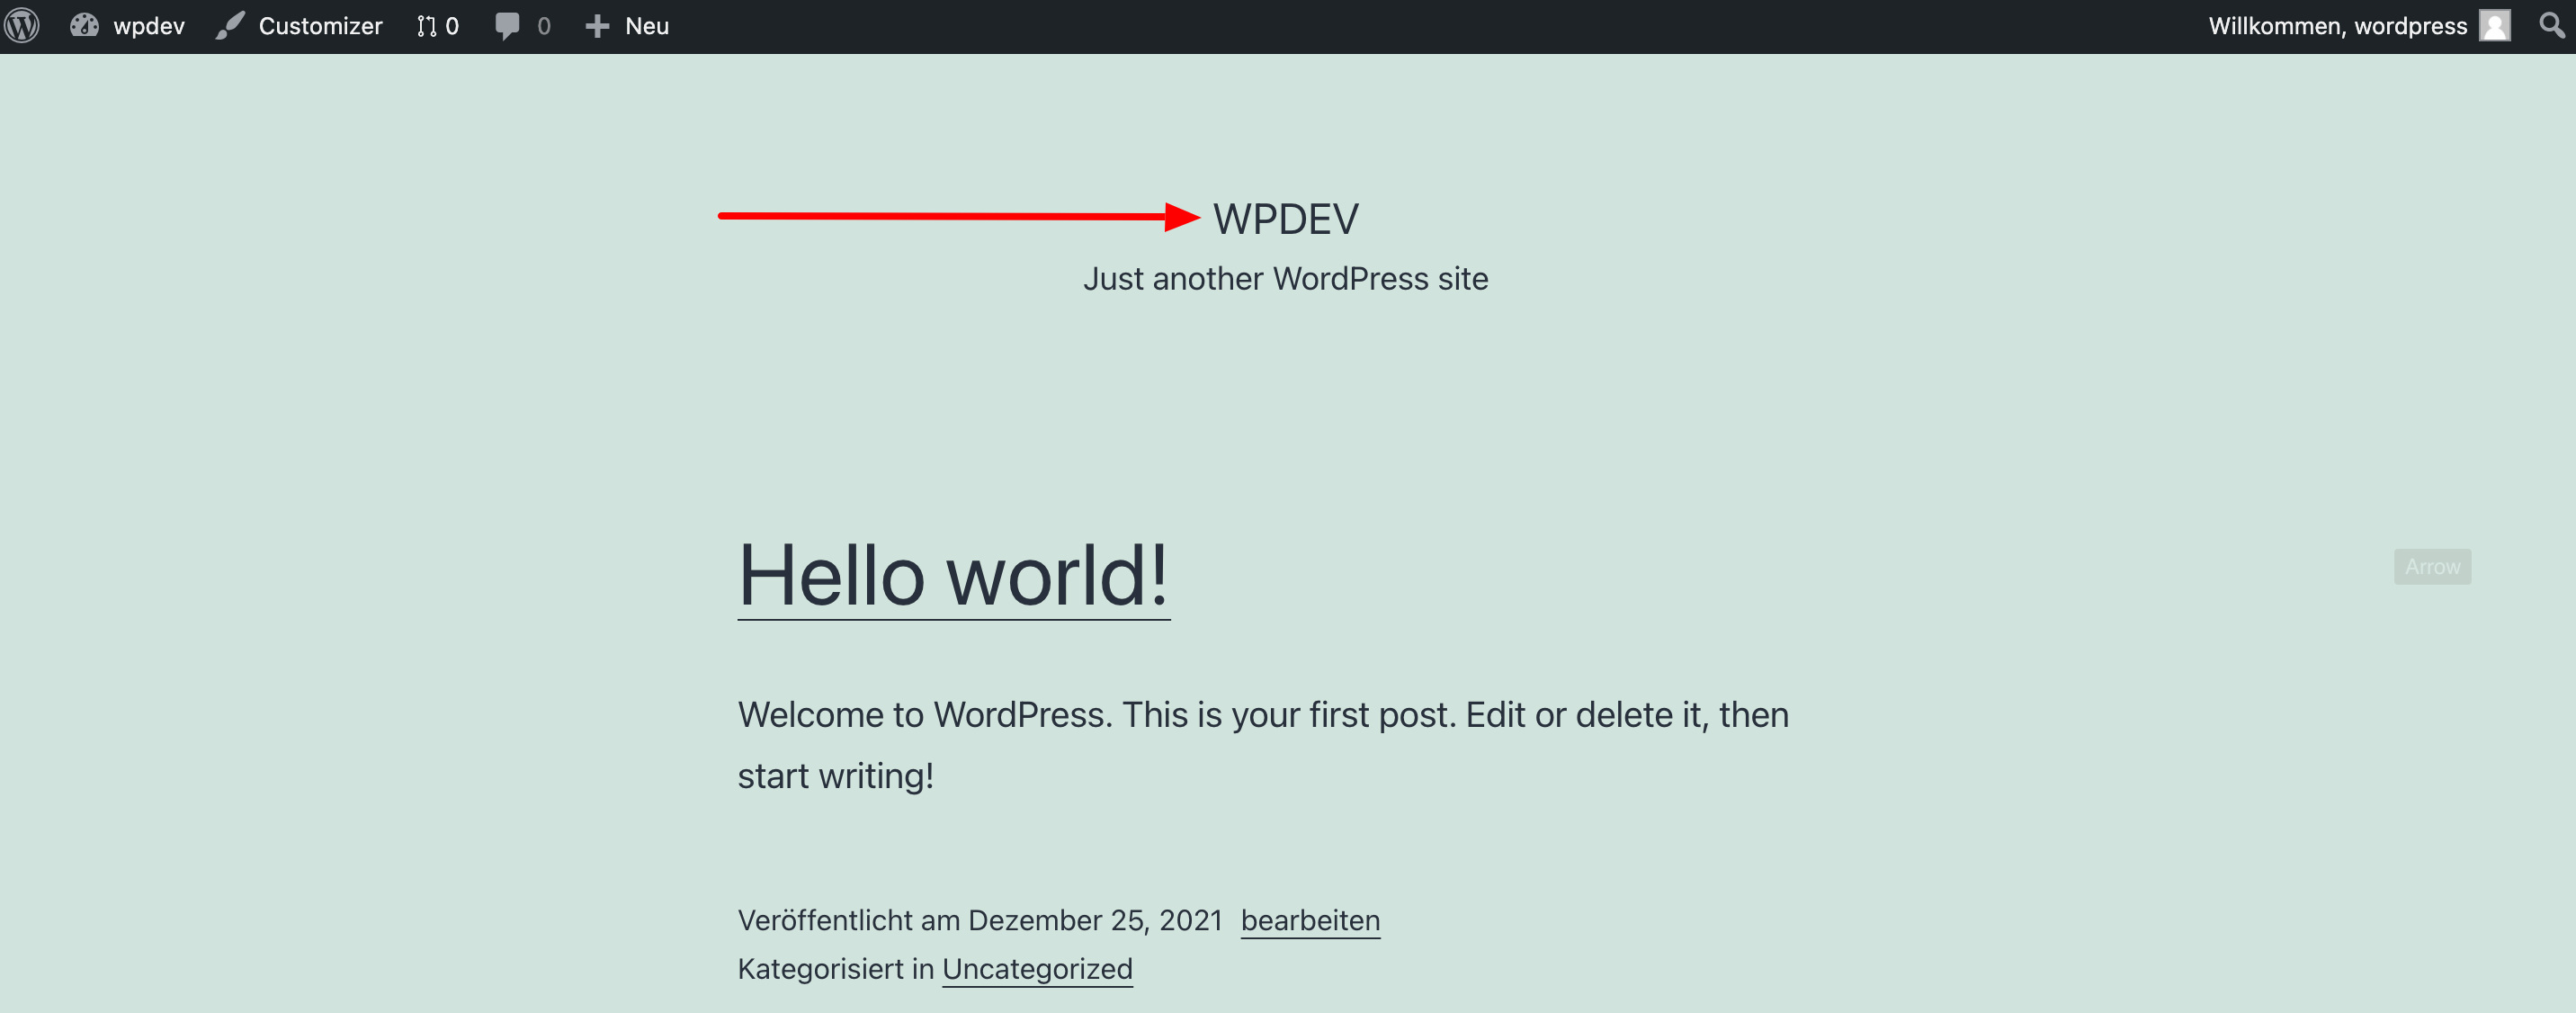
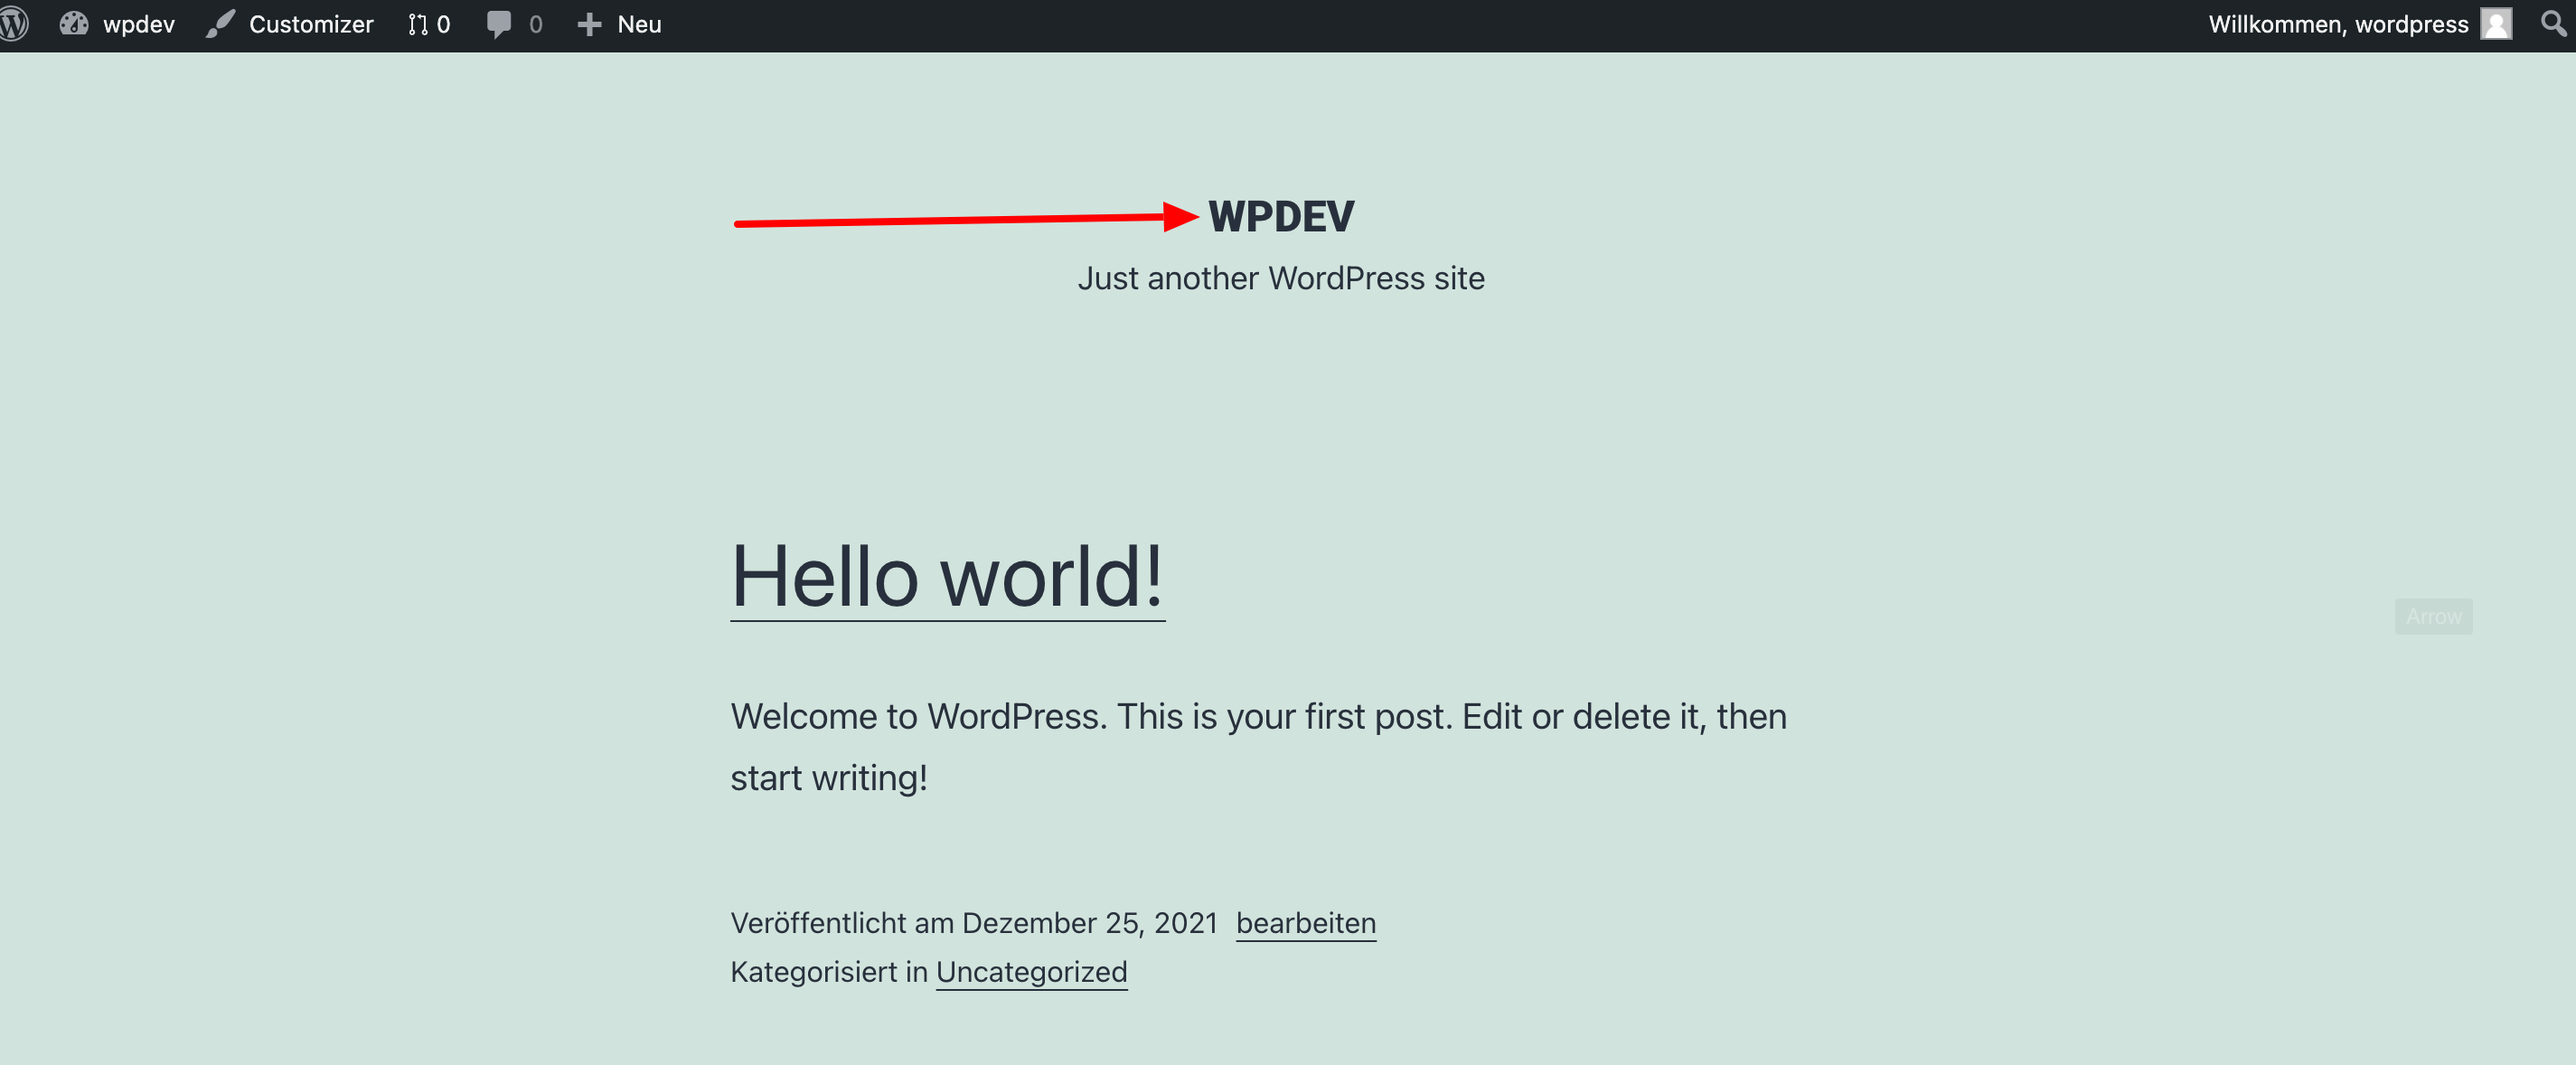
And here you can also see the whole thing in a before-and-after comparison:
WITHOUT Use Any Fonts:
WITH Use Any Fonts:
Add Predefined Fonts
If you select this option in Use Any Font, you can choose web fonts from a variety of predefined fonts. You do not have to upload anything extra. Simply click on the Add Predefined Fonts button and a corresponding window will open. If you like a font, you can add it to your website by clicking on the Add To Your Site button on the right.
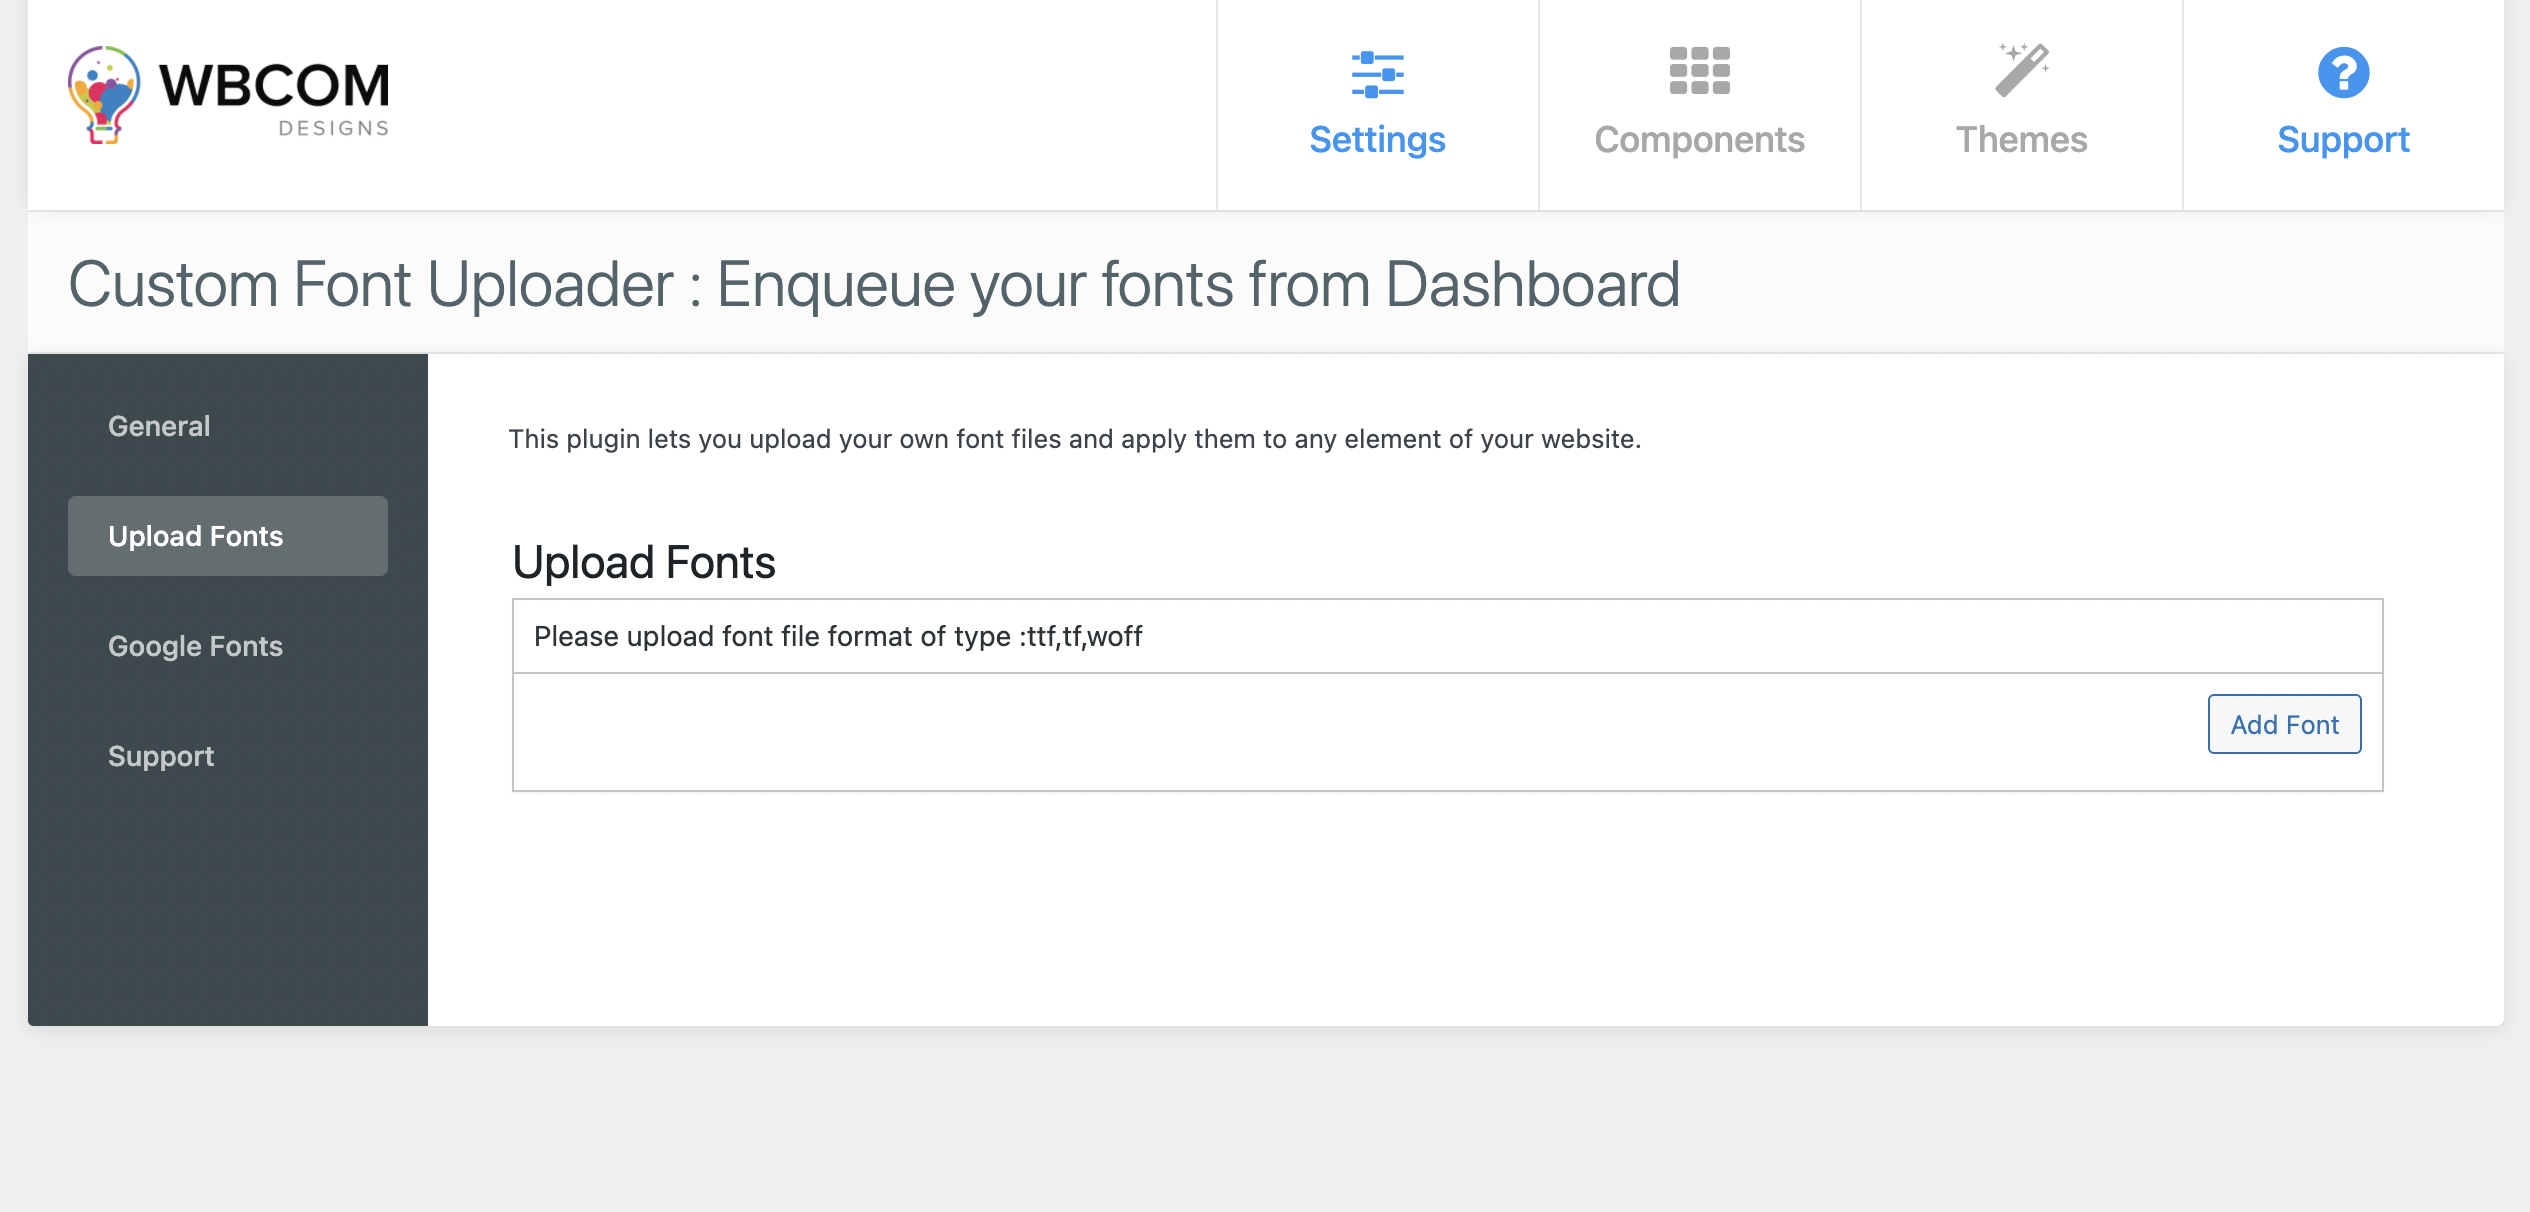
Custom Font Uploader
Custom Font Uploader is a WordPress typography plugin that helps you integrate Google fonts into your website. You can also upload custom fonts. We have already explained how you can convert such fonts in order to be able to integrate them into your website 😇
Unlike Use Any Font, you do not need an API key to use Custom Font Uploader. Consequently, you are not dependent on a server of the plug-in manufacturer. According to the developers, all fonts are stored on the server of the website operator, which is a big plus in terms of data protection, as no data is transferred to third parties.
And this is how you use the Fonts plugin:
- Open your WordPress backend and go to Plugins > Install in the menu on the left.
- Enter Custom Font Uploader in the search field and install and activate the plugin.
- The font plugin is now displayed in the menu on the left as WB Plugins. Depending on whether you want to upload a Google Font or an individual font, select either the sub-item Google Fonts or Upload Font.
Let’s take a look at how you can upload a custom font:
- Click on Add Font and select the font you want to upload. We decide on Roboto-Black. Important: The font will later be called exactly the same as the name of the font in your files. This means that you should name the file name as the font-family will be called later.
- For the following steps you have to dive into the CSS of your website – but don’t panic, we can do it together! 🤗
- Go to the frontend of your website (e.g. the homepage).
- Right-click on any free space.
- Select Inspect (in Google Chrome). Now you are in the infamous developer console of your website.
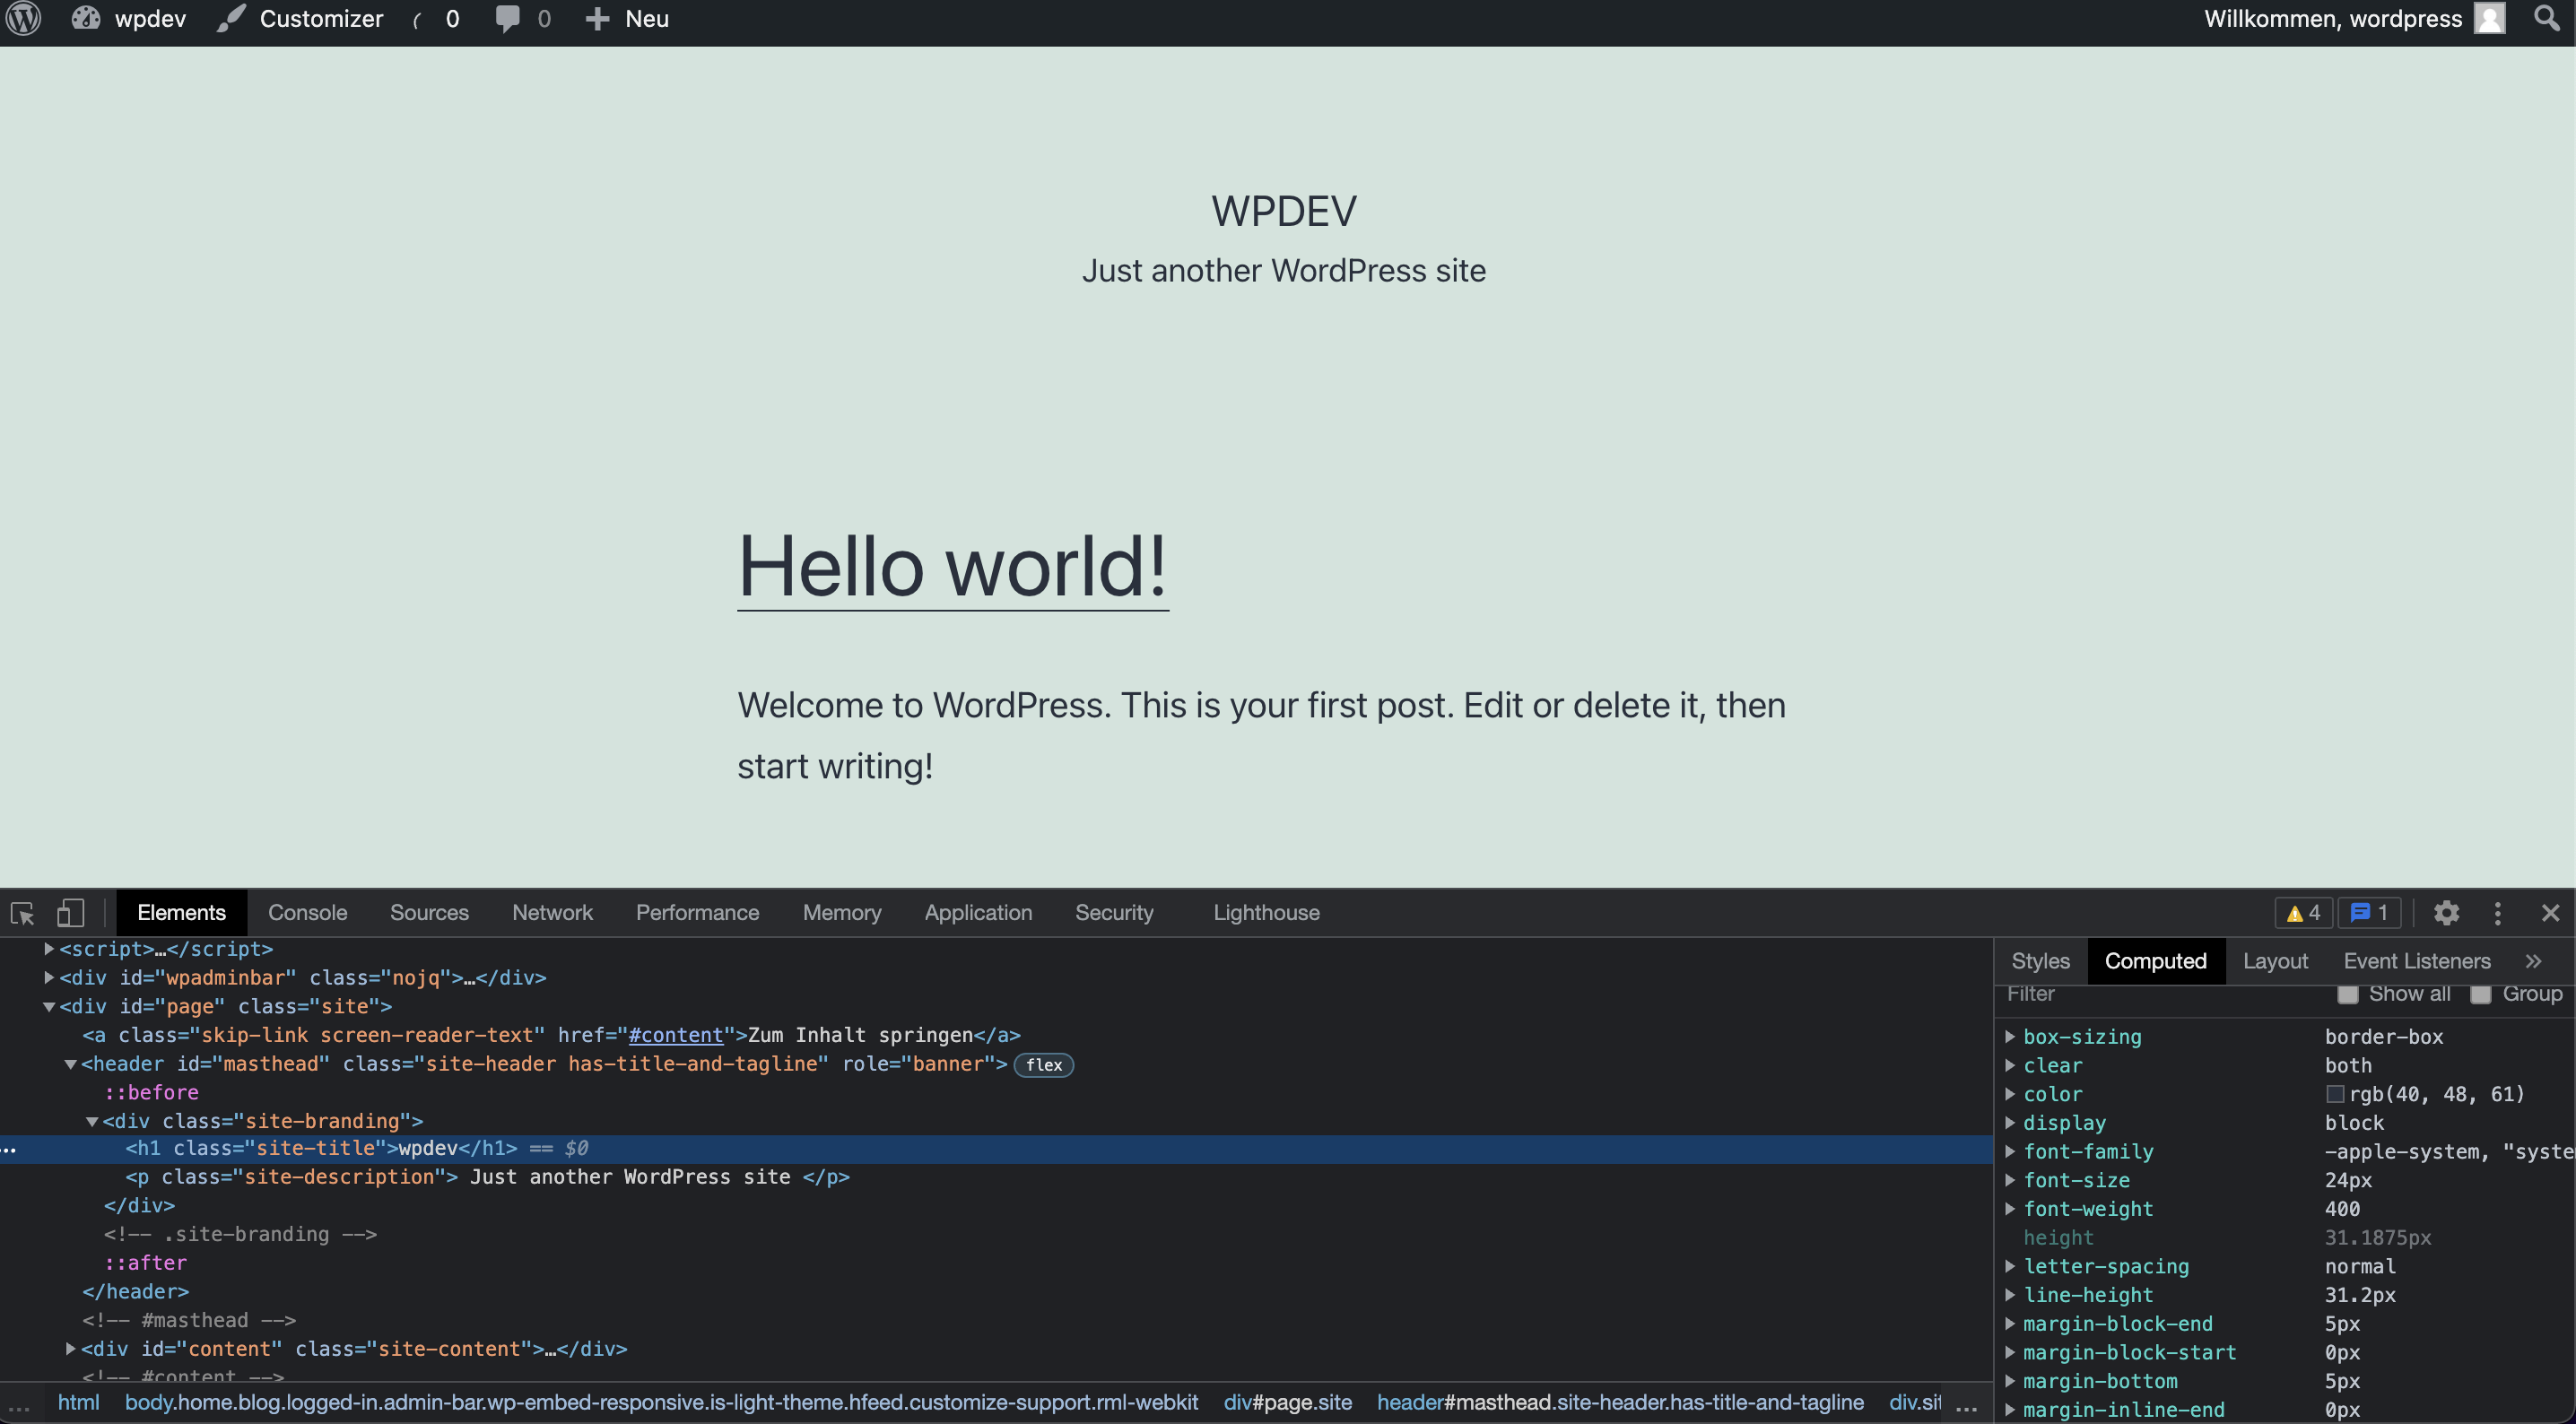
- On the far left, two tabs next to Elements, you will see an icon that looks like a square with a cursor. This is the “Picker”, which you can use to select individual elements on your website. Click on the picker.
- In our example, we select the heading WPDEV with the picker.
- At the bottom right of the developer console you will see a second column with the entries Styles, Computed and Layout.
- Stay in the Styles column.
- Now scroll down until you see the entry
font-family.
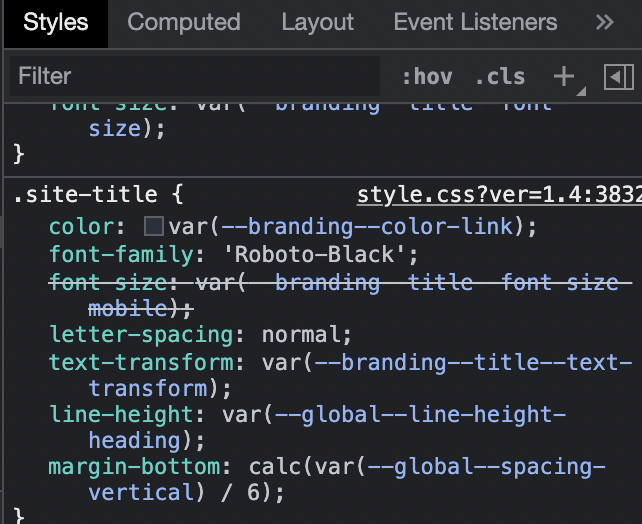
- Delete everything after
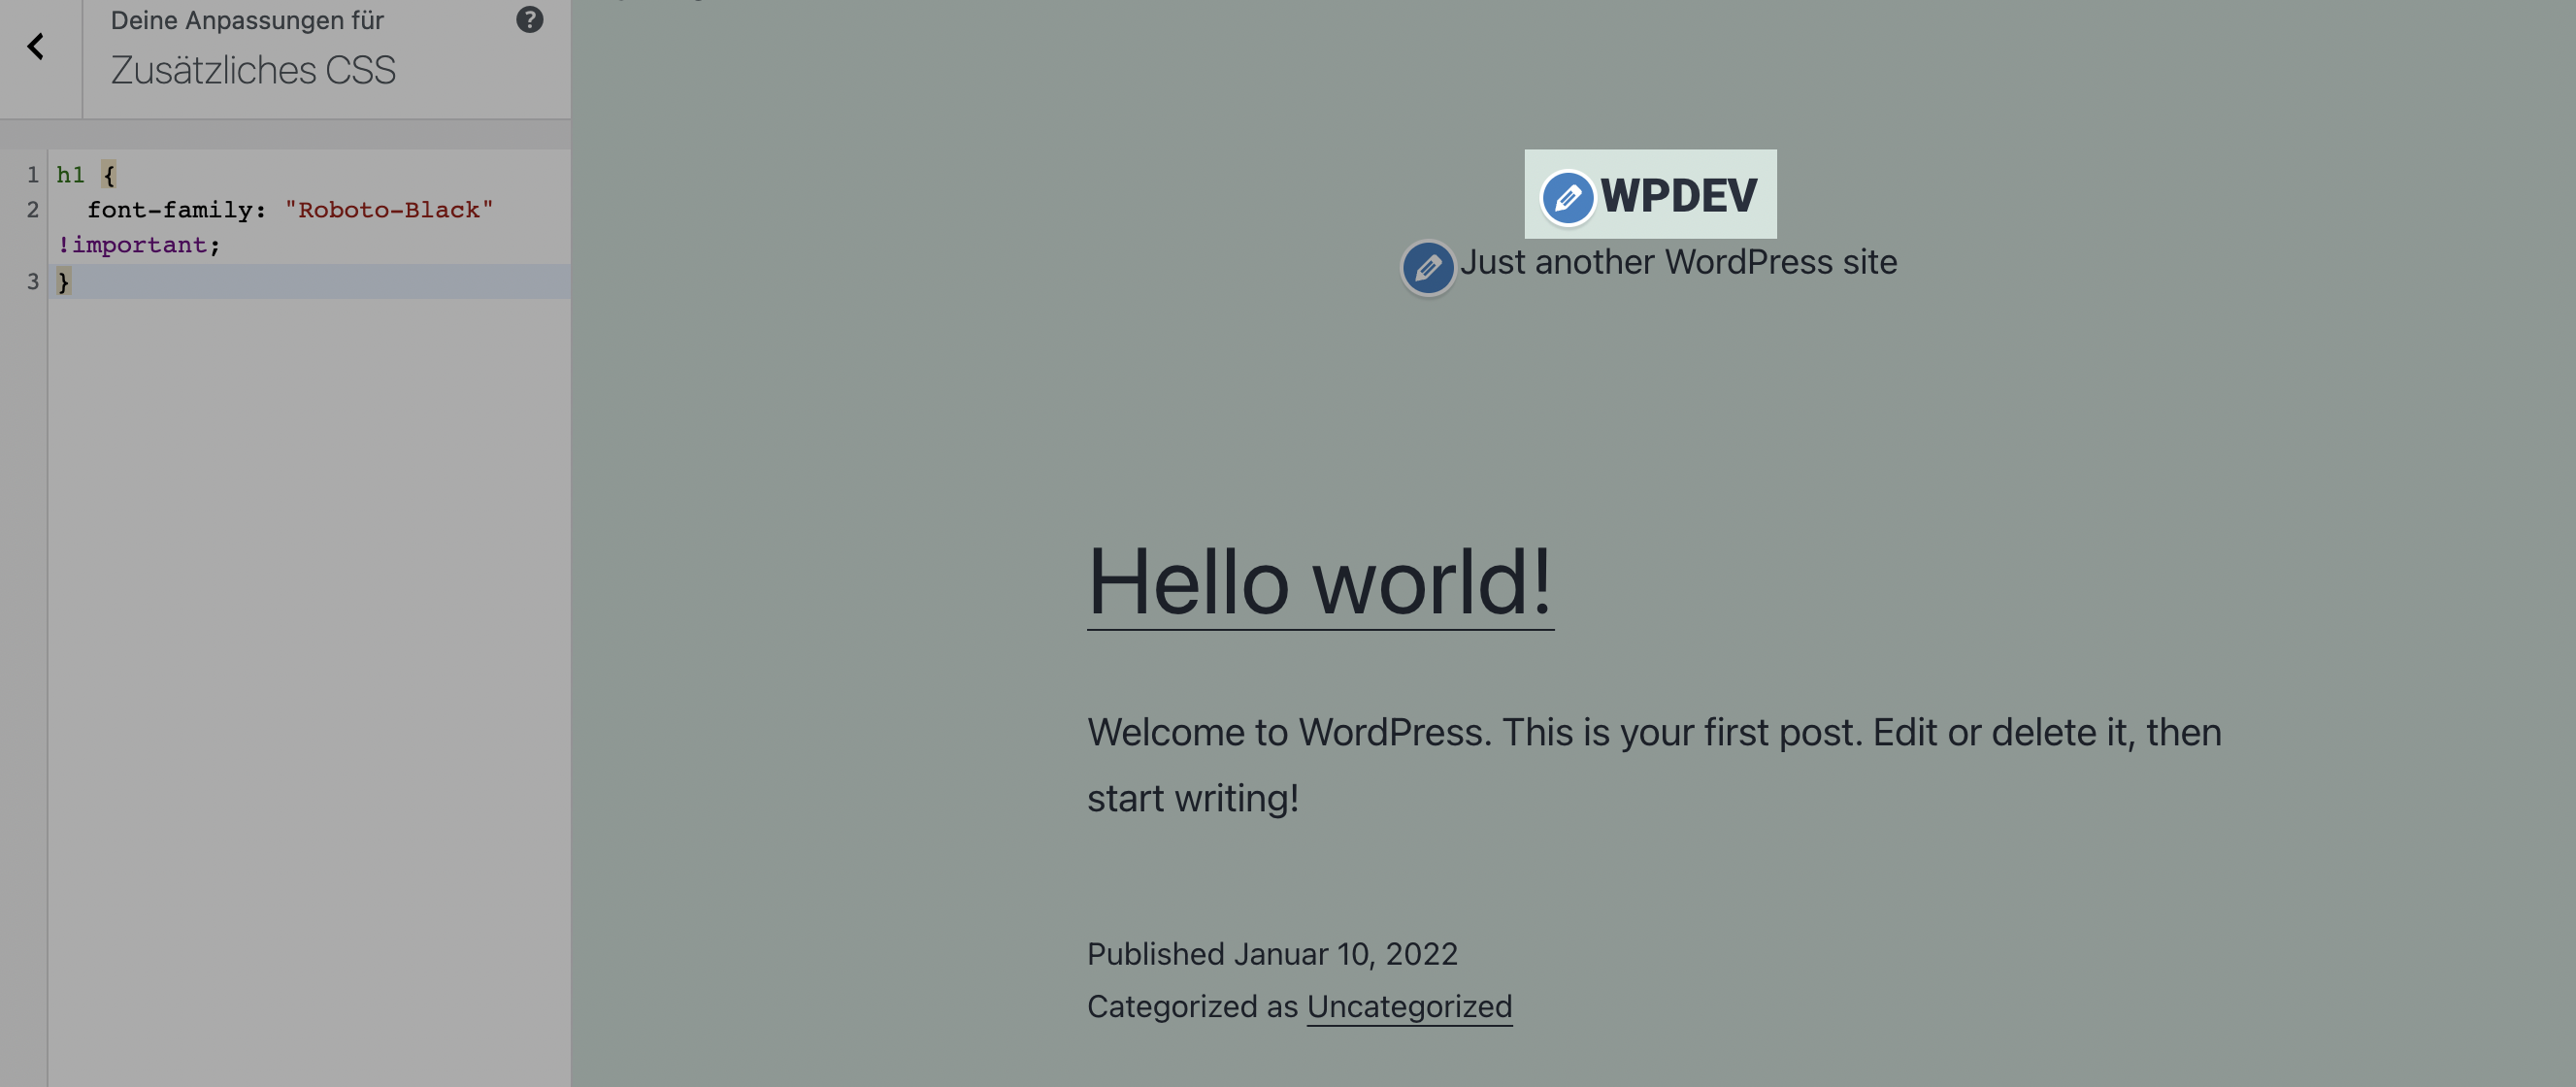
font-family: and enter the font name of your uploaded font. You will see the change directly in the live preview. (The problem here is that the changes are no longer displayed after refreshing the page. Therefore we have to configure them manually in the CSS of our website). - Check where you can store CSS in your WordPress installation. In the default theme, you will find this function in the menu on the left under Design > Customizer > Additional CSS.
- Let’s assume that you want to use the uploaded font (in our case Roboto) for all h1 headings. Enter the following into the CSS field:
h1 {

font-family: "Robotot-Black" !important;

}
👉Important: If you omit the !important, the change may not be applied because it is overwritten by a more important rule. By adding !important you prioritise your newly added rule.
If you are brave, you can take it a bit further.
With the help of CSS you can change the style of your website (e.g. font colours and spacing). Of course, you can also change the font.
Best of all, you don’t have to be a programming owl to add the following CSS to your WordPress website.
# All elements on the website (*) should have the font "Roboto-Black". If not available, display them in Arial
* {
   font-familiy: "Roboto-Black", Arial;
}


h1, h2, h3, h4, h4, h5, h6 {
   font-familiy: "Roboto-Black Headline Font", Arial;}
A comment is displayed behind the rhombus. This expresses that if the desired font “Roboto” cannot be loaded, Arial should be displayed instead.
In addition, the desired font should be used in all specified h’s (h1,h2,h3, etc), i.e. headings, of the website.
Where can I find the custom CSS for my website?
Where exactly you can find the CSS of your WordPress website usually depends on the theme. Very often, however, you will find it in the Customizer of your website. You can find the Customizer in the top left corner of the frontend view of your website or as already described under Design > Customizer – provided you are logged in 😉