MailChimp is a big player in the newsletter tool game. WordPress has a monopoly in terms of content management systems. Therefore, it is more than obvious to connect MailChimp with WordPress.
Fortunately, integrating MailChimp into WordPress is mega easy. We’ll tell you exactly how to do it in this article!
What is MailChimp?

MailChimp is an all-in-one tool that specialises in email marketing. The US cloud-based service wants to help you optimise your marketing. To do this, you can create, manage and analyse individual email marketing campaigns. In the course of this, you can create target groups in order to get your messages to the right people.
MailChimp is currently not yet available in German, but the online marketing tool is a popular alternative to Sendinblue due to its wide range of functions.
The basic version of MailChimp is free and is more suitable for people or companies with a small target group, as the availability of features is limited compared to the paid packages.
To create a newsletter, you can either choose from a variety of templates and modify them, import your own templates or start from scratch and create your own newsletter.
A/B testing can also be implemented with the newsletter tool, so you can find out which newsletter creation works best.
Integrate MailChimp with WordPress

Now we will show you how to set up MailChimp in WordPress. The prerequisite for this is that you have created a MailChimp account. You should also have already created a contact list with recipients.
Important: All registrations should have been made via the double opt-in procedure. (We explain this below in the section MailChimp and the GDPR).
- Open your WordPress backend.
- Go to Plugins > Add New. Now search for the plugin MC4WP: MailChimp for WordPress. Install and activate the plugin.
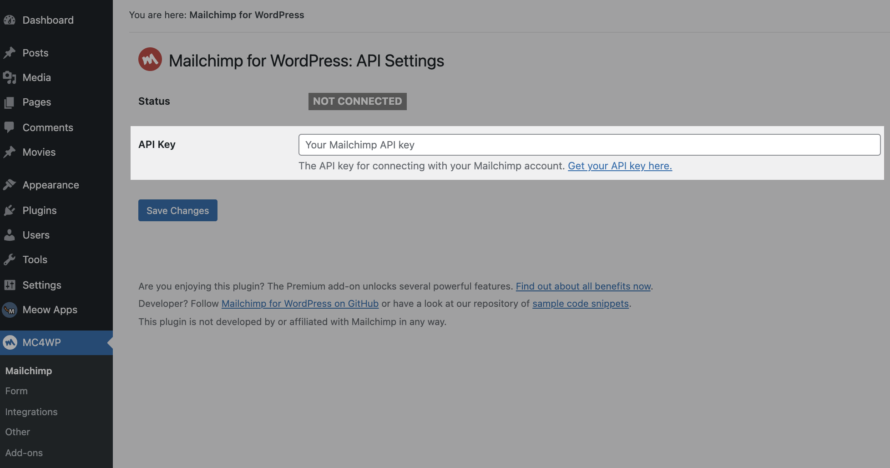
- After you have installed the plugin, you will find it in the menu on the left. You will immediately see the message NOT CONNECTED. This is because you first have to enter the API key of your MailChimp account. You can find out exactly where you can get your API key by clicking on the link Get your API key here.
- Enter the API key in the corresponding field and save the change. You should now see that you are connected.
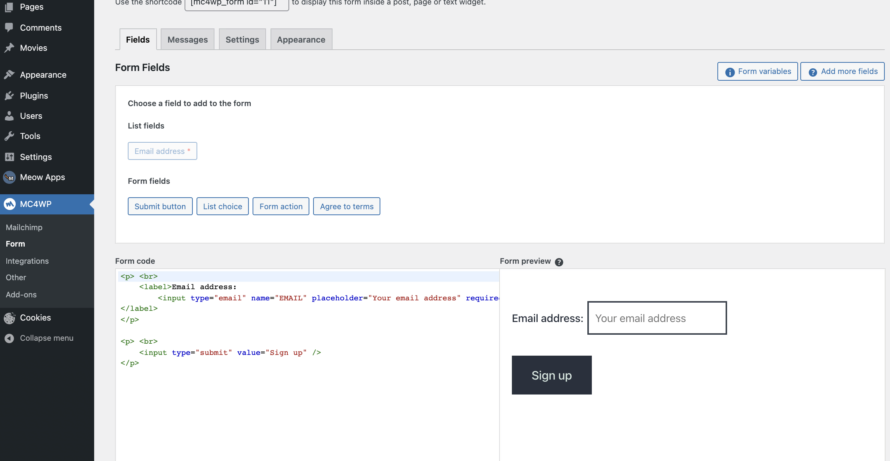
- Now click on MC4WP > Form in the menu on the left.
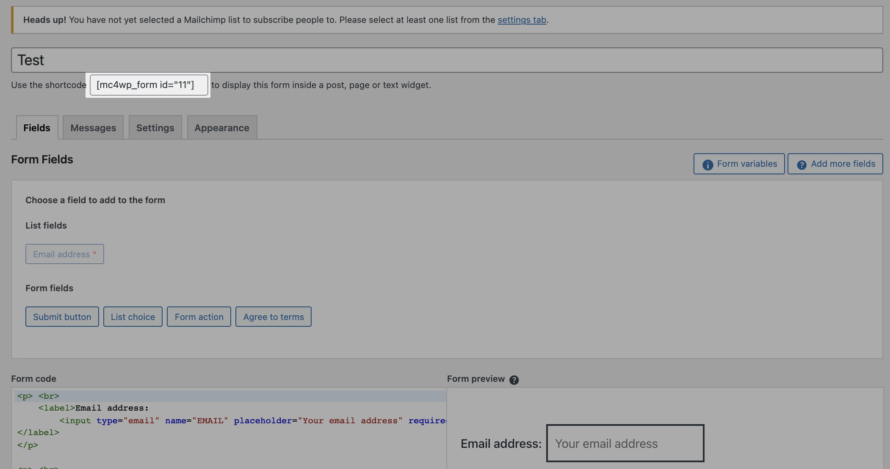
- Give your form a name and you’re ready to go.
You can now create your form here. The only disadvantage is that simple HTML knowledge is an advantage. But with a little trial and error, creating the form is actually quite easy. In theory, all you have to do is click on the entries you want (e.g. Last Name, Birthday, City) and they will be added to the form. You can change the spacing etc. manually, as you can see in our example in the screenshot above.
Further up the page you will find a shortcode that you can use to place the form anywhere on your website. You simply copy it and paste it where you want.
We have just set up the fields of the form. But there are the other tabs Messages, Settings and Appearance that we should take a look at.
Messages
Here you can define notifications that are displayed to the recipient, for example, after successful completion of the subscription. You can rephrase the texts according to your wishes.
Settings
In this tab you will find the form settings. The Mailchimp plugin offers you the option of using the double opt-in procedure. This function is activated by default. In terms of data protection, you should leave it activated!
Appearance
In Appearance you can set the style of your form and adapt it to the theme you are using, for example.
Just click through for yourself 😉
MailChimp and the GDPR
If you want to use MailChimp, you should be aware that the newsletter is sent via an external server (from MailChimp). In the case of MailChimp, this is even a company and associated servers based in the USA. This is fundamentally problematic, as data transfer to the USA is not normally permitted since the end of the Privacy Shield – a data protection agreement between the EU and the USA.
To upgrade MailChimp in terms of data protection for use in Germany, we recommend that you mention MailChimp in detail in your privacy policy. You also need an order processing contract. This is already listed in MailChimp’s terms and conditions. Therefore, in our opinion, you do not need to take care of it separately. To be on the safe side, you should get the opinion of a lawyer!
A commission processing contract is always necessary if you commission an external company to process personal data of your visitors/users/recipients. Such a contract regulates the lawful handling of this data. The basis for a processing contract is Article 28 of the GDPR.
When subscribing to the newsletter, your recipients must confirm that they have read and agree to your privacy policy by ticking a checkbox.
The topic of double opt-in also plays an enormously important role in connection with newsletter tools. In concrete terms, this means that the registration process for the newsletter must consist of a double procedure. After the first registration, an email with a confirmation link is sent to the corresponding person. This link must be clicked by the person to complete the registration. This ensures that the owner of the e-mail address has really registered for the newsletter.
The double opt-in procedure is important in order to comply with your obligation to provide proof in accordance with Article 7 of the GDPR and to use MailChimp in a way that is as GDPR-compliant as possible.
Finally, you should ensure that the customer data is encrypted.
No, in order to be able to use the MC4WP plugin, you do not need to obtain consent for once, in our opinion. This is because MC4WP is hosted locally. Therefore, no data is sent to the MailChimp server until the visitor actively subscribes to your newsletter. When signing up for the newsletter, they must – as described above – agree to your privacy policy anyway, which means that you inform them about the use of Mailchimp.
However, if you embed Mailchimp in other ways on your WordPress website, you may need consent. In this case, we recommend you take a look at the WordPress cookie plugin Real Cookie Banner.


