Integrating Google AdSense in WordPress in a GDPR-compliant manner in order to generate maximum revenue through personalized advertising can be challenging. Especially since Google will require all website operators (publishers) to obtain and transmit consent to Google in accordance with the Transparency & Consent Framework (TCF) as of January 2024.
In this article, we will show you how to configure Google AdSense, enter required information in your privacy policy, ads.txt and obtain TCF-compliant consent using Real Cookie Banner to meet all requirements.
Why is (TCF) consent required for Google AdSense?
Google AdSense enables website operators to place advertisements on their website and earn money with them. The ad content is designed based on the website content and the interests of the website visitor.
By integrating Google advertising, the IP addresses of visitors must be transmitted to Google. Since IP addresses are considered personal data in the EU, GDPR-compliant consent is required. Google AdSense also uses cookies to personalize ads and measure their success, for which consent is also required under the ePrivacy Directive. We have explained the legal background why you need consent in more detail in a separate article.
For Swiss website visitors, consent will also be required from 31 July 2024 for the setting/reading of certain cookies or similar technologies and the collection, transfer and use of personal data for the personalization of advertisements.
Google wants to ensure that you as a website operator obtain the appropriate consent from your visitors in order to ensure EU-compliant processing and compliant processing in Switzerland and avoid joint liability. Google therefore obliges you to obtain consent in accordance with the Transparency & Consent Framework (TCF) of IAB Europe from a Google-certified CMP (Consent Management Platform).
Difference between Google AdSense and Google Ads
It is important not to confuse Google AdSense and Google Ads. Although both advertising networks sound pretty similar. With Google AdSense, you earn money by advertising on your website, while with Google Ads you pay for ads in Google Search and on other websites.
Preparing for the integration of Google AdSense in WordPress
Before you integrate Google AdSense into your WordPress website, a few preparatory steps are necessary. If you are already an experienced Google AdSense publisher and only need to switch to TCF consent, you can usually skip this section.
Open a Google AdSense account and register your website
To be able to place advertising from the Google AdSense network on your WordPress website, you must first register at Google AdSense.
- Open the Google AdSense registration and sign in with your Google account (or create a new Google account).
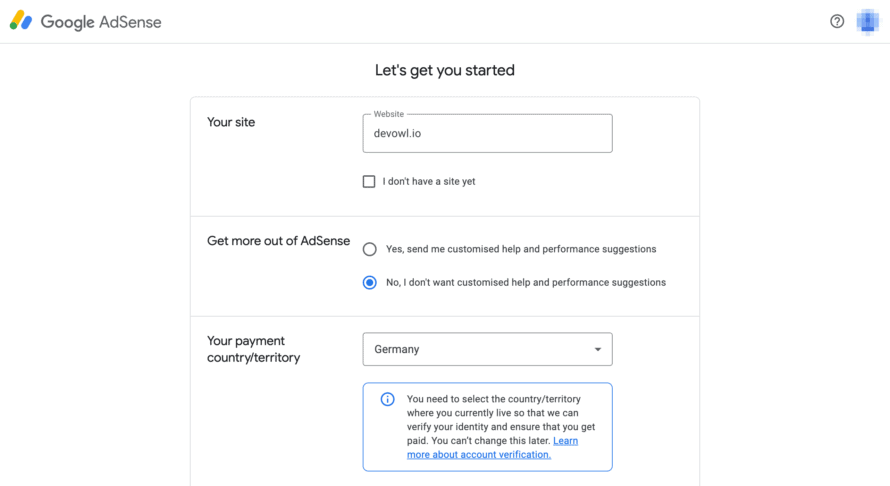
- Register your website, enter your country of residence/registered office and agree to the Google AdSense Online Terms of Use.
- After registering, you can enter your personal information (address, tax ID, legal form, etc.) and payment information so that your advertising revenue can be paid out monthly. You can also add this information later.
Provide and verify ads.txt in WordPress
The ads.txt file (Authorized Digital Sellers) – a standard of the IAB Tech Lab – was developed to create more transparency in programmatic advertising (e.g. Google AdSense) and to reduce fraud with online advertising. In this file, website operators specify which advertising networks and companies are authorized to sell their advertising space, which makes fraudulent practices such as domain spoofing more difficult.
It is not mandatory to store an ads.txt in your WordPress website, but it is highly recommended in order to maximize advertising revenue.
- Install the free WordPress plugin Ads.txt Manager in your WordPress. To do this, go to your WordPress backend under Plugins > Install and search for “Ads.txt Manager”. Alternatively, you can also manually create an
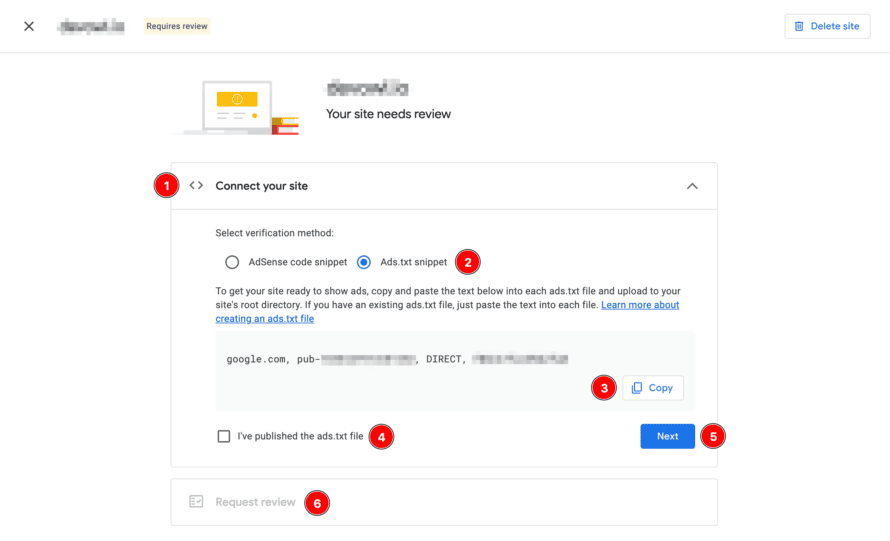
ads.txtfile in the root directory of your WordPress. - Navigate to your Google AdSense account to Sites > [domain of your website] > Connect your site and select “Ads.txt snippet” as the confirmation method. You must copy the snippet displayed.
- You can now paste and save the copied content in your WordPress backend under Settings > Ads.txt.
If your website has not yet been checked by the Google AdSense team (usually if you have newly registered yourself or the website), proceed as follows:
- Back in Google AdSense, you can confirm “I have published the ads.txt file” and request a review in the next step.
Your website will now be checked by a Google employee to see whether it is eligible to display ads with Google AdSense. This usually takes a few days. You will be notified by Google AdSense by email when your website has been approved in Google AdSense.
Enter Google AdSense account in the sellers.json
The IAB Tech Lab’s sellers.json file helps increase the transparency of online advertising and reduces fraud by allowing website operators to document authorized sellers and intermediaries of their ad spaces, making domain spoofing more difficult. This measure strengthens trust between advertisers and publishers and can lead to higher advertising revenue for you as a website operator.
The file is published by Google, but you must register in order to be listed as a publisher (website operator). The contents of sellers.json are explained in detail in Google’s knowledge base. That’s how to register:
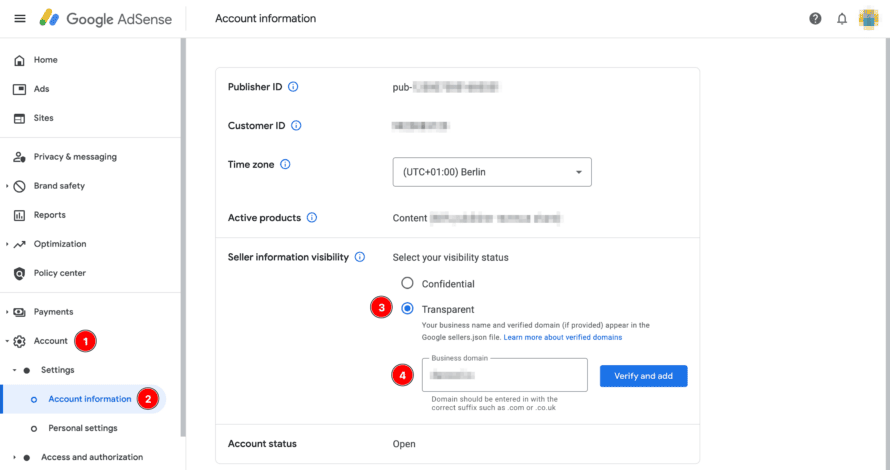
- Navigate to your Google AdSense account to Account > Settings > Account information.
- In the “Seller information visibility” section, you must change the visibility status to “Transparent”.
- (optional) As a company domain, you can specify your website in the format “devowl.io” (without “https://” or “www.”) so that advertisers can find out more about your online offer. The domain must be registered with Google AdSense as a website (for advertising).
Conclude – not – an order processing contract
You do not need a data processing agreement for Google AdSense.
Google is considered a controller for AdSense in accordance with Art. 4 No. 7 GDPR, not a processor in accordance with Art. 4 No. 8 GDPR, as Google makes decisions about data usage in order to optimize the product and deliver relevant advertising. Even when using Ad Manager or Ad Exchange, Google remains the controller as it uses the data to improve their product. Therefore, no data processing agreement is necessary. Google communicates this legal opinion in its knowledge database.
Explain Google AdSense in the privacy policy
The privacy policy must state which data is collected by Google AdSense and how it is used, in particular for personalized advertising. The legal basis for data processing and the rights of users, including the right to object, must be clearly stated. Information should also be provided about possible data transfers to third countries. This is necessary in addition to a cookie banner.
Please make sure that the data protection generator or lawyer who creates your privacy policy adds a corresponding passage! This is essential as Google checks whether the use of Google AdSense is clearly explained.
Integrating Google AdSense into your WordPress website
Before we obtain the TCF standard-compliant consent for Google AdSense, we need to place the ads on the website. You have two options: “Automatic ads” (Auto Ads), where Google independently identifies optimal locations for ads on your website, or manually placed ad units that you insert in places you specify. Below we explain both approaches, which can also be combined.
Activate automatic ads (Auto Ads)
To use Auto Ads on your website, we configure them in Google AdSense and integrate the generated script into the website.
- Navigate in your Google AdsSense account to Ads > By site.
- Click on “Get code” to get the JavaScript snippet that you need to embed on your website. Many themes offer the option to insert your own code via their settings. Alternatively, you can install the free WordPress plugin WPCode to insert the code. You can include it in the
<head>section of your website as suggested by Google, but you can also include it anywhere else (without any loss of performance, as you will ask for consent before loading). - Then navigate to your Google AdSense account to Ads > By site > All your sites > [Domain of your website] > Edit (pencil icon).
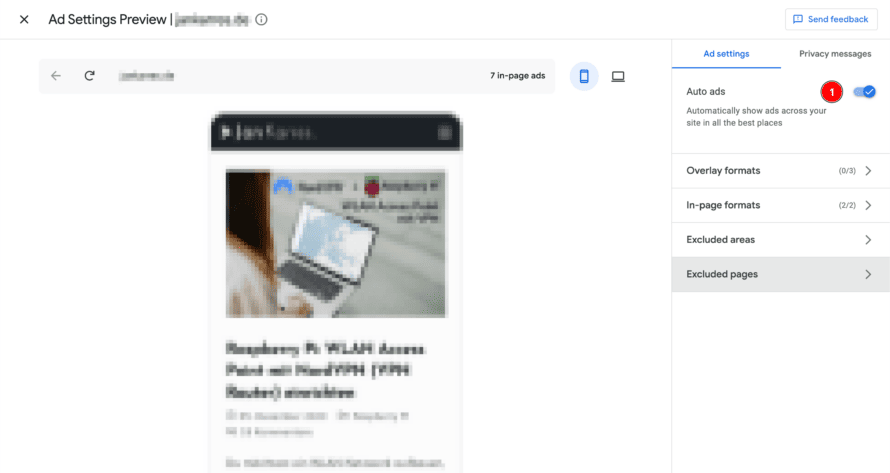
- In the “Ad Settings Preview” you must activate and save “Auto ads” on the right-hand side. You can also fine-tune how many ads, what type and on which subpages may be displayed.
Integrate ad unit manually
Manually integrated ad units allow you to control exactly where Google AdSense advertising is placed on your website. To do this, you must integrate a script for each ad unit.
- Navigate in your Google AdSense account to Ads > By ad unit.
- Choose a display block type such as display ads or in-feed ads that you want to create and configure them according to your wishes.
- Finally, you will see a JavaScript snippet that you should copy in full and insert into the place on your website where you want the ad to be displayed.
Keep in mind that if Google AdSense does not have a suitable ad, the ad space may remain empty. You should therefore not place a wrapper around the ad unit that occupies additional space, e.g. as margin or padding. You should always bind such stylings via CSS to the <ins> tag that is given to you in the JavaScript snippet from Google AdSense.
GDPR-compliant consent for Google AdSense with TCF in WordPress
In order to obtain GDPR-compliant consent for Google AdSense in accordance with Google’s guidelines, we use Real Cookie Banner. You need the PRO version (paid version) of the WordPress plugin, as Google requires consent according to the Transparency & Consent Framework (TCF), which is only available in the PRO version. We assume that you have already installed Real Cookie Banner.
Google AdSense also enables the creation of a “GDPR message” directly in Google AdSense. This special cookie banner is tailored exclusively to the TCF standard and Google AdSense. However, this option is not recommended as it does not allow consent for WordPress plugins or non-TCF services.
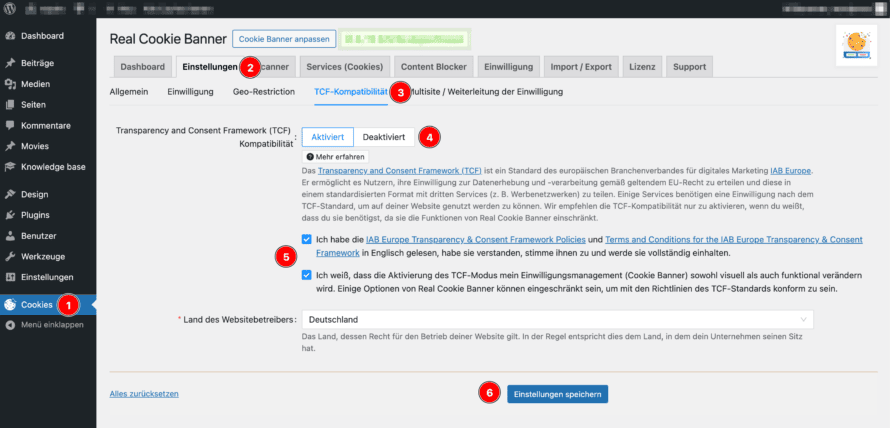
- In your WordPress backend, navigate to Cookies > Settings > Transparency & Consent Framework (TCF), activate TCF and save the settings. You should also read the IAB Europe Transparency & Consent Framework Policies and Terms and Conditions for the IAB Europe Transparency & Consent Framework to better understand the requirements of the TCF standard. In most cases, Real Cookie Banner will automatically ensure that you comply with them.
- With the activated TCF compatibility, you can now navigate to Cookies > Services (Cookies) > TCF Vendors in your WordPress backend. You can use these in parallel with non-TCF services (all services such as Google Maps, YouTube or Google reCAPTCHA), which will continue to exist.
What is a TCF vendor? According to the IAB Europe Transparency and Consent Framework (TCF), any service (e.g. Google for Google Ads) that wants to use consents according to the TCF standard must register as a vendor in the Global Vendor List (GVL). All TCF vendors specify for which purposes they need consent to process data and set cookies and which features they can offer with these consents. They also provide a link to their privacy policy for further information. You, as a website operator, must obtain consent in your cookie banner for all vendors you work with. You can limit the requested purposes of vendors to keep consents as privacy-friendly as possible.
Google AdSense displays ads from various advertising partners (ad servers) on your website by integrating just one AdSense script. A complex bidding system decides which advertising partner gets the advertising space in the end. Only advertising partners that your website visitors have consented to can participate in the auction. For advertising partners who require consent according to the TCF standard, the respective TCF vendors must be configured.
Real Cookie Banner offers you preconfigured vendor lists for ad networks, which greatly simplifies the setup.
- Click on Create TCF vendor configuration > Add vendors from ad networks (available from Real Cookie Banner v4.3.0).
- In the dialog that opens, you can choose from three different preconfigured vendor lists, whereby you have to decide for yourself how many vendors you want to obtain consent for. As the number of vendors increases, so does the risk that the consent in your cookie banner will be considered invalid under data protection law, as your website visitor will no longer be able to obtain information with reasonable effort.
The architecture of the TCF standard provides for a signal to be sent to the TCF vendor about the purposes for which consent has been granted or legitimate interests have not been objected to. The TCF vendor will evaluate this signal and accordingly only execute permitted data processing in accordance with the defined purposes. However, the TCF standard does not take into account that, in general, IP addresses are personal data according to the ECJ judgment C-582/14. Personal data may only be transmitted with a legal basis, usually consent.
Real Cookie Banner therefore offers you content blockers that block scripts until permission (as consent or legitimate interest) is given for a defined minimum of data processing purposes for a defined number of TCF vendors.
In the case of Google AdSense, we recommend embedding its advertising script if there is permission for the TCF vendor “Google Advertising Products” (755) for at least the purpose “Store and/or access information on a device” (purpose 1; practically speaking, setting/reading cookies) has been granted. However, you can also wait for consent for other vendors and purposes, which makes sense if, for example, you only want to display personalized advertising on your website.
- To have the content blocker created automatically, make sure that the checkbox “Create content blocker for Google AdSense” in the “Vendors for Google AdSense” dialog is set (active by default).
- Confirm by clicking on “Create TCF vendor configurations” that all necessary TCF vendor configurations (and the content blocker) will be created for you. Depending on the vendor list selected, this can take a few seconds to a few minutes.
- Check at Cookies > Services (Cookies) > TCF Vendors whether all created TCF vendor configurations are suitable for your case and whether you want to deactivate purposes for which the TCF vendor requests consent or a legitimate interest by default (usually you will not adjust anything here).
- Check at Content Blocker > Google AdSense > Edit whether you want to request permissions for other TCF vendors or purposes in the content blocker you have created (usually you will not adjust anything here).
- If necessary, under Cookies > Services (Cookies) > TCF vendors > Create TCF vendor configuration, create further configurations for other TCF vendors with whom you work.
You’ve done it 🥳 Google AdSense is integrated into your website and you obtain consent according to the TCF standard.
If you open the cookie banner in the frontend of your website, you will notice that it looks slightly different compared to before TCF compatibility was activated. This is prescribed by IAB Europe as part of the TCF standard and is unavoidable. However, you can of course adapt some of the design elements to the design of your website under Cookies > Customize banner in the WordPress backend.
How and when does Google AdSense recognize whether I have obtained the correct consent?
As a website operator from the EU, Google AdSense asks you to obtain correct consent in accordance with the TCF standard in your Google AdSense account. If you do not comply, no more advertising will be displayed on your website from 14. January 2024 and you will receive no further revenue.
Google AdSense recognizes whether you are obtaining consent correctly, as the TCF standard provides a standardized interface for transferring consent from your cookie banner to the vendor. As soon as you have configured your cookie banner in Real Cookie Banner with TCF, the transfer happens fully automatically.
After setting up TCF, it may take 1-2 days until warning messages about insufficient consent disappear from your Google AdSense account. Google needs this time to automatically check your website.
Frequently asked questions about the integration of Google AdSense
In addition to the standard way of integrating Google AdSense into WordPress with TCF consent, there are other technical options and regulations that we would like to point out.
Which WordPress ad manager plugin can I use?
There are various ad manager plugins for WordPress that allow you to display targeted advertising on your website. These plugins include:
Some of these plugins are TCF-compatible and wait for general TCF consent. However, none of them load ads based on specific TCF vendor consents (as of November 2023). However, in our legal opinion, this is necessary to prevent the loading of Google AdSense scripts using a content blocker if no consent has been given. Only if the scripts are blocked will you prevent the processing of personal data that requires consent, such as the IP address of your website visitors (explained in more detail in the previous section).
Therefore we currently advise against using these plugins if you want to be able to use Google AdSense in compliance with data protection regulations. For integration with Real Cookie Banner, we recommend contacting the plugin manufacturers directly!
However, if, contrary to ECJ ruling C-582/14, you have the legal opinion that the transmission of the IP address to Google AdSense is permitted without consent, you can use ad managers that are compatible with TCF. Since TCF offers a standardized interface, the consent of Real Cookie Banner is automatically transferred to the vendors of the advertising scripts without further integration.
Observe data protection regulations for minors in Google AdSense integration
Google AdSense complies with the Age Appropriate Design Code (AADC) for users in the United Kingdom as well as data protection regulations for minors in the EEA such as Art. 8 GDPR and Switzerland. As a WordPress website operator in the EEA, UK or Switzerland, minors may not be shown personalized ads. You should mark requests for users under the age of 18 with the TFUA tag.
The TFUA tag (parameter) is used to deactivate personalized ads, including remarketing. It also deactivates requests sent to third-party providers in the Google AdSense advertising network, e.g. tracking pixels and third-party ad servers. This leads to lower advertising revenue for you as a website operator.
In practice, it is not possible to differentiate between website visitors based on their age, as the true age of the website visitor is not known. In addition, if you have activated the age notice in Real Cookie Banner, only website visitors over the age of 16 (which may vary depending on your country) may give their consent. If these children and young people respect the notice, Google AdSense will not be displayed to the majority of the affected website visitors due to the lack of consent.
We therefore recommend setting the TFUA tag for all Google AdSense ads for websites that specifically target under-18s. How to set the TFUA tag, Google explains in its knowledge base.
As a WordPress website operator, you want to show ads to all visitors and generate revenue. You need consent for the cookies that Google AdSense sets. Consequently, the advertising can only be displayed after consent has been given.
It is not possible to use Google AdSense without cookies. Google AdSense requires cookies, even for non-personalized advertising, to measure the success of the ads. In addition, consent is required for the processing of personal data by Google AdSense, which cannot be avoided. We have explained in more detail in a separate article what you need consent for.
Integrating Google Analytics with Google AdSense connections in compliance with data protection
Google AdSense and Google Analytics can be linked to share collected data. This allows you e.g. to see in Google Analytics how much AdSense revenue certain articles have brought you.
To check whether you have linked the two Google products, navigate to your Google Analytics account at Admin (gear icon) > Property settings > Product links > Google AdSense link.
We have explained in detail in a separate article how to integrate Google Analytics in a privacy-compliant manner and configure privacy-friendly settings. If you use the Google AdSense link, we recommend that you mention this link in the “Purpose” field of the service you have created for Google Analytics in Real Cookie Banner for more transparency. You should also explain the data exchange between the two services in more detail in your privacy policy.
