If you use PixelYourSite, the plugin integrates tracking pixels without consent into your website. This is not allowed according to the GDPR and ePrivacy Directive, as consent is required for non-essential services that use cookies. That’s why PixelYourSite and Real Cookie Banner offer you an integration that allows you to get consent in your cookie banner before the tracking pixels are loaded on your website.
In the following article, we will explain how to enable the integration and configure it properly.
Enable integration in PixelYourSite
PixelYourSite does not automatically detect which cookie banner you use. You have to manually activate the various integrations to collect consents. Here’s how to do that:
-
- Open in your WordPress backend PixelYourSite > Dashboard > Consent.
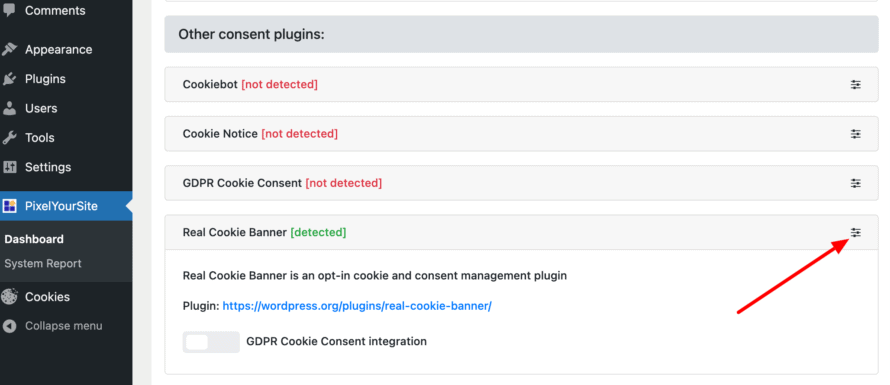
- In the section “Other consent plugins” you will find Real Cookie Banner. Now click on the small icon on the right, at the same height as Real Cookie Banner, to expand the settings (see screenshot).
- Enable the GDPR Cookie Consent integration option and save the setting.
- If you are using Google Services within PixelYourSite, make sure to enable the option PixelYourSite > Google Tag Settings > General > DataLayer Setting > Disable name transformation for the data layer (use dataLayer).
PixelYourSite will now check if consents have been given via Real Cookie Banner, if a service has been created for the respective tracking pixel in Real Cookie Banner. If you forget to create a service, PixelYourSite will continue to load the tracking pixel without consent!
You must obtain informed consent from your website visitors. To do this, you must describe exactly what data you are collecting for what purpose with each tracking pixel. The visitor of your website can then freely decide in your cookie banner whether he agrees to the use of the tracking pixel (opt-in).
To do this, you create a service in Real Cookie Banner as follows:
-
- In your WordPress backend, go to Cookies > Services (Cookies) > Add service.
- Search for the service “PixelYourSite”, create it and click “Save” in the service. Note: You must have downloaded the PixelYourSite plugin for this, otherwise it cannot be displayed and used.
- Than click on Services (Cookies) > Create New Service again.
- Select Facebook Pixel, Google Analytics, Google Ads or Pinterest Tag from the list of templates (depending on which pixel you have integrated with PixelYourSite).
- In the service configuration, please check all the details. Especially in the field Purpose you should add information, if you collect more data than usual via events in PixelYourSite.
- Save the service.
That’s it. PixelYourSite now loads the respective pixel only if there is consent from your website visitor.
