Real Cookie Banner is compatible with Google Consent Mode. Google Consent Mode can be used to transfer legal bases (consents or legitimate interests) for services to Google Tag Manager as so-called “additional consents”. This means that you can fire tags in Google Tag Manager only when there is a legal basis for doing so.
In the following article, we explain how you can set up your cookie banner on your WordPress website with Google Tag Manager in connection with Google Consent Mode.
Activation of Google Consent Mode with Google Tag Manager integration
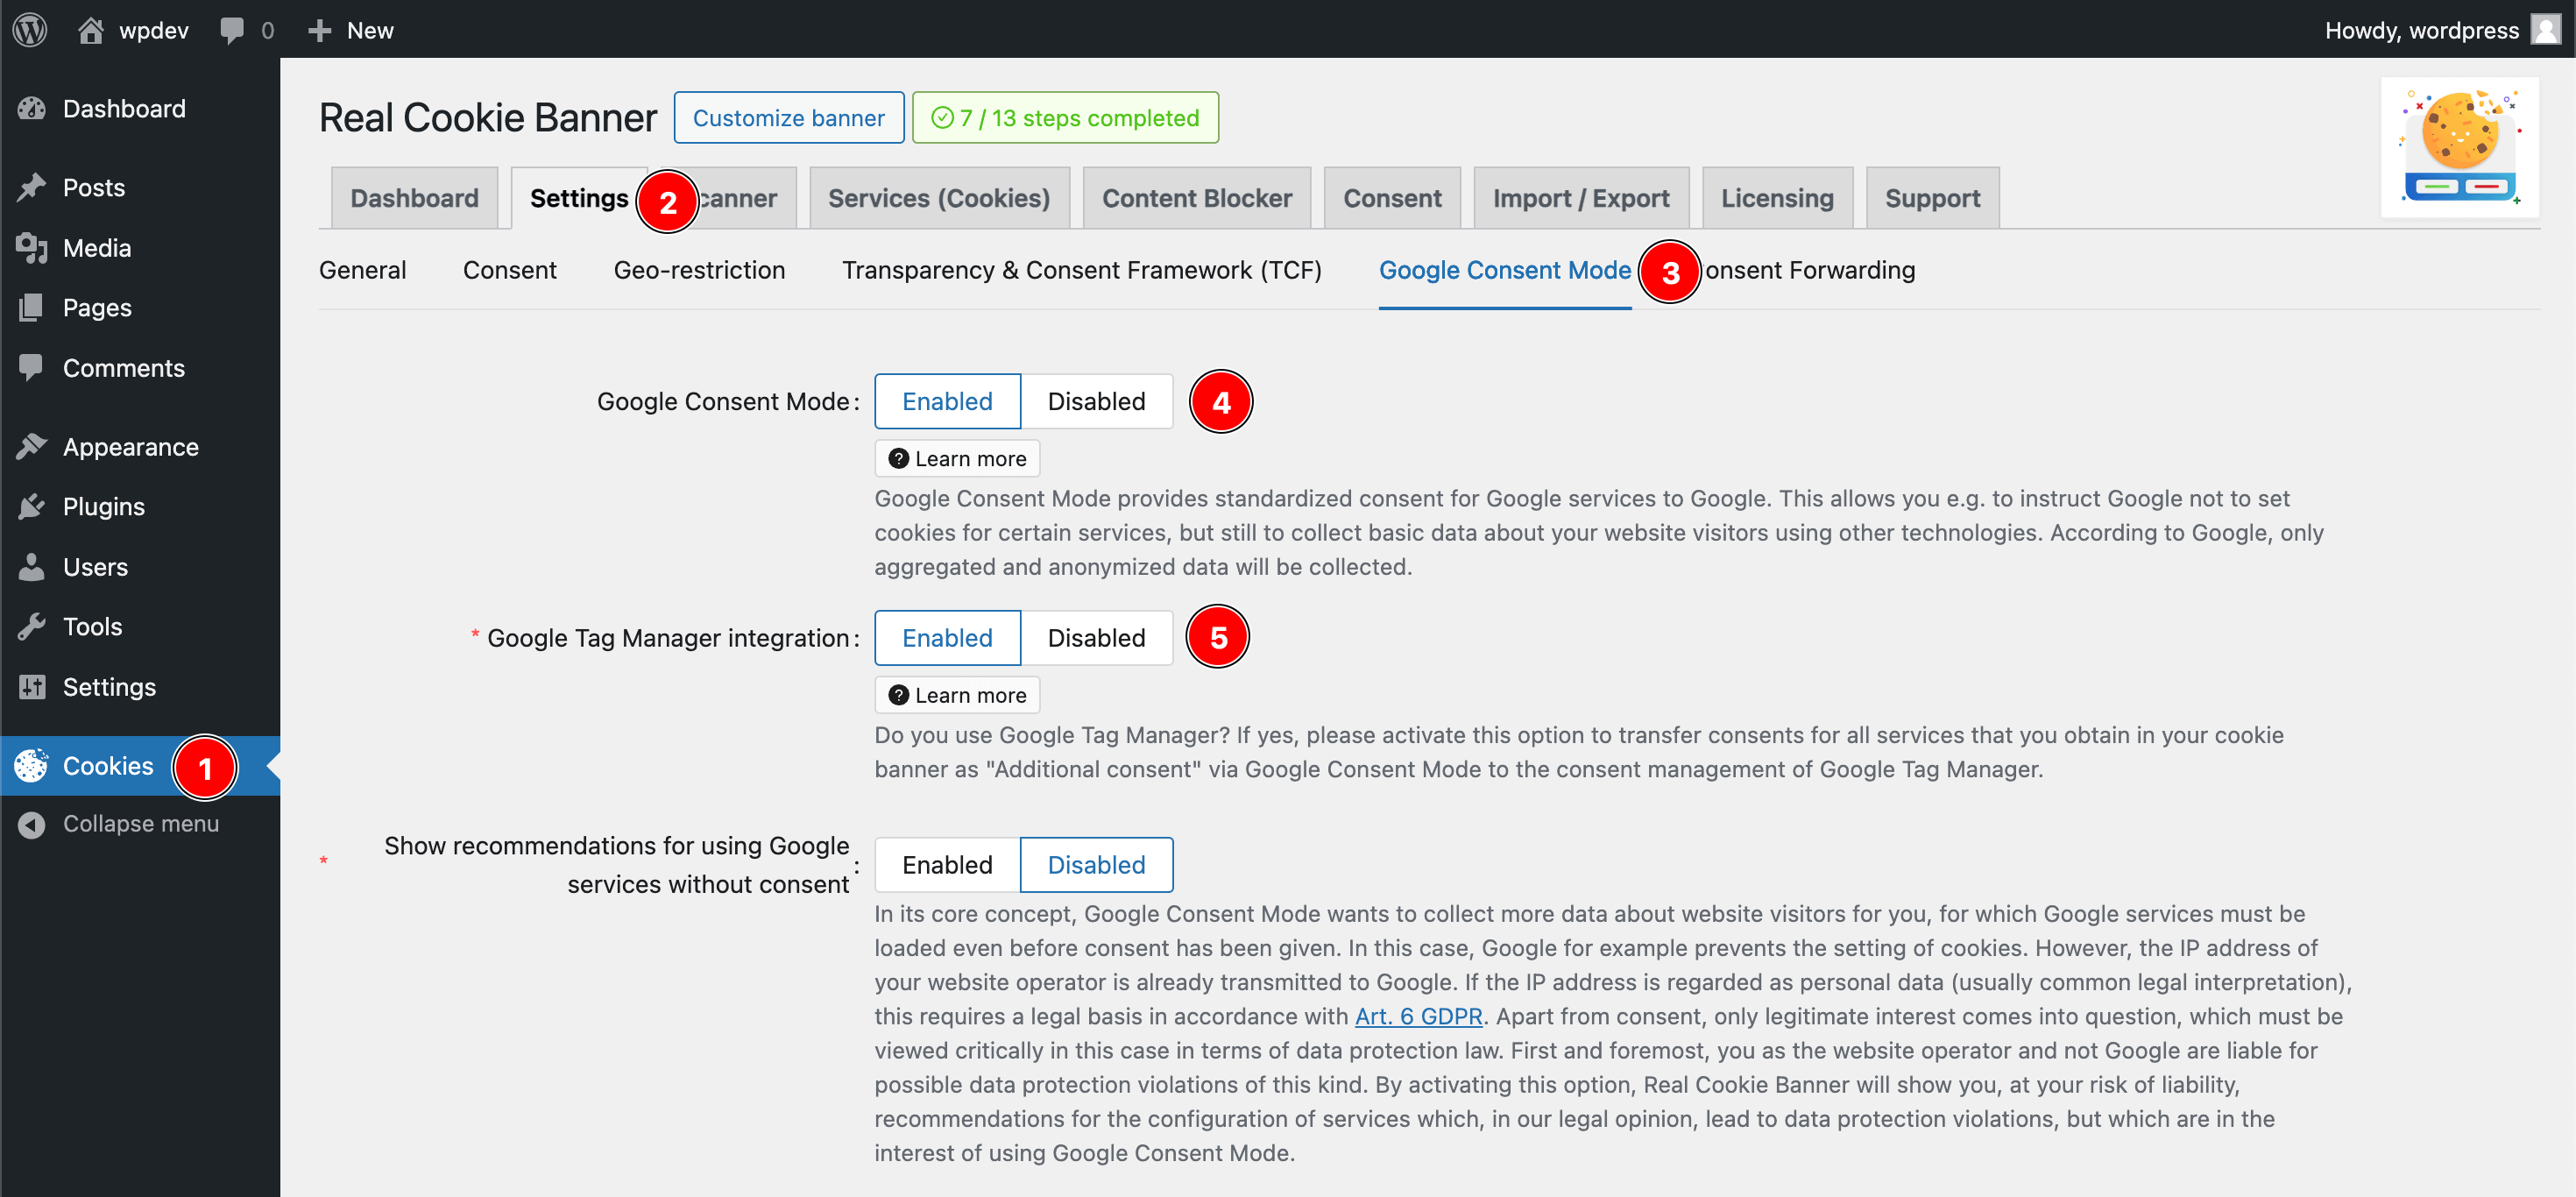
First, we need to enable the Google tag manager integration in Real Cookie Banner to see all the additional features for using Google Tag Manager. To accomplish this, follow these steps:
- In your WordPress backend, go to the Cookies tab in the left sidebar.
- In the tab Settings > Google Consent Mode, you need to enable the Google Consent Mode, as the consents will later be transferred to Google Tag Manager via this framework/interface.
- In the same tab, you must also activate the option “Google Tag Manager integration”, so that the legal bases for all services get automatically transferred to Google Tag Manager.
These steps enable the additional options in Real Cookie Banner to be able to transfer consents. However, Google Tag Manager itself is not yet integrated into your website.
Embed Google Tag Manager
You must integrate Google Tag Manager into your WordPress website and obtain consent from your website visitors. If you have already integrated Google Tag Manager on your website (using the official script or a plugin such as GTM4WP), it must be blocked until consent is obtained.
By following the steps below, you can add Google Tag Manager to your website:
- Go to Services (Cookies) > Add service and select Google Tag Manager from the templates.
- In the service template, please add all the information you need or want to change.
- If you have already integrated Google Tag Manager on your website, make sure to activate the option “Create content blocker for this service” at the end of the service create form. After creating the service, you will be prompted to create a suitable content blocker, which you should create.
Activation of the consent overview in Google Tag Manager
In the Google Tag Manager Container, we recommend that you activate the so-called “Consent Overview”. This allows you to efficiently assign the necessary consents to your tags in the Google Tag Manager interface. This is how you activate the feature:
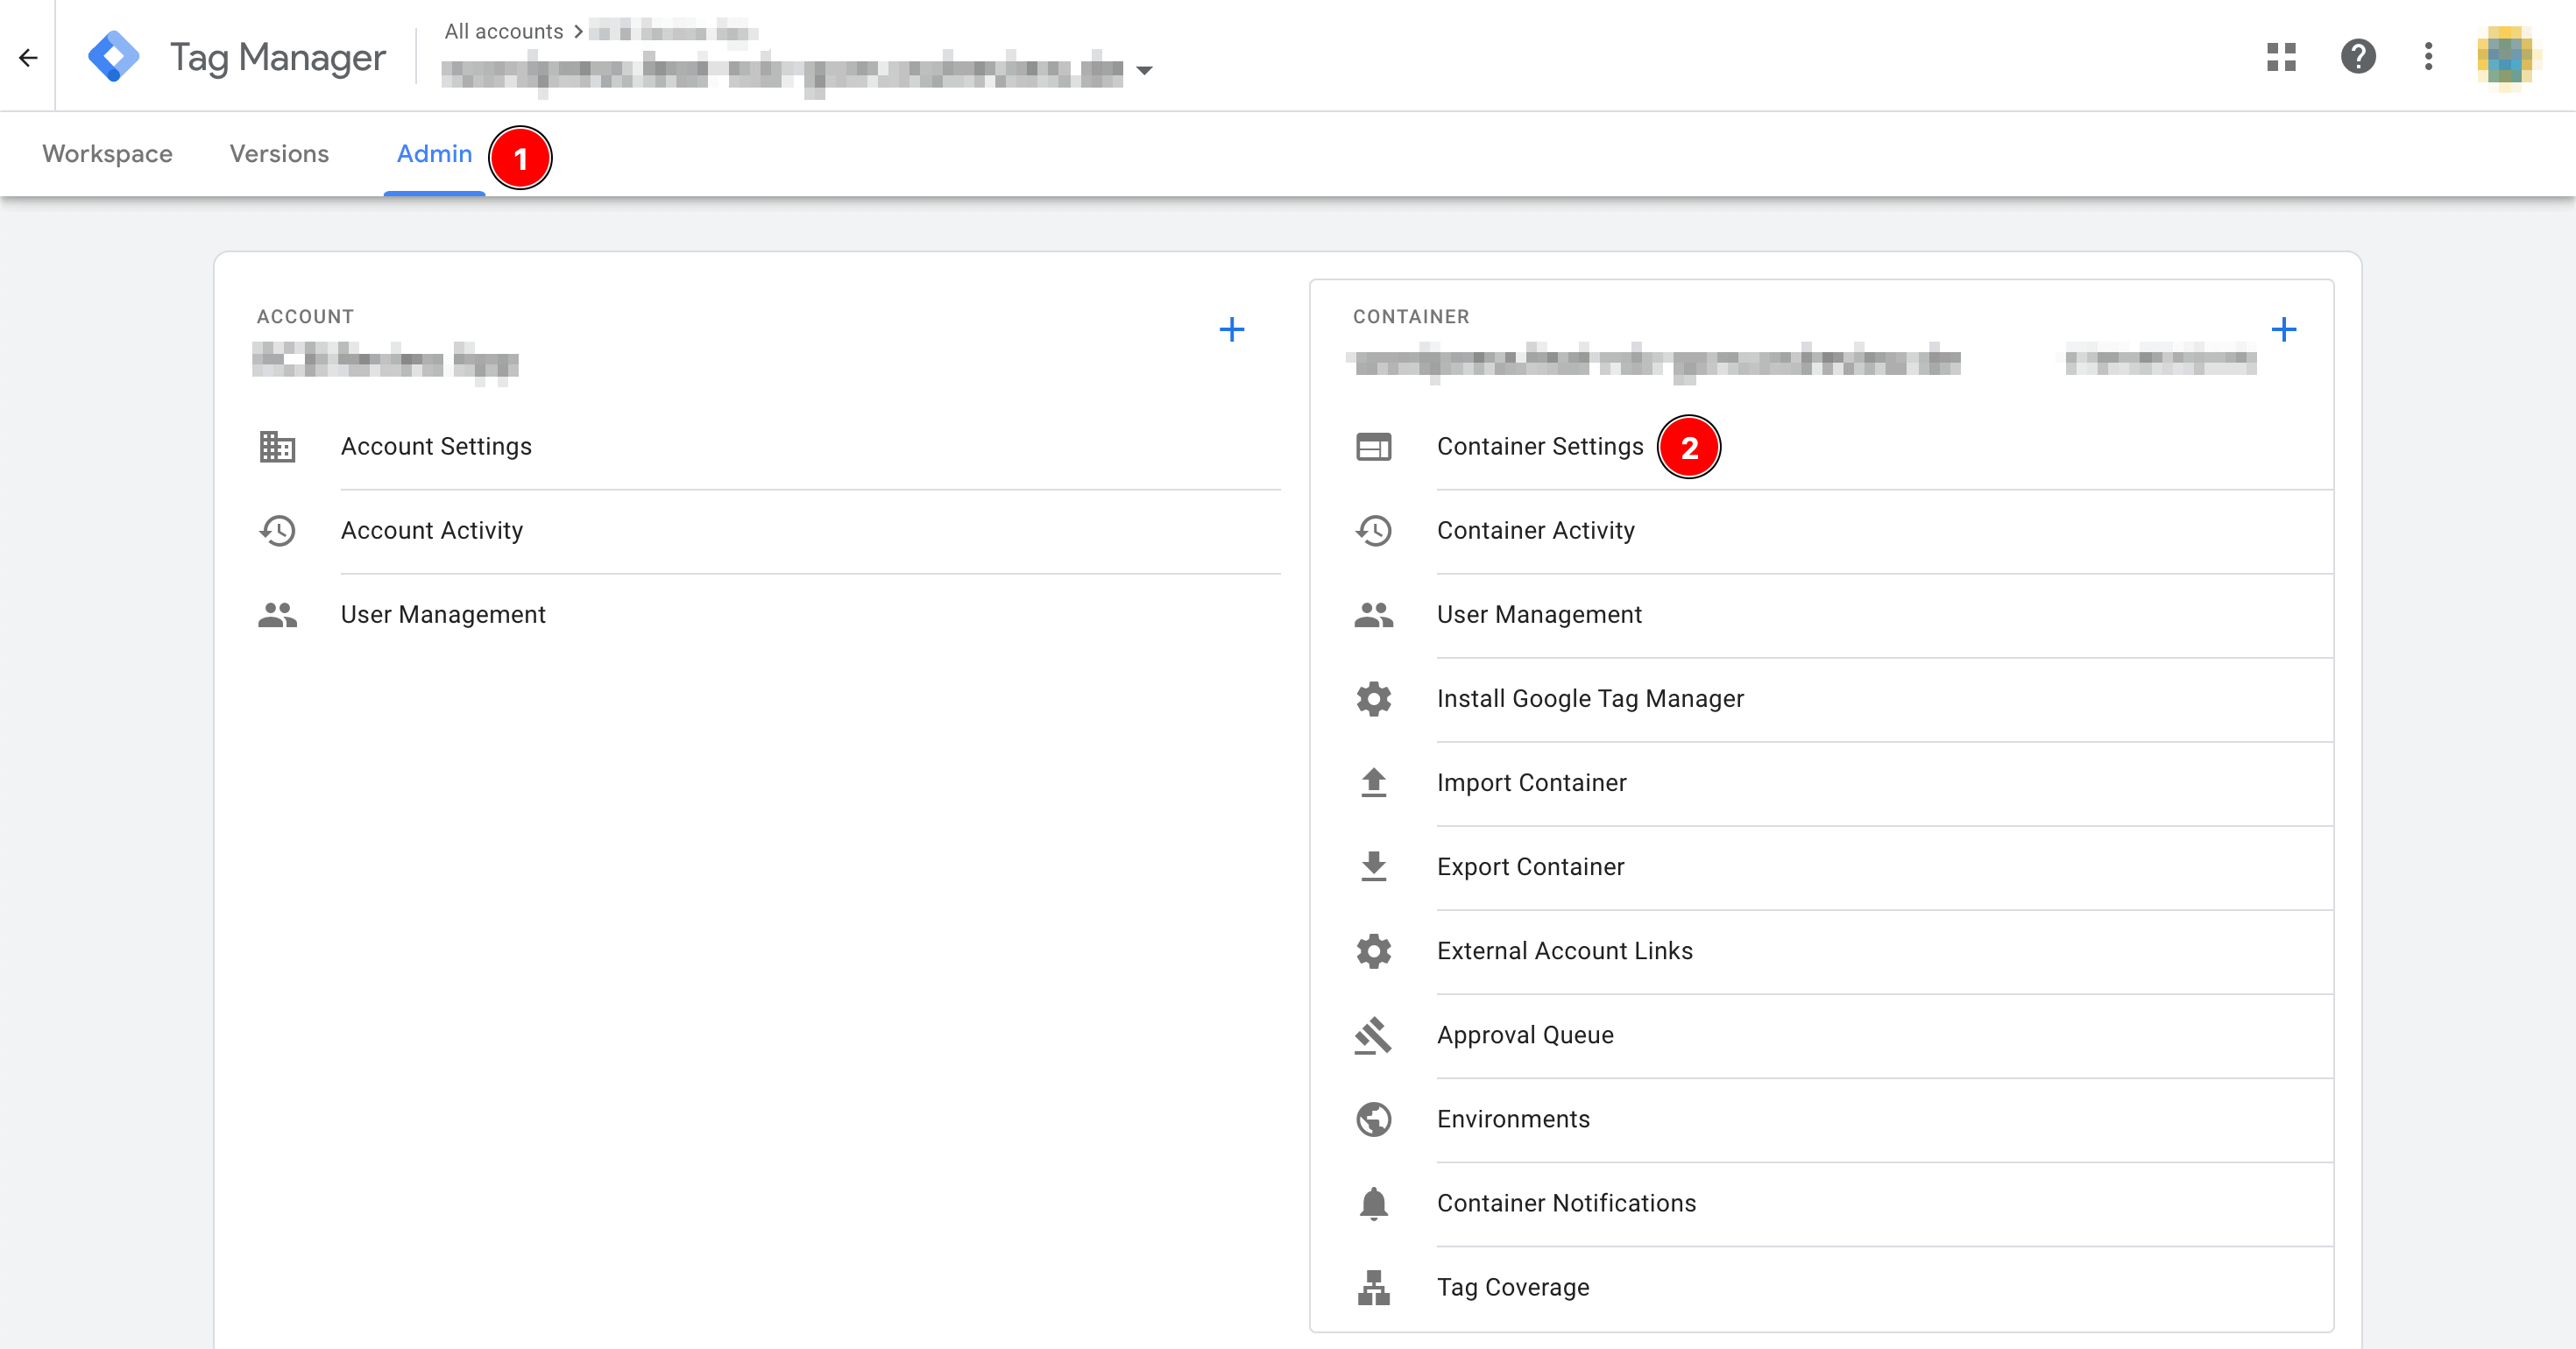
- Open the accounts overview in Google Tag Manager and open your Google Tag Manager container.
- Navigate to Admin > Container Settings.
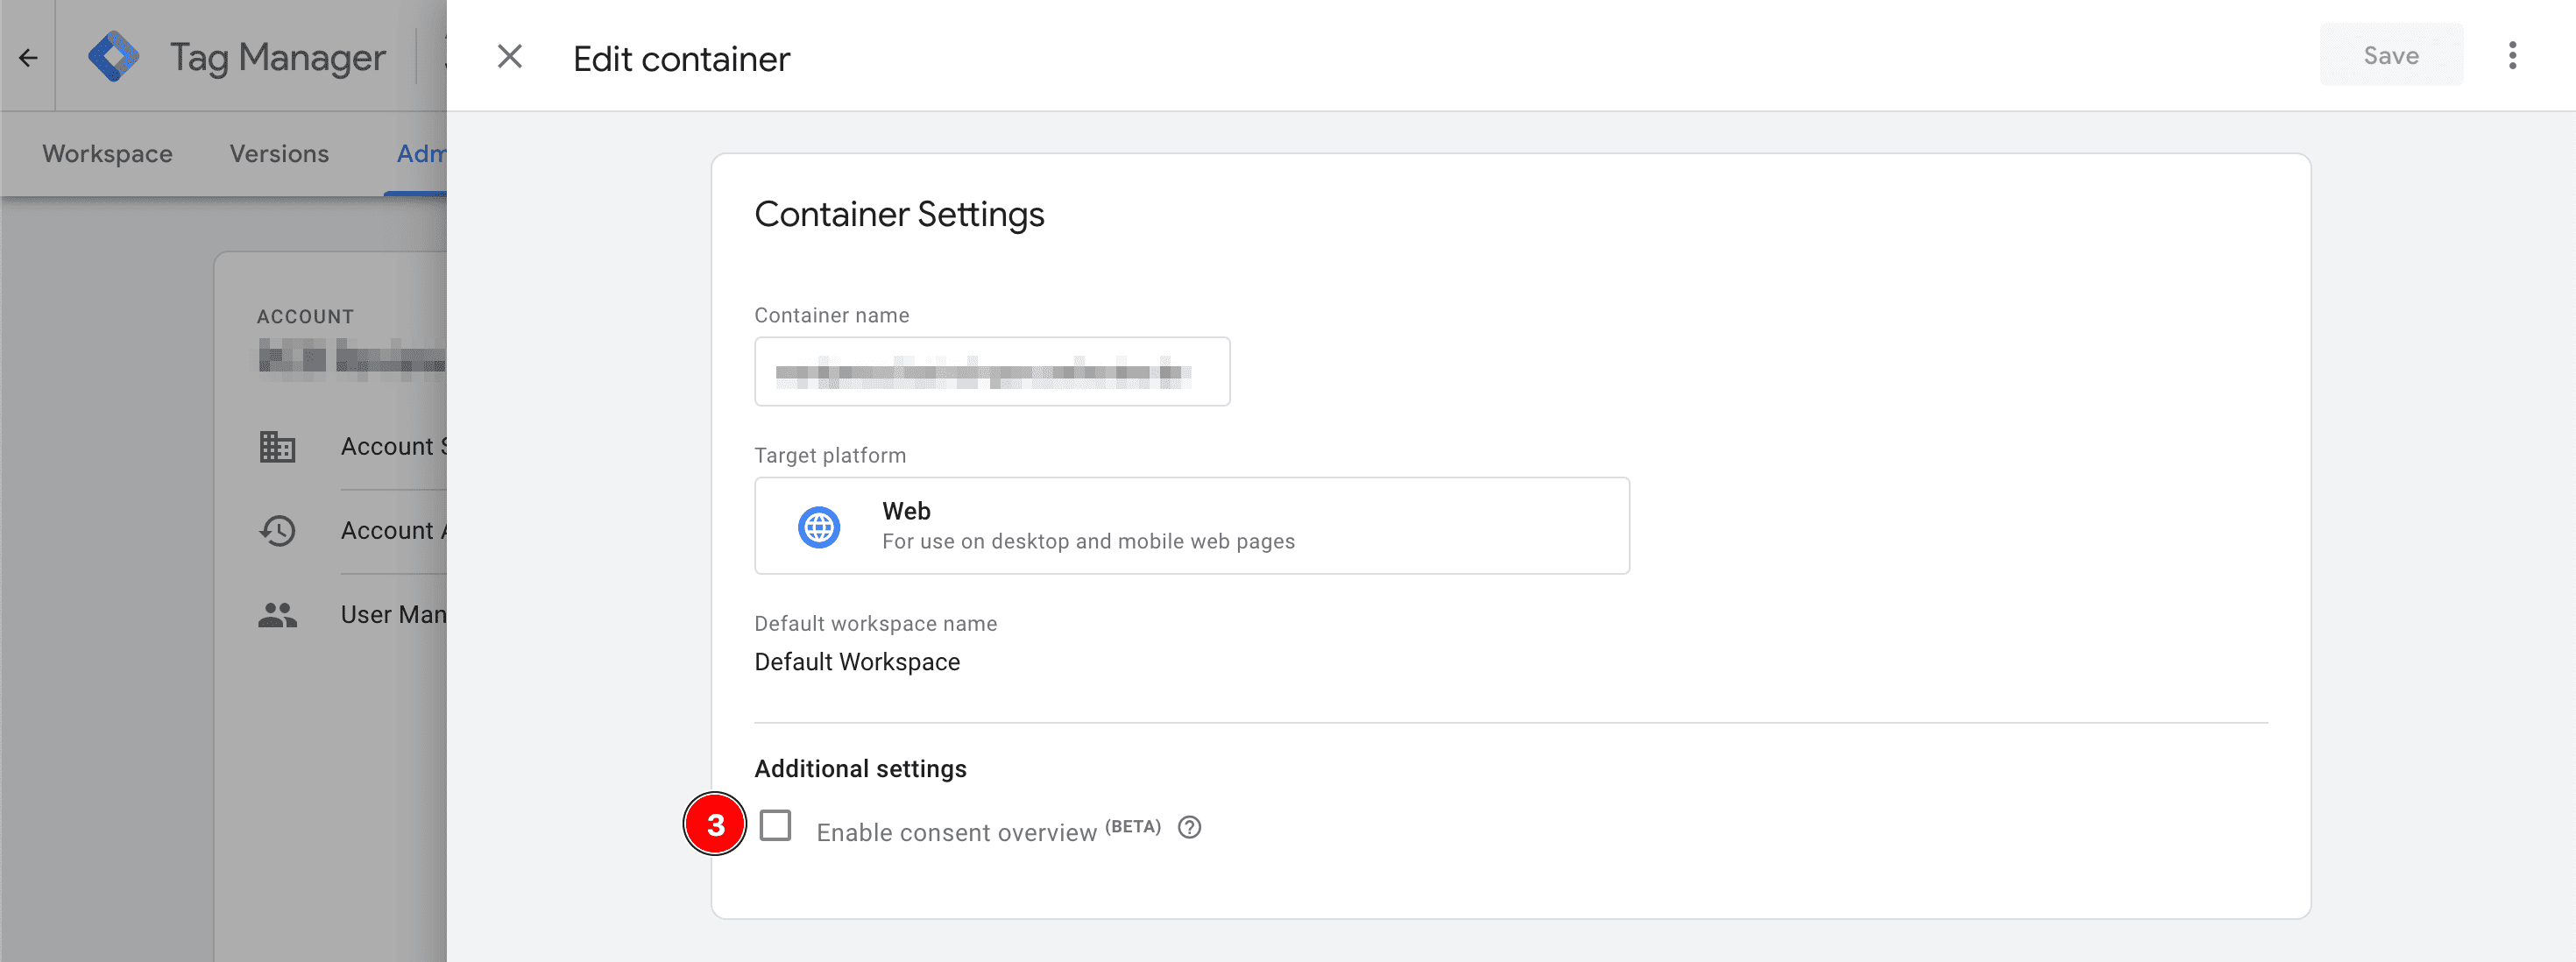
- In the opened dialog, activate the option “Enable consent overview”.
Google Consent Mode is activated, Google Tag Manager is integrated into your website and legal bases such as consent are transferred. This means that we have fulfilled all the pre-requirements for firing tags only after consent has been given.
In the following, we will explain what you need to configure in Google Tag Manager for using Google Analytics, which we would like to load in a tag in Google Tag Manager. This procedure works with any other tag (also any other kind of tag, like event tracking or conversion linking) and trigger that you can create in Google Tag Manager.
- In your WordPress backend, go to Services (Cookies) > Add service and create a service for which you want to collect a consent. In the case of Google Analytics, you can use the pre-defined service template.
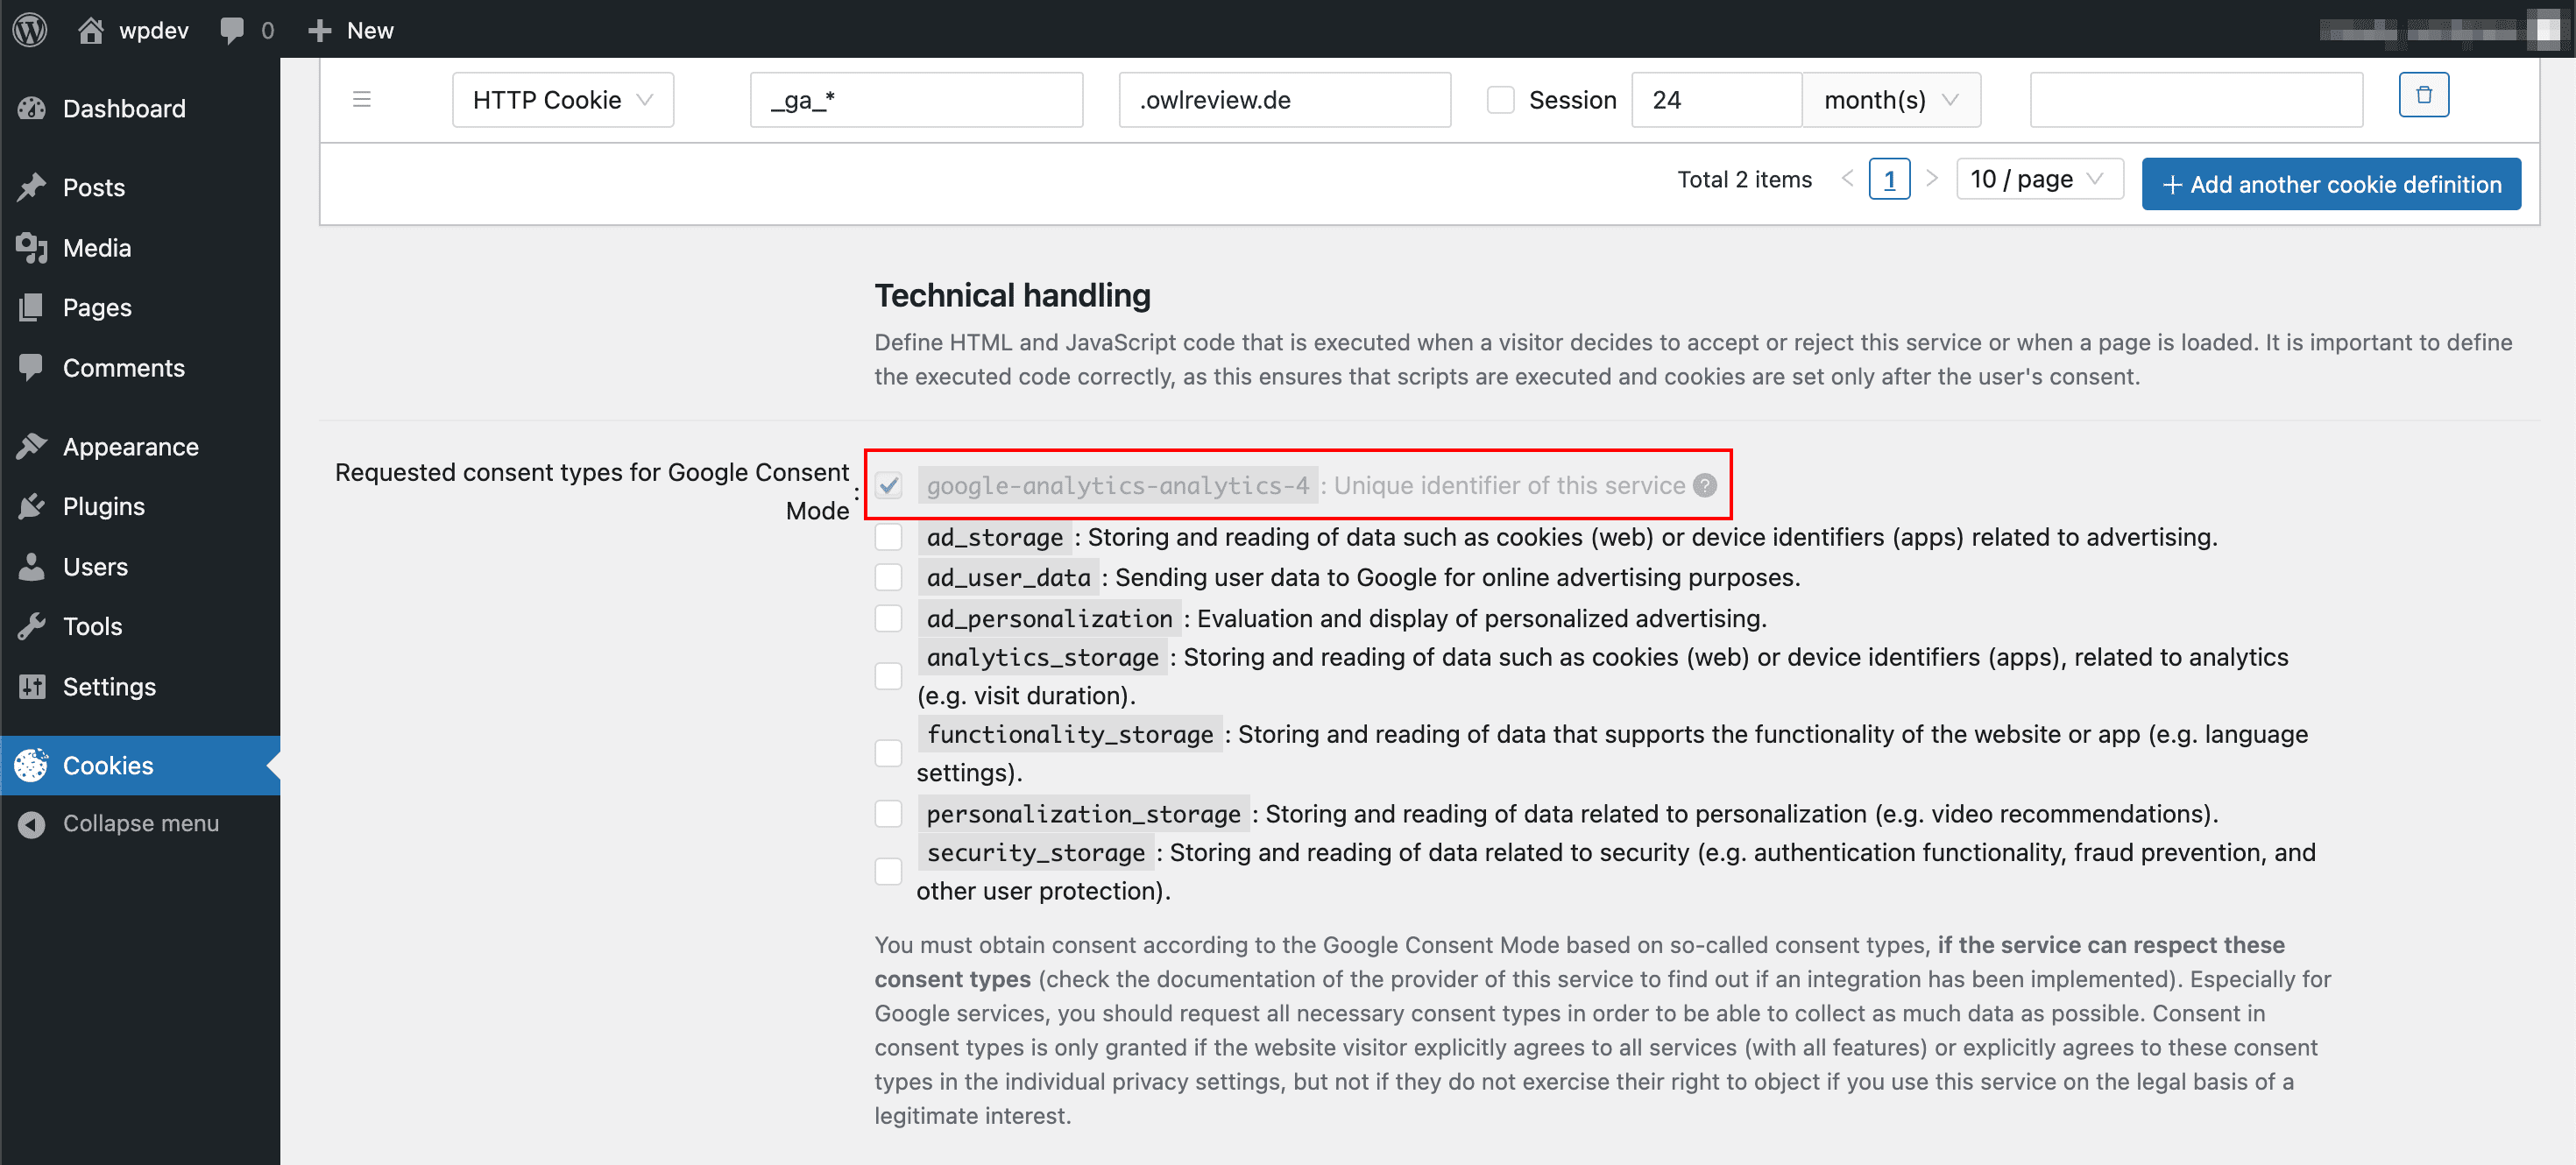
- When creating the service, in the section “Technical handling” you will find a new option “Requested consent types for Google Consent Mode”. In it, you find the unique identifier of this service as an additional consent type. In this example, it is called
google-analytics-analytics-4. Copy this name of the consent type!
- Now, go to your Google Tag Manager container and create a tag and trigger as if you were not using any cookie banner. For Google Analytics, I create a Google Tag, which should get triggered at all pages.
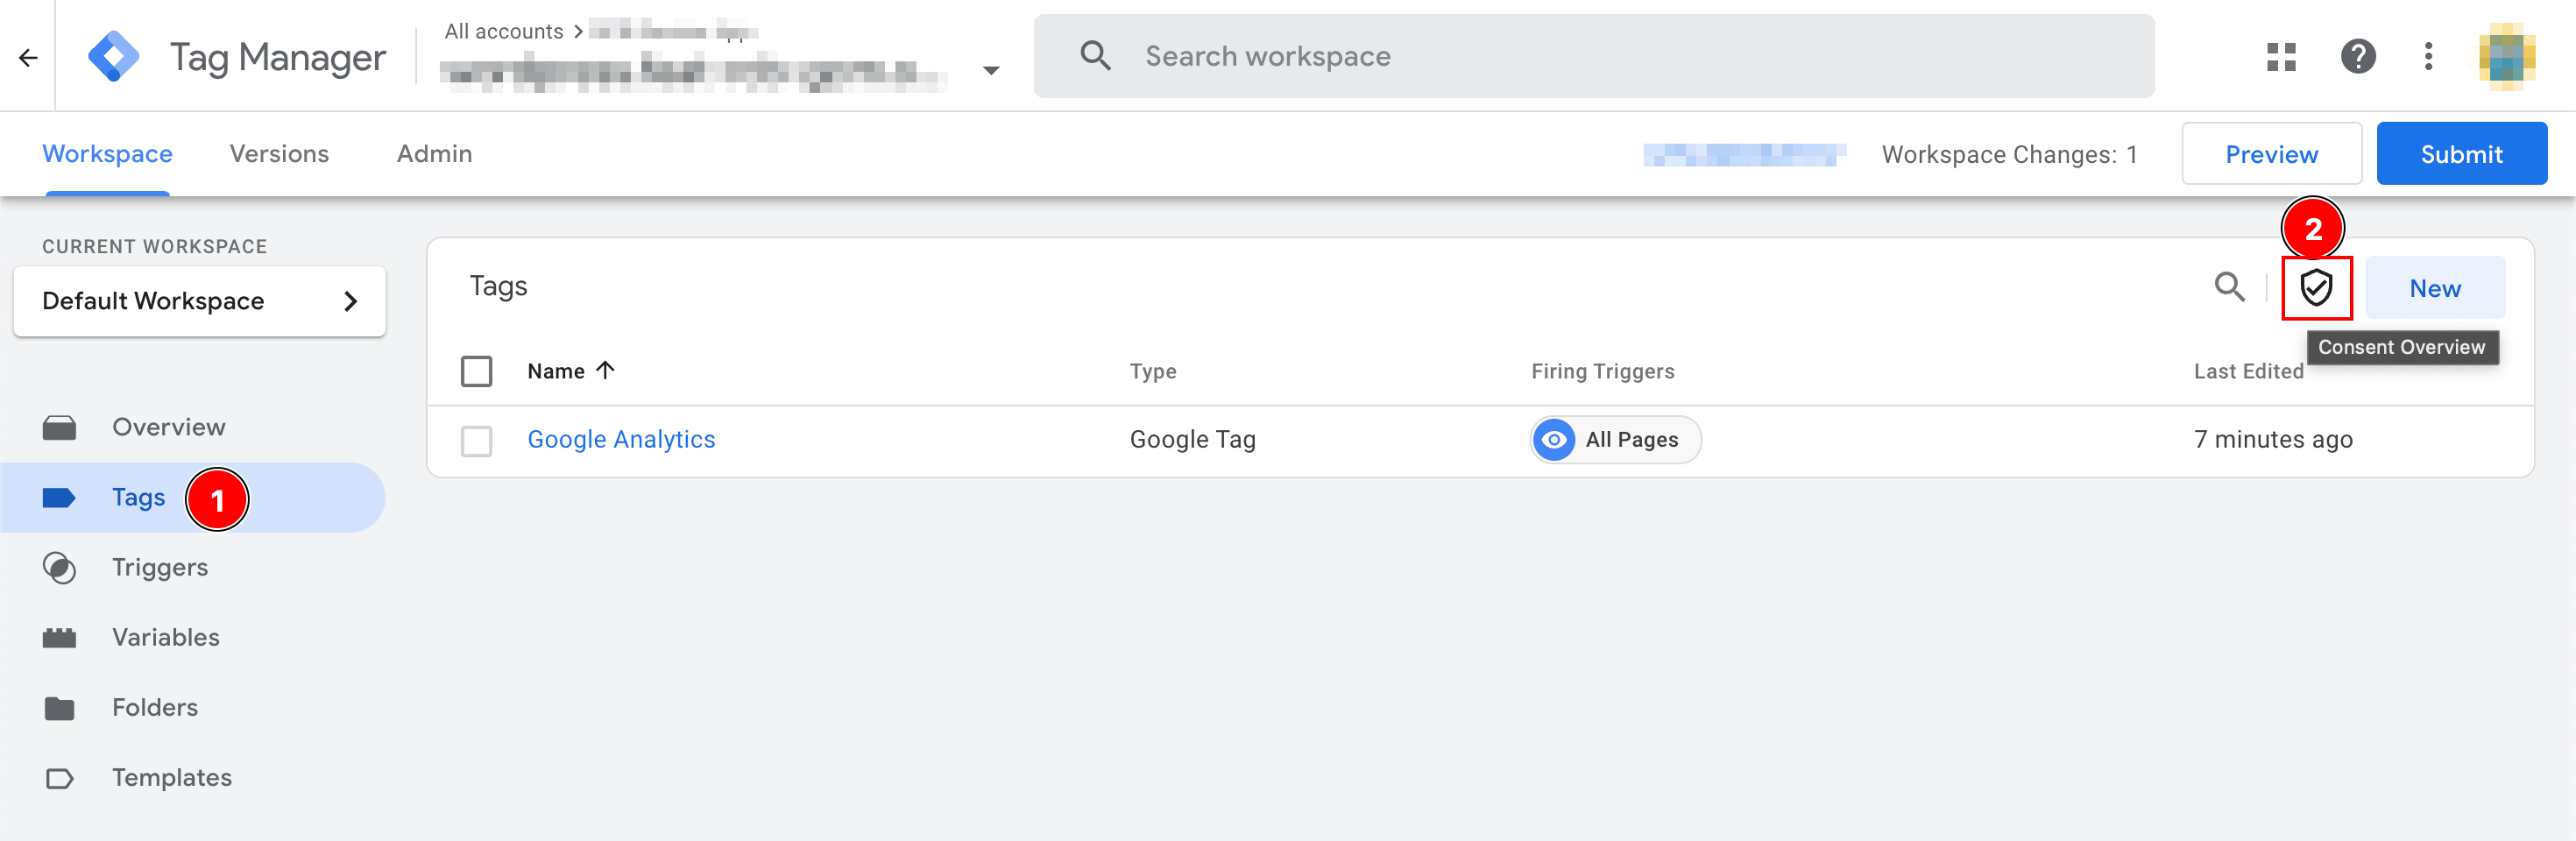
- In the tag overview, you will now find a shield icon to open the “Consent Overview”. You can manage the consent settings of all created tags here.
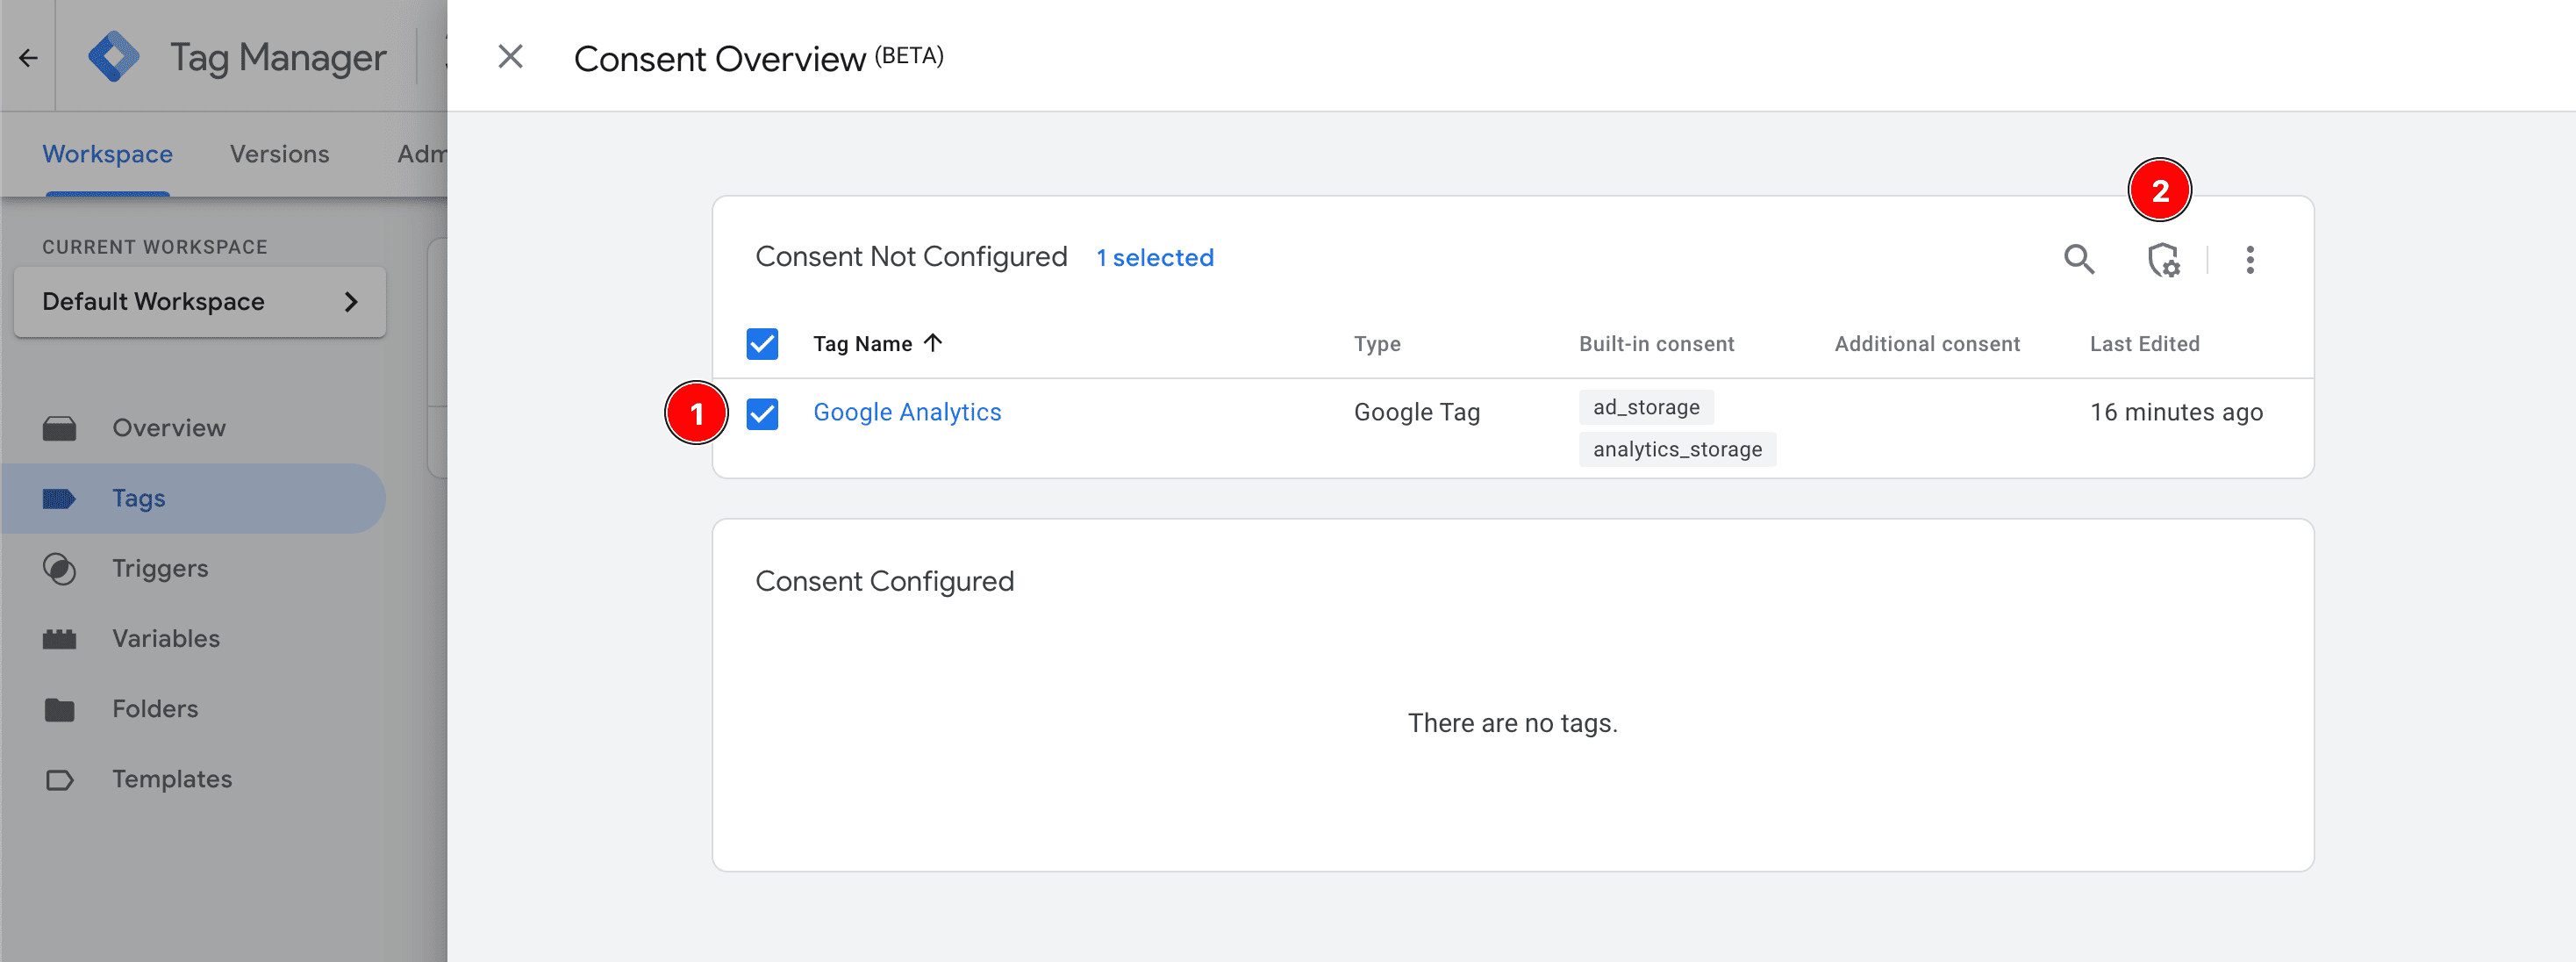
- In the “Consent Overview” dialog, all created tags are grouped into “Consent Not Configured” and “Consent Configured”, depending on whether consent requirements have already been defined. Your Google Analytics tag should be in “Consent Not Configured”. Check the box next to it and then click on the shield with the gear icon at the top right of the table to configure the consent settings. You can also select several tags at the same time to change the consent settings for all selected tags in one step.
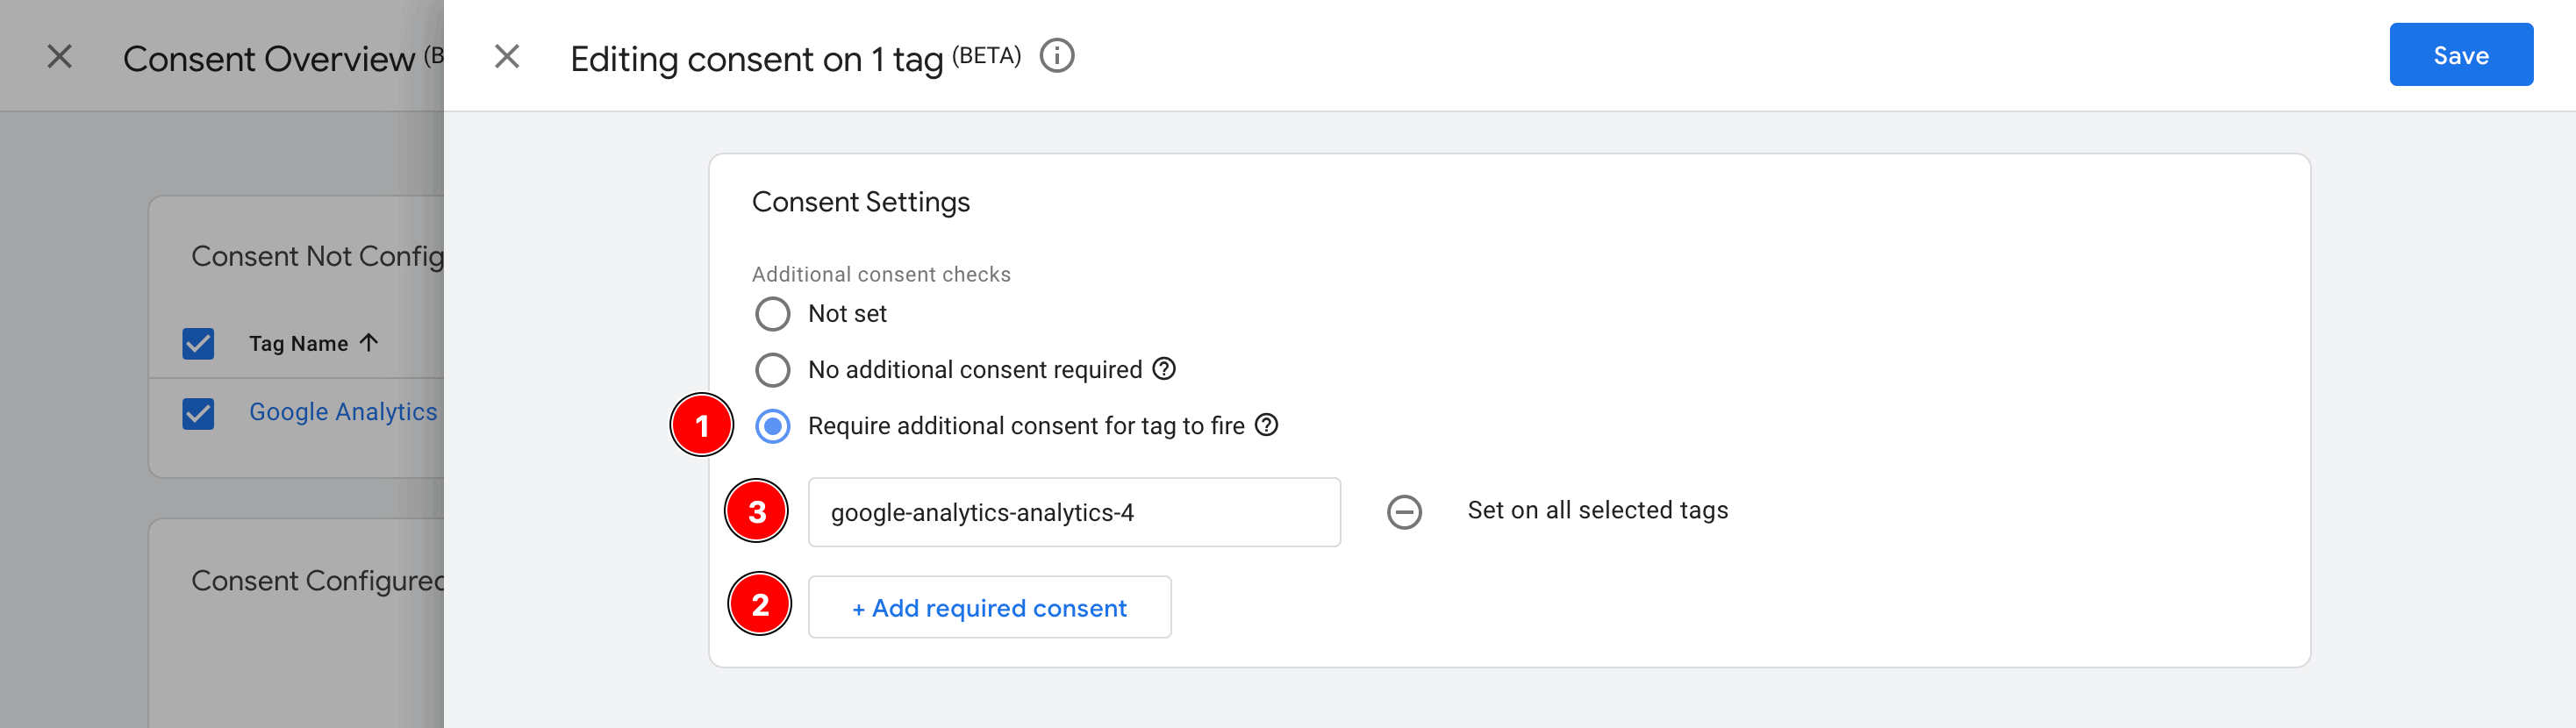
- Now that we have arrived in the “Consent Settings”, we need to configure when the tag is fired. In this case, “when” means for which service there is a legal basis (consent or legitimate interest). Google calls the permission to load a service “additional consent”. Consent for a purpose after Google Consent Mode, which is primarily required for Google services, is considered as “normal” consent. Therefore, you must select the option “Require additional consent for tag to fire” at this point and create a field by clicking on “+ Add required consent” and inserting the name of the additional consent type copied in step 2. Afterwards, save the setting!
We have configured that the Google Analytics tag is only fired if there is a legal basis (consent or legitimate interest) for loading the service with the unique identifier google-analytics-analytics-4.
For Google Services in particular, please note that you should obtain consent for “normal” consent types (purposes) in your cookie banner. We have explained how to configure Google Consent Mode in this regard in a separate article.
In the previous section, you learned how to fire a tag in Google Tag Manager only if you have consent to do so. To check whether the configuration is working correctly, let’s take a look at how you can check the configuration on your website.
We will continue our example that Google Analytics should be loaded on every subpage of the website if there is a legal basis for this.
- Navigate back to the overview of all tags in your Google Tag Manager container. At the top right, click on “Preview” to open Google Tag Assist and preview your website.
- Now consent to all services in the cookie banner on your website so that Google Tag Manager is also loaded and Google Tag Assist can connect to the preview window.
- In the Google Tag Assistant, you can see the events on the left-hand side. Here you should see two “Consent” events. The first transmits default settings before the cookie banner is displayed or before the consents already given have been read out (“On-page Default”). The second “Consent” event transmits the selection of the website visitor in the cookie banner (“On-page Update”). Click on the second “Consent” event and then switch to the “Consent” tab.
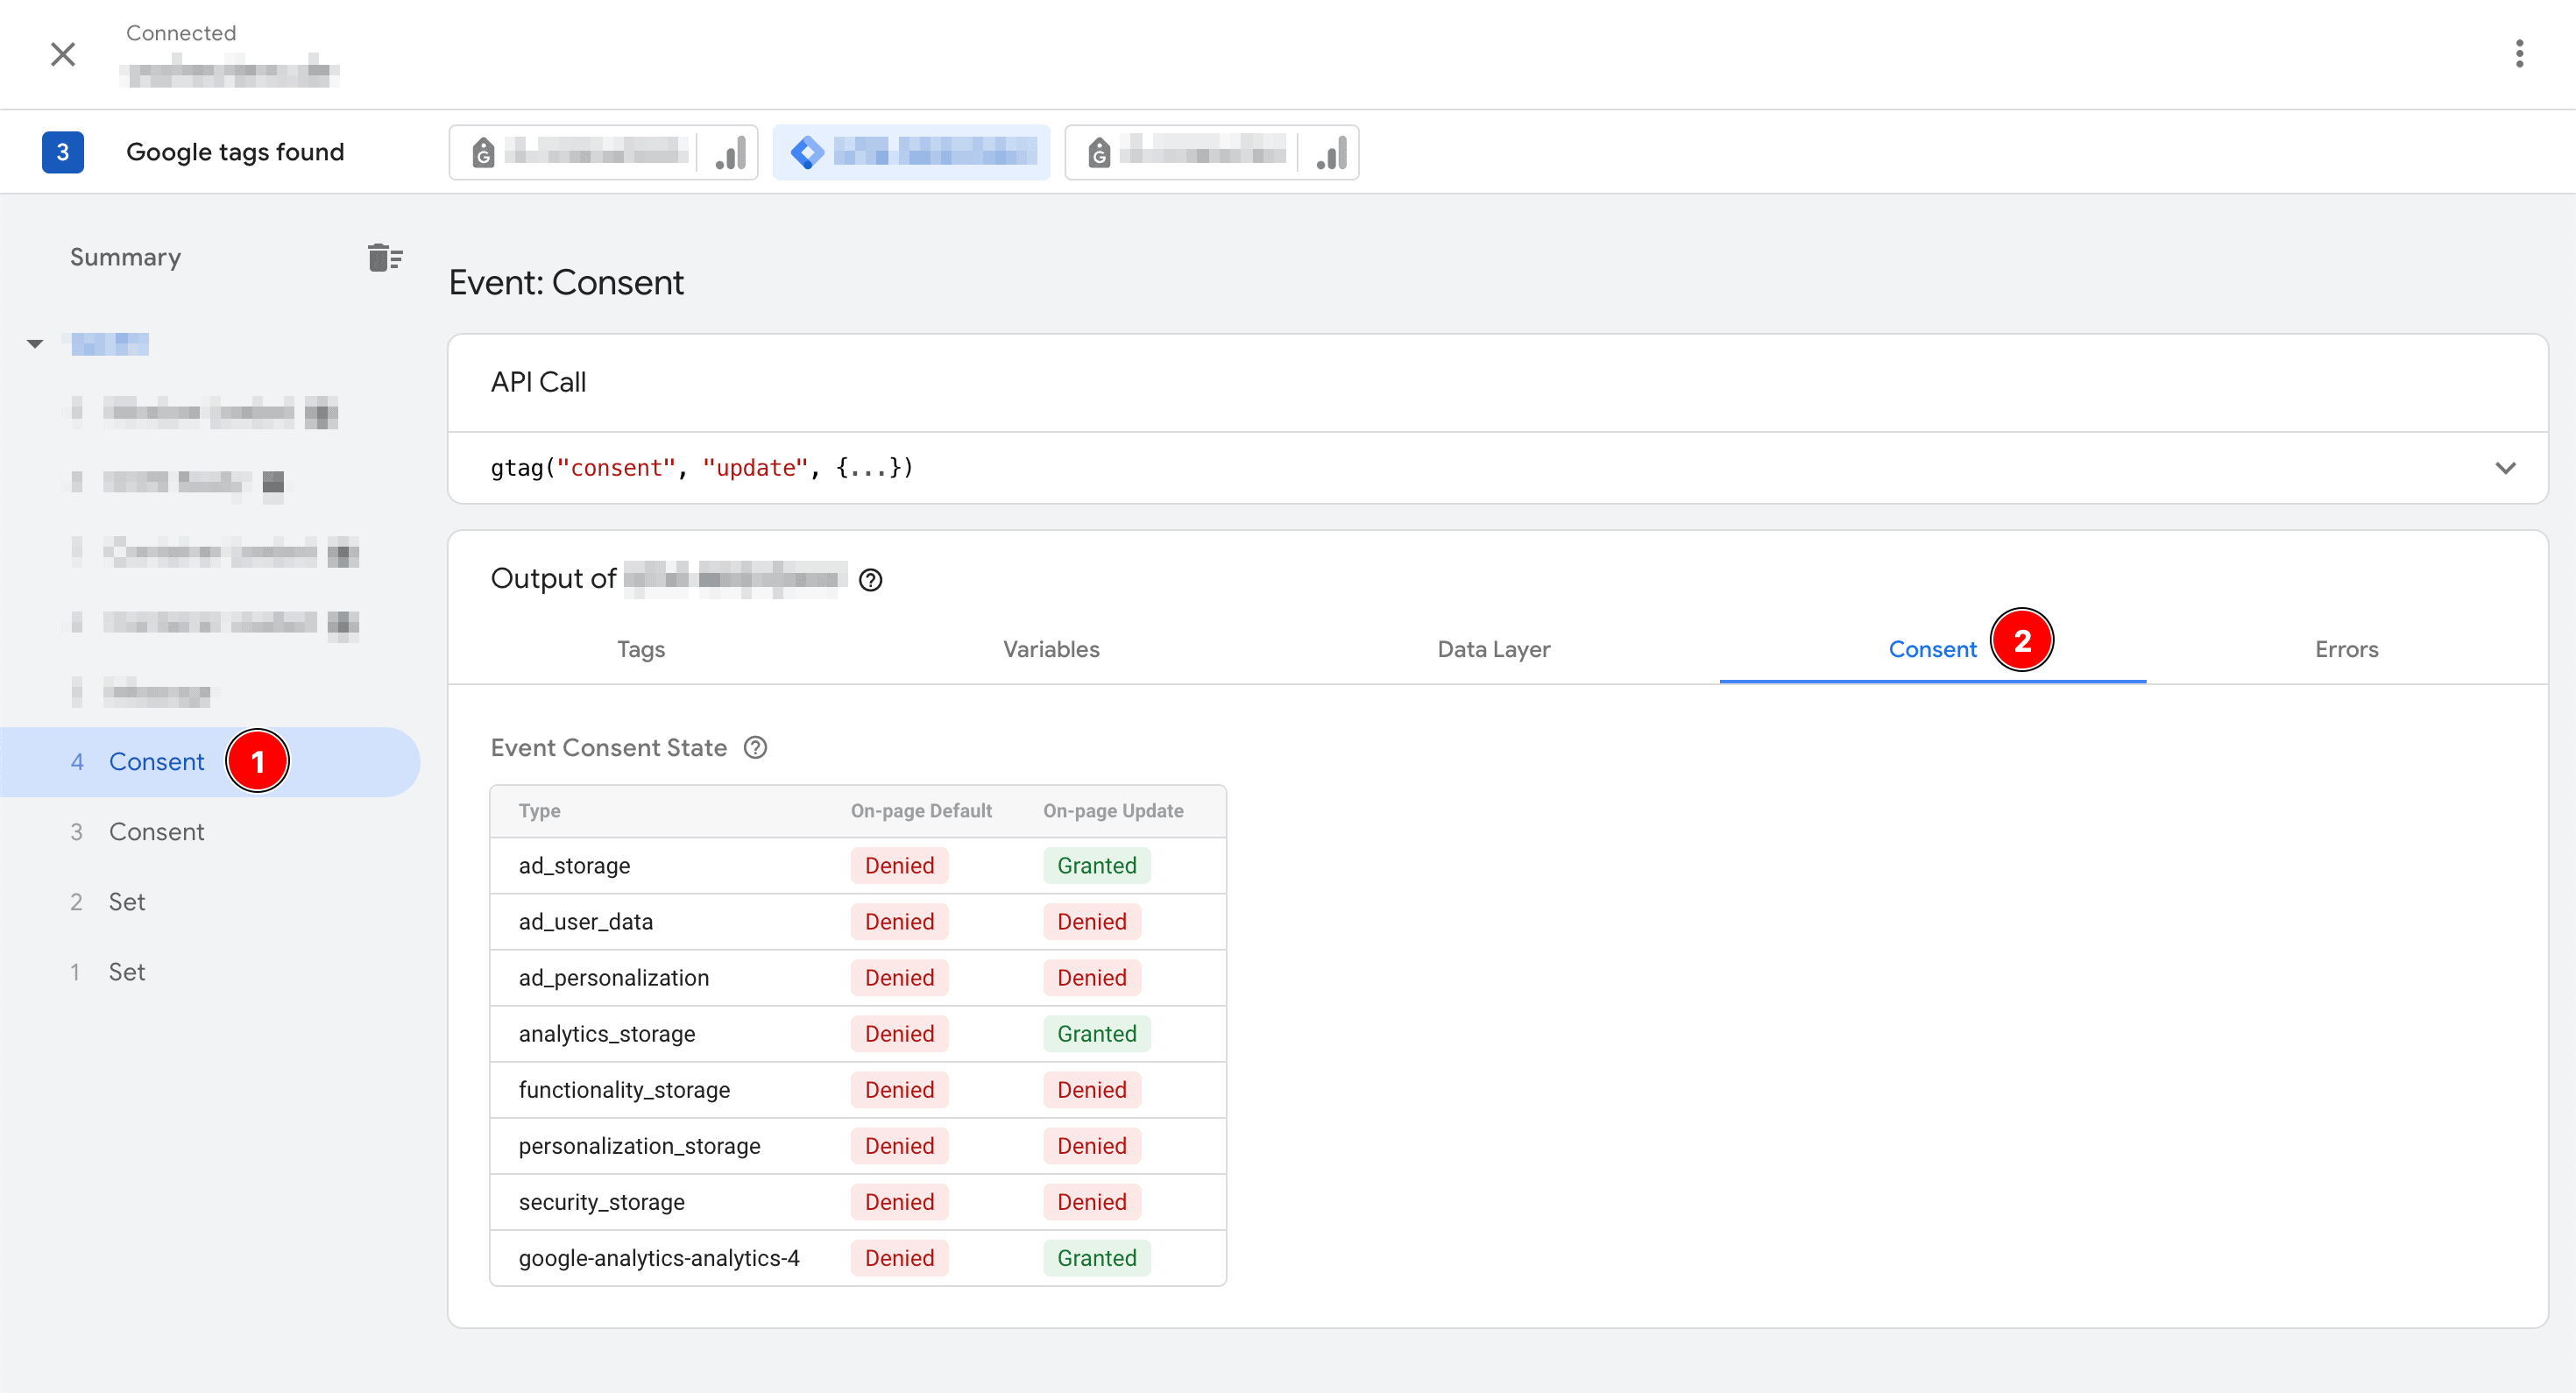
- In the “Consent” tab, you can see in green with “Granted” for which consent types there is a permission (consent or legitimate interest that has not been objected to). In red with “Denied”, on the other hand, you will see if there is no permission for a consent type. In our example, we have consented to all services. This means that we have also consented to the use of Google Analytics. Consequently, “Granted” is indicated for the consent type
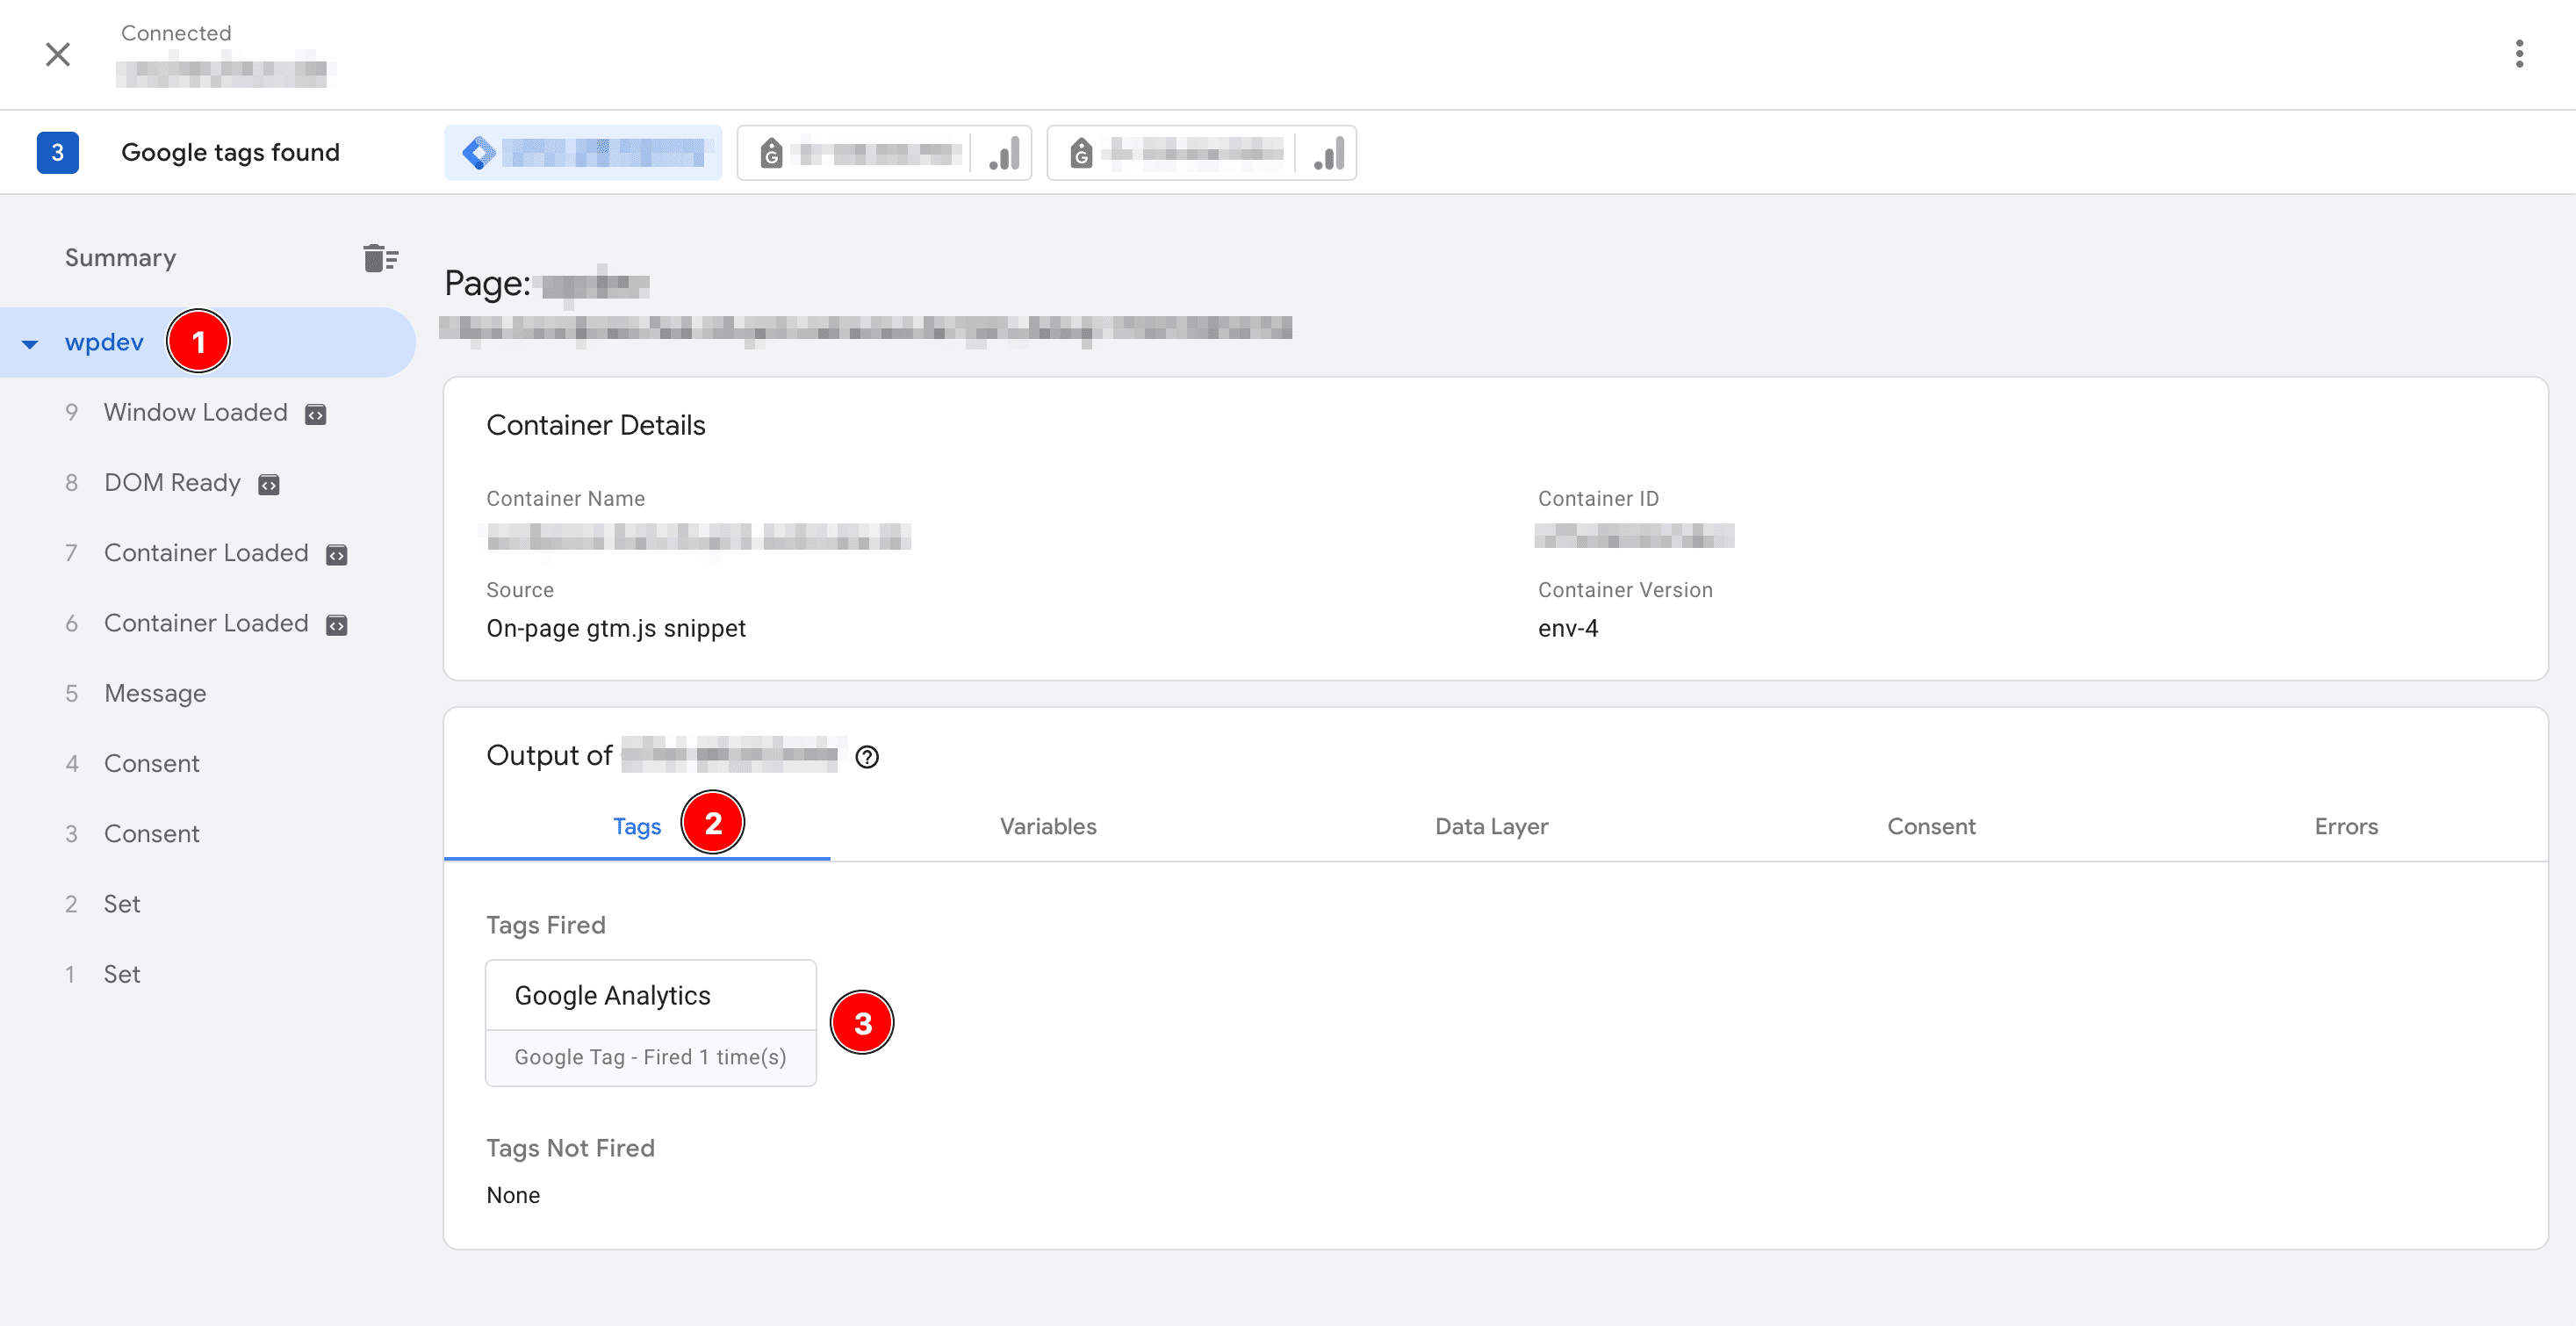
google-analytics-analytics-4. - If you now switch to the view of all events of the page view (name of the browser tab in the left sidebar) and switch to the “Tags” tab, you should see that the Google Analytics tag has been fired.
- Finally, you can cross-check by going through these steps again, but consenting to all services except of Google Analytics in the cookie banner. In this case, the consent type
google-analytics-analytics-4should be “Denied” and the Google Analytics tag should not have been fired.
With the explained process, you can fire any tag in your Google Tag Manager only if consent or a legitimate interest has been obtained via your cookie banner on your WordPress website. After configuration, you can also check whether the configuration works as expected.