Real Cookie Banner offers a deep integration for Google Tag Manager and Matomo Tag Manager, which loads the respective tag manager only after the consent of the user. This way you are on the safe side and do not transfer any personal data via the tag manager script to e.g. Google without consent, but you can react to consents via an event in the tag manager.
In the following article we explain how you can set up your cookie banner with a tag manager. The explanation is done using Google Tag Manager. However, it works just as well with Matomo Tag Manager, since this tool has implemented the same concepts as Google Tag Manager.
Video tutorial
Enable Tag Manager Mode
First, we need to enable the Tag Manager Mode in Real Cookie Banner to see all the additional features for using Google Tag Manager or Matomo Tag Manager. To accomplish this, follow these steps:
- In your WordPress backend, go to the Cookies tab in the left sidebar.
- In the tab Settings > General you will find the option “Load services after consent via“. You should specify here which tag manager you want to use to respond to consent.
This will activate the additional options in Real Cookie Banner, but the tag manager you have chosen will not be integrated into your website yet.
Embed Google Tag Manager
You need to embed Google Tag Manager or another tag manager in your website. If you have already done so, please remove Google Tag Manager again, e.g. from the custom JavaScript code of your website because you have to include it via Real Cookie Banner. This is mandatory because only this way we can send events to the Tag Manager at the right time.
By following the steps below, you can add Google Tag Manager to your website:
- Go to Services (Cookies) > Add service and select Google Tag Manager from the templates.
- In the service template, please add all the information you need or want to add. Note that the option “Opt-in script below loads Google Tag Manager” is already active. This must remain active so that Google Tag Manager is loaded at the right time.
Consents via Google Tag Manager events
We have now completed all the preparations to use Google Tag Manager together with the consent obtained using Real Cookie Banner. Now you can set up any cookie (service) and respond to the opt-in as well as opt-out in Google Tag Manager via events for the data layer of the service.
As an example, let’s set up Google Analytics. This should be loaded via Google Tag Manager (if Google Tag Manager itself is allowed to be loaded; otherwise via a fallback script):
- Go to Services (Cookies) > Add service and select Google Analytics from the templates.
- In the section “Technical handling” you will find two new fields under the label “Event names for Google Tag Manager”. Here you can define the event names to which Google Tag Manager should react. In this example, the event
ga-opt-inshould be thrown after the consent (opt-in) andga-opt-outafter the rejection of the cookie (services) or the revocation of consent (opt-out). - Now go to your Google Tag Manager container. You can set up a so-called “Custom Event” trigger under Trigers > New. In the “Trigger Configuration” form you have choose a “Custom Event” to enter the event name defined in the previous step in the “Event name” field. You should create triggers for the two events
ga-opt-inandga-opt-out. - You can create a tag in Google Tag Manger to embed Google Analytics. For triggering, select the opt-in trigger we just set up. If you also want to execute something on an opt-out, you can, of course, create a tag for that as well.
- We now jump back to Real Cookie Banner, where we create the service. In the fields “Code executed on opt-in” and “Code executed on opt-out” can still be HTML and JavaScript that is executed as soon as the consent is given. This can be useful if, for example, if the use of Google Analytics is consented to, but not the use of Google Tag Manager. So Google Analytics could also not be loaded because Google Tag Manager can never be notified about the consent. By using the toggle “Only run this script if the user has not allowed to use Google Tag Manager” you can define that the scripts should only be executed if Google Tag Manager cannot be loaded. The scripts act as a fallback to be able to integrate Google Analytics without Google Tag Manager in case of doubt.
Consents via Google Tag Manager data layer variables
There may be cases in Google Tag Manager where consent events cannot be listened to. For example, if you want to fire a tag for custom click tracking in Google Analytics only after click on an element of your website. However, this tracking can only be performed if, in addition to the click event, consent to Google Analytics has been given prior to the event.
For cases like this, Real Cookie Banner additionally pushes the status of the consent per service into the Google Tag Manger Data Layer as a realCookieBannerOptInEvents variable. In the following, we assume that you are familiar with the basic concept of the Google Tag Manager Data Layer, as this is the basis of a professional use of Google Tag Manager.
Below, we’ll explain how you can use the variable in the data layer as part of a trigger to check for, for example, a click event and consent at the same time:
- (If not already created) Go to Services (Cookies) > Add service and select Google Analytics from the templates.
- (If not already created) In the section “Technical handling” you will find two new fields under the label “Event names for Google Tag Manager”. Here, you can define the event names to which Google Tag Manager should react. In this example, the event
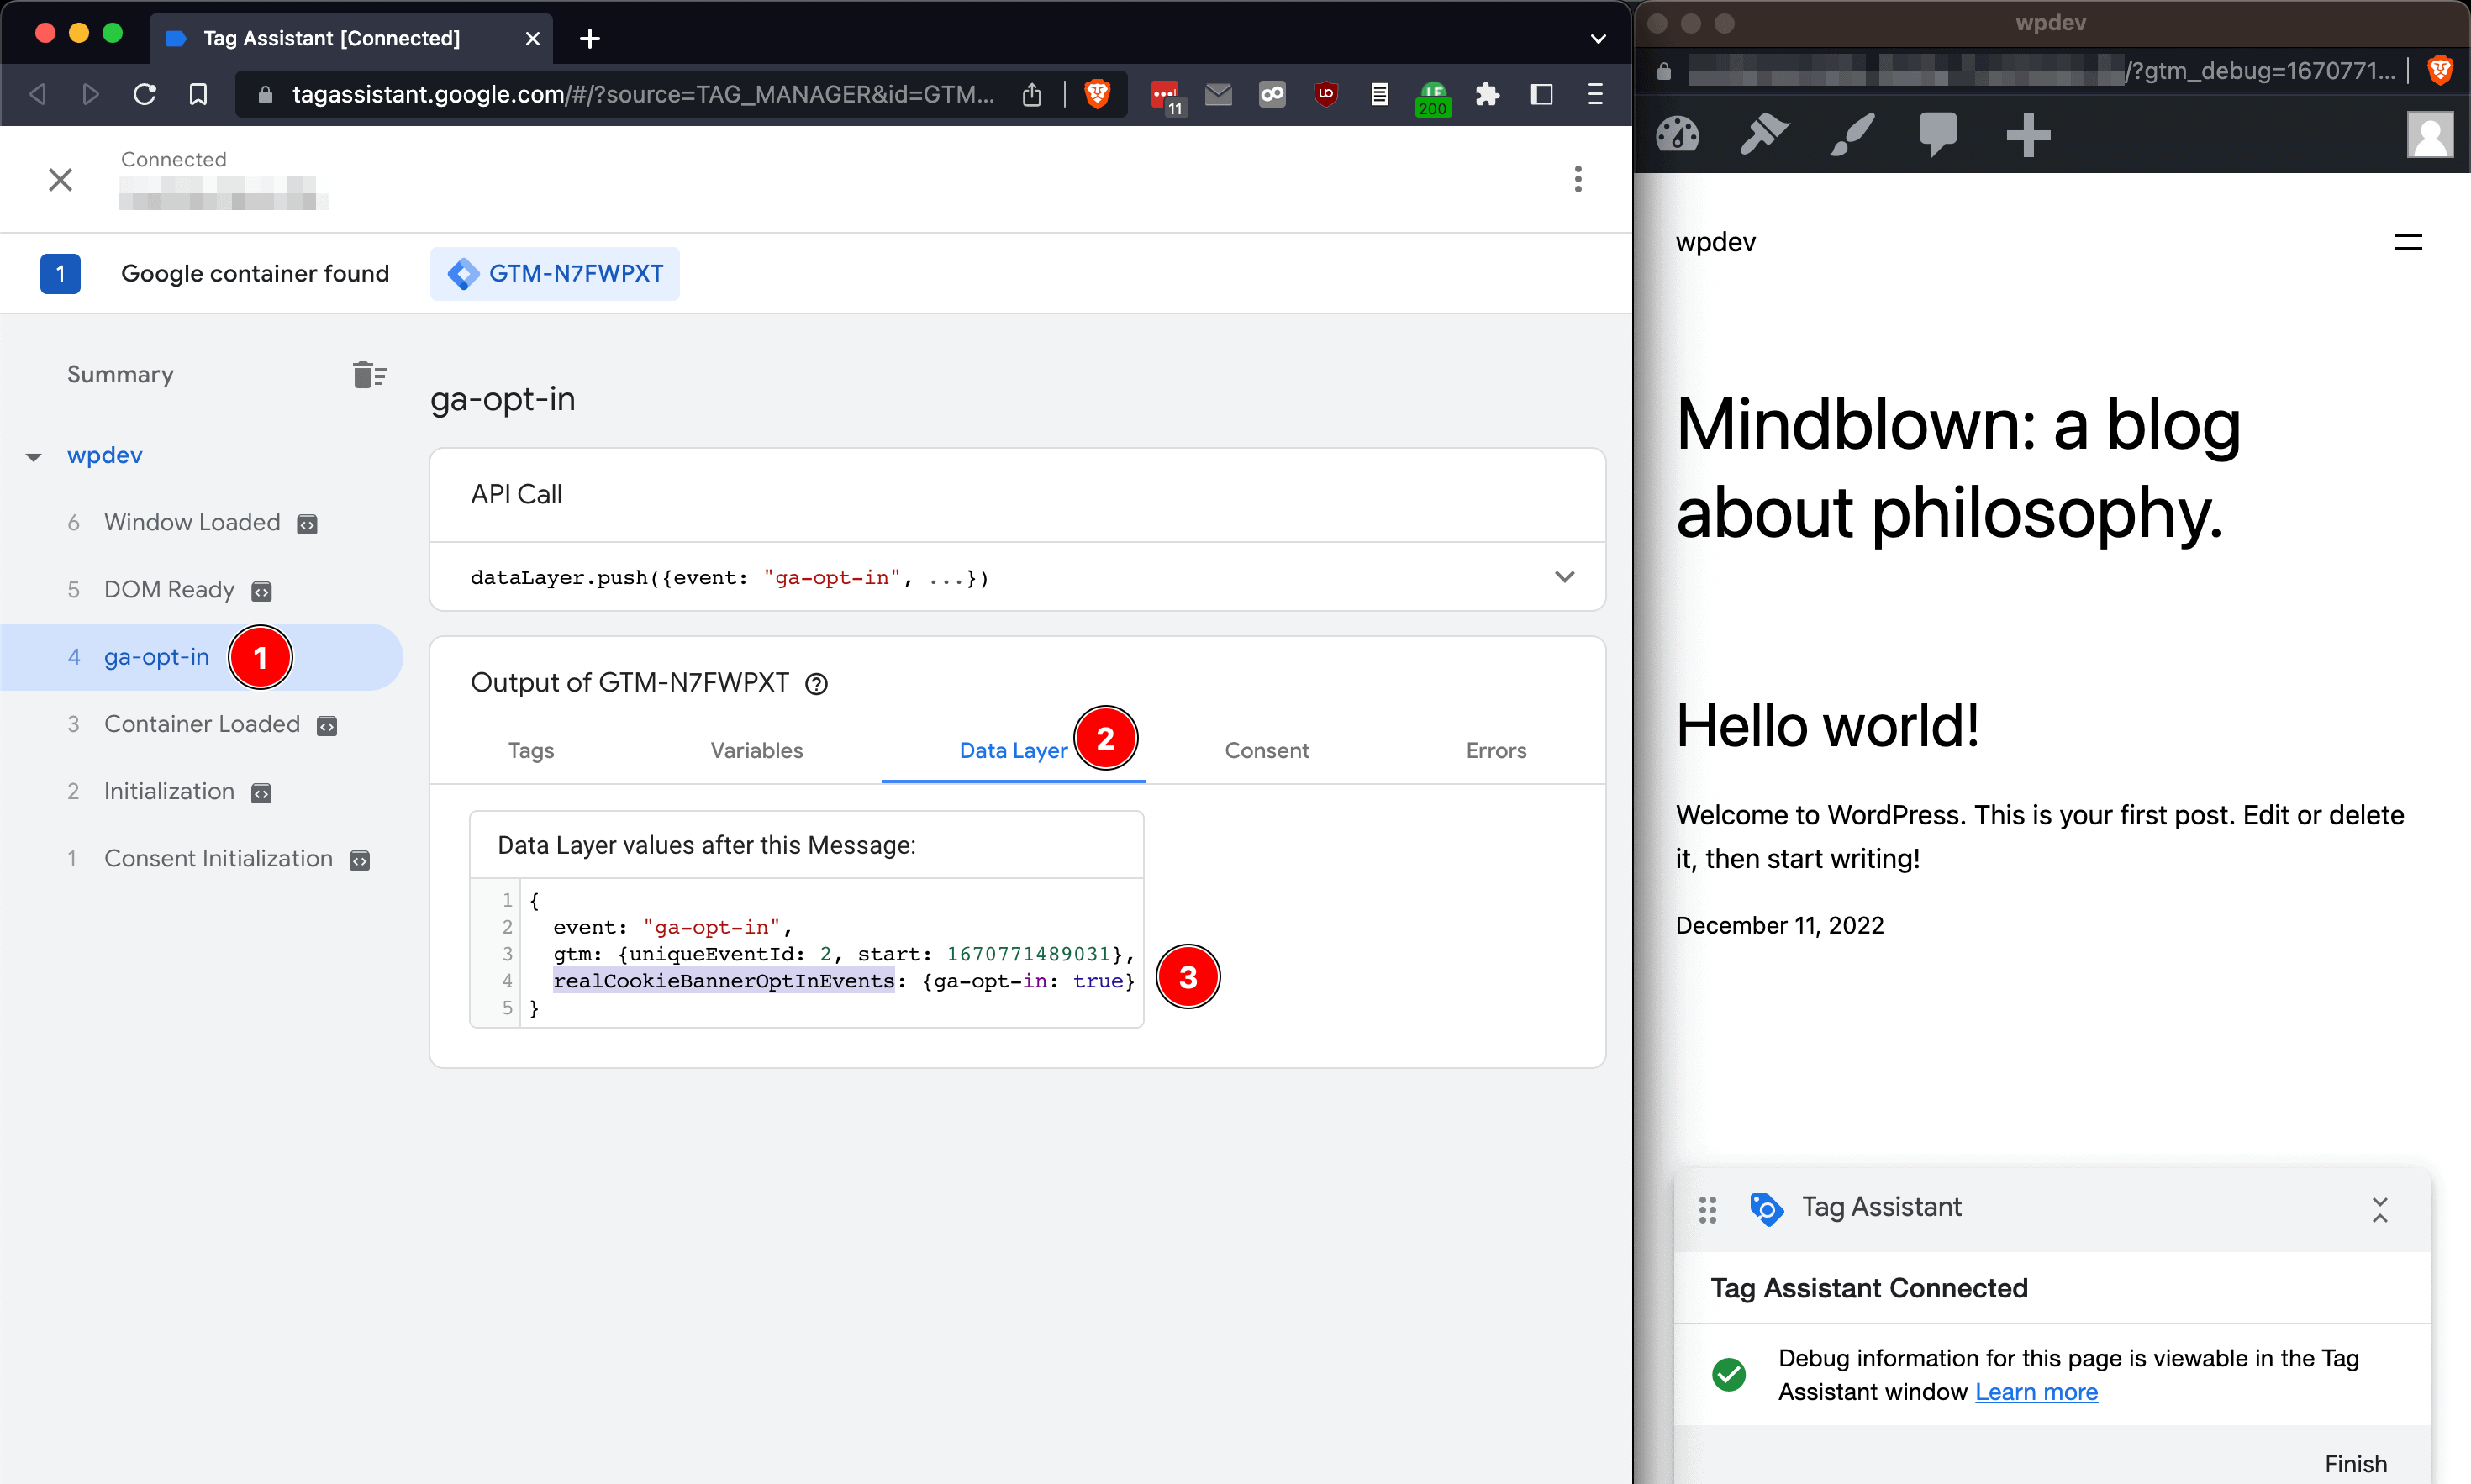
ga-opt-inshould be thrown after the consent (opt-in) andga-opt-outafter the rejection of the cookie (services) or the revocation of consent (opt-out). - Now, we can check whether the variable in the Google Tag Manager data layer get set correctly. Open the Google Tag Manager Tag Assistant to for the front page of your website. At your website, in the cookie banner, you give consent to Google Analytics. Afterwards, you should see in the Tag Assistant the event
ga-opt-in(in the following screenshot, event no. 4; marked with 1). In the tab “Data Layer” (marked with 2) you should see that the variablerealCookieBannerOptInEventswith the propertyga-opt-ingot pushed into the data layer (marked with 3). In any further event (in the screenshot no. 5DOM Readyand 6Window Loadedare fired) the data variable will be accessible.
- To use the variable, go to the “Variables” tab in Google Tag Manager Workspace and create a new “User-Defined Variable”.

- You can name the variable in Google Tag Manager as you like. We name it “ga-opt-in” (marked as 1) below to use the same name everywhere. We select “Data Layer Variable” as the variable type (marked as 2). As “Data Layer Variable Name” (marked as 3), according to the Google Tag Manager Data Layer Variable concept, the variable must be specified in dot notation. This means that in our case we have to specify
realCookieBannerOptInEvents.ga-opt-in(generally alwaysrealCookieBannerOptInEvents.{event name}).

The Data Layer variable for consent is now set by Real Cookie Banner and we can use it as a variable in Google Tag Manager. Therefore, it can now be used as a condition for a trigger.
In the following, we will assume from the above example that we want to track a custom event in Google Analytics as soon as an element on the website has been clicked. There is already a tag and trigger for this tracking in your Google Tag Manager, but so far, it does not wait for the consent of the website visitor. The procedure described below will also work for any other type of tag or trigger you are using so far.
- We replace the existing trigger with a new trigger of type “Trigger Group”. In a trigger group, we can have several triggers defined as conditions that must all be fulfilled for the tag to be fired. Consequently, we add the existing trigger “Submit contact form” to the trigger group.
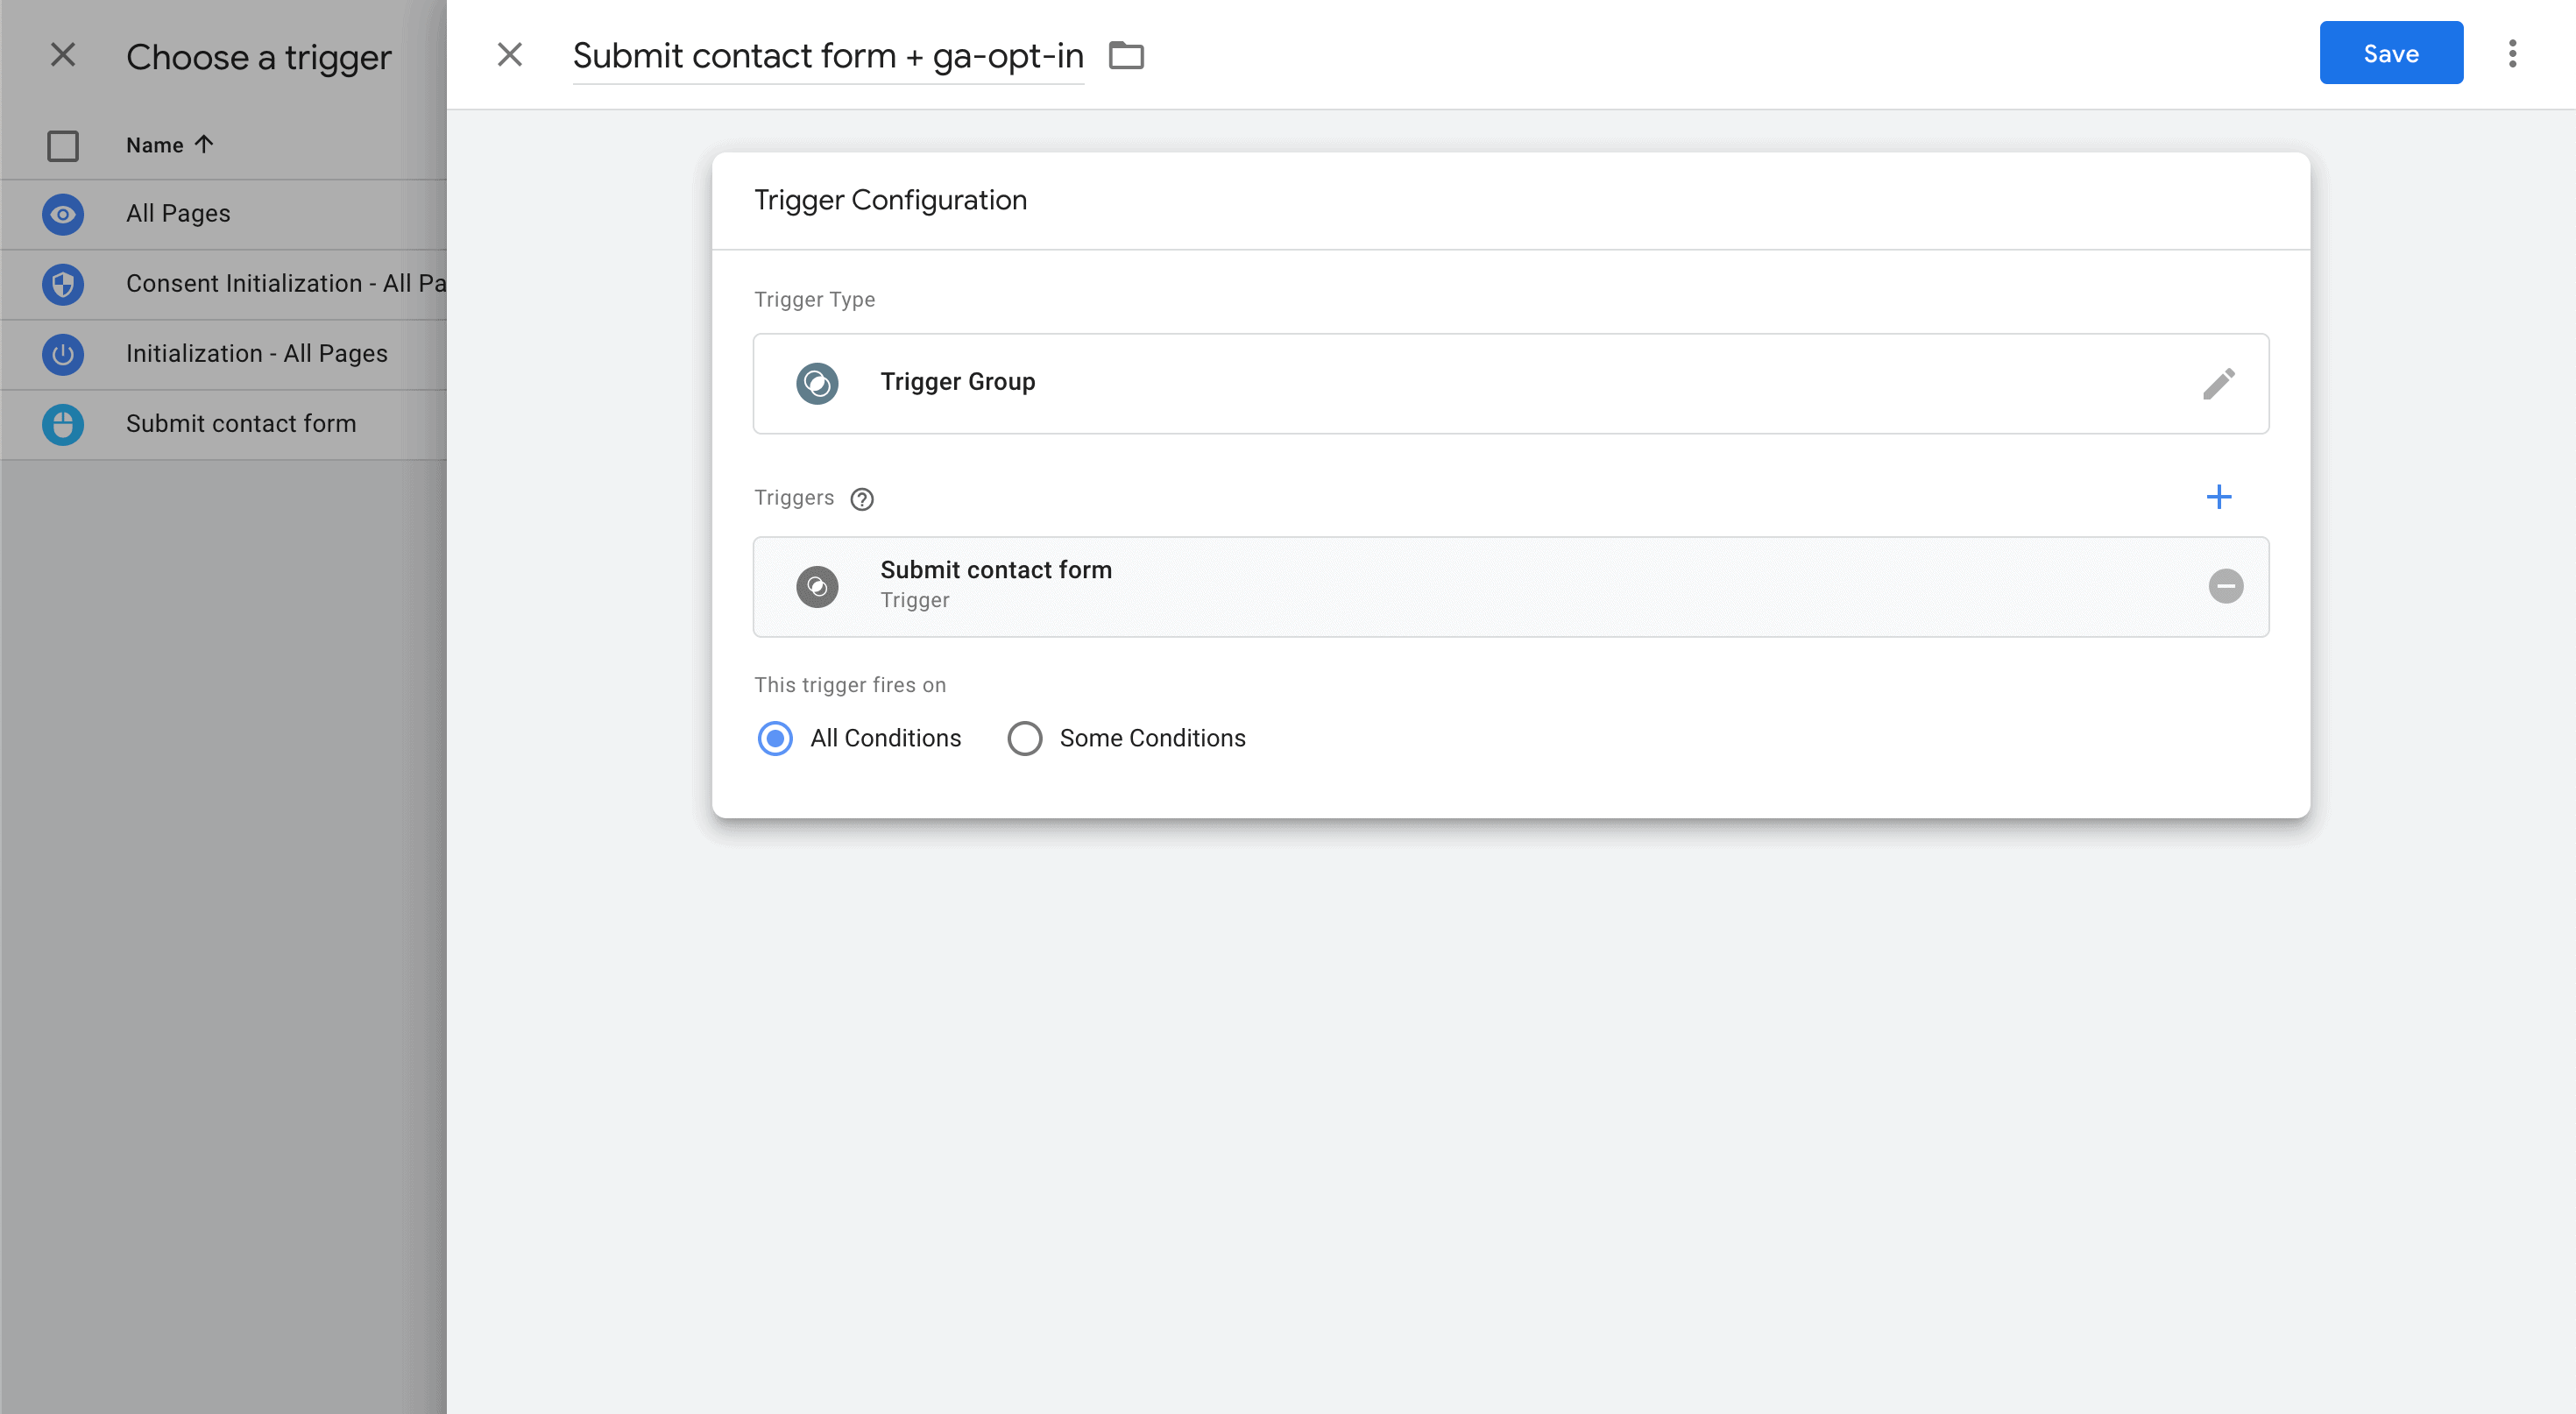
- We also add a second trigger to the Trigger group, which we use to check whether consent has already been given for Google Analytics. The trigger is of type “Page View”, but we don’t let it fire on all page views, but we choose “Some Page Views”. As a condition, the variable “ga-opt-in” must contain exactly the value
true(condition typeequals).

With this, we have completed the setup. The tag will only be fired if the click on the button has been executed and at the same time consent to tracking has already been given. You can visualize in Tag Assist when which condition from the trigger group is fulfilled and consequently when the tag is fired.